2023/12/28

How to Add Audi Q7 MLB Smart Key by KYDZ MLB Tool?

 Here is the instruction to generate Audi Q7 MLB smart key using the new KYDZ MLB Tool.


Procedure:

Add Audi Q7 MLB Smart Key by KYDZ MLB Tool 1

Remove the circuit board from the original MLB key
Weld chip to this MLB key tool board

Add Audi Q7 MLB Smart Key by KYDZ MLB Tool 2

Add Audi Q7 MLB Smart Key by KYDZ MLB Tool 3

Then connect device with laptop
Run KYDZ MLB Tool software
Press Calculate data, this process takes about 5 mins

Add Audi Q7 MLB Smart Key by KYDZ MLB Tool 4

The indicator light on the MLB tool will flash when reading data

Add Audi Q7 MLB Smart Key by KYDZ MLB Tool 5

This is the key ID

Add Audi Q7 MLB Smart Key by KYDZ MLB Tool 6

Calculate data finished. Start to upload data to server.

Add Audi Q7 MLB Smart Key by KYDZ MLB Tool 7

The indicator light on the MLB indicator also flashes when uploading data.
Upload data completed. Start to calculate password. This procedure takes about 4 min.

Add Audi Q7 MLB Smart Key by KYDZ MLB Tool 8

You will see service number. Record the service number. VERY IMPORTANT!!!

Add Audi Q7 MLB Smart Key by KYDZ MLB Tool 9

If software shows this, just press Read password to continue.

Add Audi Q7 MLB Smart Key by KYDZ MLB Tool 10

Wait for the MLB tool indicators go out. CS code is calculated and saved.

Add Audi Q7 MLB Smart Key by KYDZ MLB Tool 11

Add Audi Q7 MLB Smart Key by KYDZ MLB Tool 12

Then put a new key on the KYDZ MLB programmer

Press Generate dealer key->Identify key

Add Audi Q7 MLB Smart Key by KYDZ MLB Tool 13

Add Audi Q7 MLB Smart Key by KYDZ MLB Tool 14

It will show key ID. This is a brand new Uninitialized key.

Add Audi Q7 MLB Smart Key by KYDZ MLB Tool 15

If lost one original car key, only 1 left, you can write the lost key ID number here.
(only the original key with IDE: FF can be modified.)

Now we don’t need it. We have both original keys.
Generate dealer key directly.
So generate dealer key successfully.

Add Audi Q7 MLB Smart Key by KYDZ MLB Tool 16

Add Audi Q7 MLB Smart Key by KYDZ MLB Tool 17

Remove chip from MLB tool board and install it back to the original key PCB. Then install PCB back to shell.

Now you can program new key with other progrmamers (i.e Lonsdor K518 Pro).

2023/12/27

KESS3 PCR2.1 OBD Communicating with server Solution

 Alientech KESS3 works flawlessly on VAG Simos pcr 2.1 ECU whether you unlock bench and VR read. kess3 does unlock perfectly as well.


OBD Mode:

PCR2.1 is virtual read with Kess 3, not real read. unlocking and writing takes about 15min.


Here is the common situation when doing PCR 2.1 with KESS v3 via OBD.

For example:

PCR 2.1, currently trying to write however I have been stuck on “Communicating with server..” for around 30 minutes now.. how long could it realistically take?


KESS3 PCR2.1 OBD Communicating with server

Nothing to worry about sometimes it does.
But make sure you’ve a good internet and your battery power is too high for this ecu.

Now you’d need to recover in the original file and leave the ignition on.

and make sure your internet good and battery power 13.5.

and you can always try to write the mod file on recovery mode.

Or contact support to fix the file and it is ok.


Obdii365.com customer feedback:
Had the same right now.
Comm with server
Waited to «DATA» LED on tool to stop blink
Lowered voltage on the GYS to 13.5V
Closed KESS3 aliensuite with task manager
Connect diag tool, still comms with ecu!
Writing mod file again OBD (patch was done)
Car started.
Had one earlier that had to be rescued bench.

KESS3 PCR2.1 OBD 1

FYI

If OBD PCR2.1 says not possible to contact server, do not listen to this message, just press ok and it will continue.

KESS3 PCR2.1 OBD not possible to connect server

KESS V3 Module License Price List & ECU List

How to Use KYDZ MLB Tool to Generate Dealer Key?

 The KYDZ MLB tool is used to calculate data and generate dealer key for VW Audi Porsche Lamborghini Bentley MLB platform models. No need to get in car to collect, you can use the original MLB key.


Here is the procedure to generate dealer key with the KYDZ MLB tool.

Preparation:

Open the original key shell and remove the main control chip QFN64 package

Place the main control chip into the adapter or weld it on the adapter board

Use KYDZ MLB Tool to Generate Dealer Key 1

How to generate dealer key with the MLB tool?

1.. Run MLB OBD App

Read original key IDE

Use KYDZ MLB Tool to Generate Dealer Key 2

2. Place the original key at the antenna location

Read data then generate dealer key

Use KYDZ MLB Tool to Generate Dealer Key 3

3. Open the original key shell and remove the main control chip QFN64 package

Place the main control chip into the adapter or weld it on the adapter board

Click Calculate Data and the device will connect to server to calculate key data.

Record the service number for matching keys to third-party devices.

Use KYDZ MLB Tool to Generate Dealer Key 4

4.After generating dealer key, you can program key with Lonsdor k518 pro.

Use KYDZ MLB Tool to Generate Dealer Key 5

As for MLB vehicle list, check previous post:

Lonsdor K518 Pro Add VAG MLB Key Programming

2023/12/25

How to Connect Autel Tesla Diagnostic Cables?

 Autel released diagnostic cables for Tesla S and X vehicle models which enable Autel MaxiSYS MS909, MS919, or 908SPro, Elite, Elite II, and MS Ultra tablets to connect with Tesla S and X vehicles to activate factory mode and perform system diagnostics.


Autel Tesla cable set including:

Autel Tesla cable set

Adapter Cable ImageSupported ModelModel YearConnection PortConnection Port LocationFunction
TLAN001
ModelS/ Model XAllX861On the back of the instrument clusterActivate Factory Mode
After Sept 2015X863Below the central control screenPerform Diagnoses
For LAN Related Systems
Before Sept 2015On the left side of the Instrument Cluster
TCAN001
After Sept 2015X437Below the central control screenPerform Diagnoses
For CAN Related Systems
TCAN002
Before Sept 2015

Location of X861, X863, and X437

Location of X861, X863, and X437


How to Connect Autel Tesla TLAN001 Cable?

Required Tools (not included)

Connect Autel Tesla TLAN001 Cable 1

Preparation before Disassembly

*Ensure power is off before vehicle’s disassembly

1.Tap the lower-left corner of the central control screen in the following sequence: vehicle icon>> Safety & Security>>POWER OFF

2.Disconnect the negative cable of the 12V battery at the front compartment

Connect Autel Tesla TLAN001 Cable 2

3.Disconnect the first responder loop on the right side of the 12V auxiliary battery

Connect Autel Tesla TLAN001 Cable 3

Disassembly Steps

1.Remove the side cover of the instrument panel from the vehicle, and then remove the screws behind the side cover.

Connect Autel Tesla TLAN001 Cable 4

Connect Autel Tesla TLAN001 Cable 5

2.Remove the lower dash trim from the vehicle.

Connect Autel Tesla TLAN001 Cable 6

3.Remove the gasket on the top of the instrument cluster.

Connect Autel Tesla TLAN001 Cable 7

4.Remove the fixing screws (2 pcs) between the top pad and the instrument panel carrier (torque 1.2 Nm).

Connect Autel Tesla TLAN001 Cable 8

5.Release the fixing clips (2 pcs) between the steering column cover and the instrument cluster frame.

Connect Autel Tesla TLAN001 Cable 9

6.Remove the instrument cluster frame from the vehicle.

Connect Autel Tesla TLAN001 Cable 10

7.Remove both the outer face-level vent and the inner face-level vent from the vehicle dash.

Connect Autel Tesla TLAN001 Cable 11

Connect Autel Tesla TLAN001 Cable 12

8.Remove the instrument cluster from the instrument panel carrier to check the harness connection.

Connect Autel Tesla TLAN001 Cable 13

9.Disconnect the x861 from the backside of the instrument cluster.

Connect Autel Tesla TLAN001 Cable 14

10.Connect the diagnostic cable TLAN001 to the instrument cluster connector X861.

Connect Autel Tesla TLAN001 Cable 15

 https://www.obdii365.com/service/how-to-use-autel-tesla-tlan001-cable.html

2023/12/24

How to Configure Porsche PIWIS3 for J2534 Passthru?

 Free download Porsche PIWIS III 38.400 VMware software for passthru devices. The software is updated and modified for PassThru.


Compatible devices: 

VAS 5054A

Scanmatik 2 PRO (SM2 Pro)

Openport 2.0

Godiag GD101

VNCI 6154

Cl0ne VAS 6154

VXDIAG VCX SE 6154

Autel Maxiflash VCI

and more.


Download Link

File including:

PIWIS3-PT VMware torrent

porsche piwis iii torrent


PassThru settings files included for:
VAS5054ASM2Pro
Openport 2.0
GoDiag GD101 J2534

VXDIAG ODIS6154 for piwis

VXDIAG VAS6154 (vas6154 clone) for piwis

VAS 6154 for piwis

AbritesAVDI for piwis

Maxiflash VCI for piwis


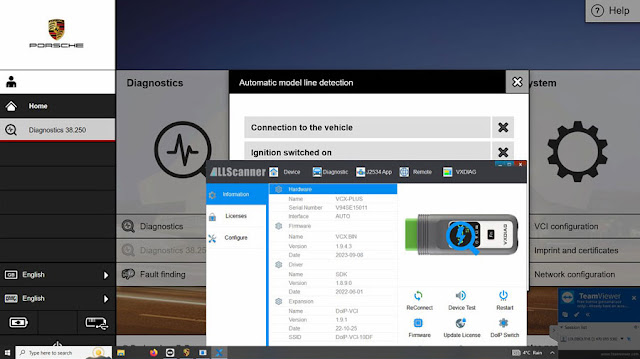
How to configure or set up PIWIS3 VMware with J2534 Passthru?


Just load this on VMware Workstation Pro and launch Piwis3.  Connect your VAS 6154 (or other VCI) and you should see the usb connection on bottom left of the screen.

To verify connection with VAS6154:

  1. Navigate to D:\PiwisApps\VCI\Actia_64\XS_D_PDU_API_64 and run ACTIA_D-PDU_API_Tester.exe
  2. Module Name and Resource drop downs should be populated if VAS6154 is detected.
  3. Hit Start to run all tests — All tests should succeed.

configure porsche piwis iii

*Latest clone vas6154 FW works on PT3G well. 1.6.6 can be updated to latest firmware (1.8.9) but needs to patch or buy VAG license from Allscanner (or buy vcx se 6154 with vag license in default).

(You need to install VAS drivers according to firmware)

vxdiag vcx se 6154 license 1
vxdiag vcx se 6154 1.8.9


Tips for users:

1. When you start it for the first time, we advise you to delete all unnecessary applications from lenovo and other unnecessary programs (video driver, Fi-Wi utilities). Otherwise VMware slows down very much, it is impossible to work.
On the good, the vmware image needs to be redone and downloaded without unnecessary programs.

2. You have to install VMware Tools and Adjust Windows scaling to 100% for proper display.


3. You can update interface firmware of 6154 clone to 1.66 with no problem but should not (!) upgrade software otherwise LIC for interface will be gone. If you are working with Vmware Workstation. Go ahead and install VMware tools in order to smoothen applications. Before you begin to modify VM take a snapshot that you can revert to, when You messed up your app.
You probably won’t need keylogger … rvlk.exe. It can be found in Sys32 folder… stop running it before delete.


4.

Make sure to have your interface connected to your VM.
Step 1 : check in VM -> Removable devices -> disconnect from Host
Step 2 : Countercheck in Devicemanager if “new device” is connected
Step 3 : “Navigate to D:\PiwisApps\VCI\Actia_64\XS_D_PDU_API_64 and run ACTIA_D-PDU_API_Tester.exe
Module Name and Resource drop downs should be populated if VAS6154 is detected.
Hit Start to run all tests — All tests should succeed.”

Explorer won’t show Volume D:\ …… in order to see all existing volumes use CMD -> diskpart -> ” List volume” …. also helpful to find location of VMware Tools update.


5. In case Piwis Application surface is shown incomplete on your screen and is unusable it is a must (!) to have Vmware client running on a host environment with native hardware granting VGA resolution of 1920×1068.
This is the only way to get a working solution. Be sure to check your client’s resolution and set it accordingly.


6.  If cannot see VCI interface with firmware 1.6.6. double click the vas6154 driver shortcut and you’ll see.


7.  For those with PIWIS imprint/registration issues:
– PIWIS is already imprinted to the VM. You should NOT need to imprint or register.
– The first time opening the VM, ALWAYS pick “I moved it” (even if you actually copied it). If you do not pick “I moved it” then PIWIS loses imprint and does not work.


8.

* For those with clone vas 6154 issues:
– Your 6154 device MUST have firmware 1.6.0 or 1.6.6. Newer firmwares will NOT work. If you have a newer firmware then the only reliable fix is to buy a replacement 6154 that has 1.6.6 (and never update the firmware). If you have 1.6.0 device then you need to set the VM date to before 2020 and then PIWIS will work. 1.6.6 does not need to change the date.

– Do NOT touch anything inside the VXManager app (don’t even run the app unless you need to see which firmware version you have). Using VXManager app can break PIWIS 6154 support and then both PIWIS and ACTIA_D-PDU_API_Tester will not work with your device. If 6154 support becomes broken, then the only easy fix is to delete the entire VM and download again. VXManager may ask to update firmware — NEVER UPDATE THE FIRMWARE (see note above).


Feedback:
1)
Worked like a charm with VxDiag Passthru!

porsche piwis iii vxdiag vcx se 1
 
porsche piwis iii vxdiag vcx se 2

2)
I tested it with an Autel MaxiFlash VCI on an 911-2022 and it works very good!
Piwis does not show it as connected and ignition is not provided so you have to select the car manually.

It is important to delete all other VCI entries in the PassthruSupport.04.04 registry folder.


3).
I can confirm it now also works with VNCI 6154a. VM is great and functions perfectly.


4). All work with 6154 clone.

clone vas6154 with this vmware work without any problem! yesterday flashed ecu and tcu with pdx files.