2024/01/31

KESS3 Adds Peugeot SID208 Citroen Valeo V56 via OBD

 Remap via OBD Peugeot 208 and Citroen C1 and C3 with Valeo V56 ECUs.

Thanks to Alientech KESS3, you can now work quickly and efficiently on the Valeo V56 ECUs equipped with 1.2 Pure-Tech and 1.0 VTi turbo-petrol engines from some PSA Group vehicles. To read ECU information for the first time, allow the ECU to be unlocked by applying a patch in BOOT mode on the bank. Immediately following this surgery, you can always reschedule via OBD.

KESS3 Adds Peugeot SID208 Citroen Valeo V56 via OBD

LATEST UPDATES AND NEWS FROM THE ALIENTECH WORLD! UPGRADE 1.84


New ECU: Valeo V56 With KESS3, you provide a complete and professional service in all aspects, from Tuning to repair, reprogramming hundreds of ECUs with a single tool. This increases your customer base and revenue opportunities for your shop.


CITROEN

RD, WR in OBD

C31.2 PureTech 82Petrol61 kW
C11.0 Vti 72Petrol53 kW


  • SID208

PEUGEOT

 RD, WR in OBD

2081.2 PureTech 82Petrol61 kW
2081.2 PureTech 75Petrol55 kW


Activate the CAR – OBD or CAR – BENCH/BOOT protocols to work with maximum effectiveness in all connection modes in the latest compatible vehicles, included in the subscription.

Top Tools to Program 2020-2023 Nissan Sentra Smart Key

What tool to program 2019, 2020, 2021, 2022, 2023 Nissan Sentra proximity smart key? add key and all keys lost?


1.

Lonsdor K518 Pro/K518 Series:

2019-2021 Nissan Sentra: Lonsdor will only add key (with Nissan gateway adapter), it cannot read security password (pin code), it cannot do all keys lost.

2021.08-2023 Nissan Sentra: Lonsdor will add key and do all keys lost. Require B18 Chassis License Online Activation and Nissan 40 pin BCM cable.


Some FAQs of Lonsdor & Sentra

Q: I have Nissan Sentra 2021 All key lost.
It’s with pincode 28 digits.
Will Lonsdor k518 program this proximity?

A:  Lonsdor cannot read pin code. Need pin code from the manufacturer.

lonsdor k518 pro nissan sentra

Q: Will Nissan Sentra 2020 all smart key lost if i can get pin code?

A: Yes, need a gateway adapter.


Q: Will Lonsdor read 2021 Nissan Sentra pin code?

A: No, it cannot read pin code


Q: Will lonsdor k518 program 2022 nissan Sentra all keys lost?

A: No, it cannot read pin。


Q: Will K518PRO do 2020/2021/2022 Nissan kicks, Sentra, versa/rouge all keys lost?

A: Nissan kicks ok, Sentra/Rouge 2021- yes with gateway adapter,  19-21 requires password, Versa 2020-2022 All keys lost need luck.


Q: If the Lonsdor Nissan 40 pin BCM cable will work on the new Sentra 2020 and up?
Also do I need to buy a license and how does it work?

A: Yes, does require Nissan license.


Q: Does Lonsdor make key Nissan Sentra 2021 all key lost without pincode?

A: No, does require pin code.


2.OBDSTAR Tools

OBDSTAR x300 dp plus (key master dp plus) and x300 pro4 (key master 5) will do 2019 to 2023 Nissan Sentra add key and all keys lost bypass pin code.


May 2023 New Update:
Adds Nissan Sentra 2021.08- smart key add key & all keys lost (require Nissan 40 BCM cable)

obdstar nissan sentra 1

The Nissan BCM40 gateway adapter can be used to replace Nissan/Renault 16+32 cable.

obdstar nissan sentra 2

Here comes the OBDSTAR Nissan Sentra car list

It will do North American Sentra proximity 2019-, add key and all keys lost. Need gateway adapter to bypass pin code.

It also does Sentra blade key till year 2019.

obdstar nissan sentra 2


3

Autel IM508/IM608

IM508/IM608 will do 2019 Nissan Sentra add key and all keys lost.


autel im508 im608 nissan sentra 1

For 2020-2023 Nissan Sentra

autel im508 im608 nissan sentra 2

If all keys lost, it cannot read password pin code. But yes if you can get pin code.

If add key, it will do, but it can only read pin code for part of vehicle software numbers.

autel im508 im608 nissan sentra 3

Read also:

2024/01/29

Download and Install VNCI Ford VCM3 IDS V130

 The new VNCI Ford VCM3 is different from other Ford VCIs (VXDIAG, VCM2 Clone, SVCI 2534, VNCI MF Ford etc).  It supports 4 channel CAN BUS and work on new Ford pickup and EV vehicles.

Our customers are very happy with the tool. Even works on Ford F150 for programming that most VCM2 would not work on.


Download and Install VNCI Ford VCM3 IDS V130 1

The tool does not come with the software.

Here you can download software and driver for free.


Ford IDS software driver for VNCI VCM 3

Software including

Ford IDS V130

IDS Loader

VCI Driver

Installation video

Download and Install VNCI Ford VCM3 IDS V130 2

Operating system: Windows 10

Multi-language


How to Install Ford IDS V130 for VNCI VCM 3?

1. Download the VCM3 installation package, unzip it and put it on the desktop

2. Install IDS-130.01 setup

Download and Install VNCI Ford VCM3 IDS V130 3

Download and Install VNCI Ford VCM3 IDS V130 4

3. Install JavaSetup

Download and Install VNCI Ford VCM3 IDS V130 5

4. Install VCI_Software_1.0.1.18. If the IDS software is registered and activated, there is no need to continue to the next step.

Download and Install VNCI Ford VCM3 IDS V130 6

Select device type as VCM3

Download and Install VNCI Ford VCM3 IDS V130 7

If run IDS shortcut from desktop, it says IDS software license not found

Download and Install VNCI Ford VCM3 IDS V130 8

You need to install IDS loader.

5. Install IDSFordLoaderDriverSetup. vc. x86 .1v6.exe startup program

Download and Install VNCI Ford VCM3 IDS V130 9

Download and Install VNCI Ford VCM3 IDS V130 10

6. Connect the device and run software from “IDS Loader for Ford” icon.

Download and Install VNCI Ford VCM3 IDS V130 11


VNCI Ford/Mazda is also compatible with original Ford FDRS and Mazda Mdars software for OEM online programming.

Download software on Ford/Mazda official

Ford FDRS software download

Mazda MDARS software download


Read also:

VNCI VCM3 vs OEM VCM3 vs VNCI J2534 vs VXDIAG Ford

How to Read Mercedes ME9.7 ECU with Alientech KESS3?

 Can Alientech KESS3 clone Mercedes ME9.7 ECU? via OBD or BDM?

Read Mercedes ME9.7 ECU with Alientech KESS3 1

Here is the clue.

No VR file at alientech, only option left is BDM.

Read Mercedes ME9.7 ECU with Alientech KESS3 2

If you have BDM adapter, follow kess v3 wiring diagram to read and write ME 9.7 via BDM.

Reading was a bit faster but the writing was really slow. Well over 30.
The old Kess v2 master version takes 45 minutes.

Read Mercedes ME9.7 ECU with Alientech KESS3 3

Read Mercedes ME9.7 ECU with Alientech KESS3 4

Read Mercedes ME9.7 ECU with Alientech KESS3 5

Read Mercedes ME9.7 ECU with Alientech KESS3 6

Read Mercedes ME9.7 ECU with Alientech KESS3 7

If currently don’t have an adapter for this ecu, just use needles or solder wires.

Found the pinout and soldering did the trick.

You have no issue with ID by obd. This ecu is a lot safer to do boot.

Read Mercedes ME9.7 ECU with Alientech KESS3 8

Read Mercedes ME9.7 ECU with Alientech KESS3 9

If you are looking for a tool to do it via OBD, go for original pcmflash.  (Clone pcmflash has no me9.7 in module 69).

2024/01/25

How to Set up Openport for Nissan Consult 3 Plus?

 We have pointed out how to configure J2534 passthru devices (Godiag j2534, 5054a, PCMTuner, SM2 pro) for Nissan Consult III Plus software.

How to Configure Nissan Consult III+ with Passthru Devices?

Here we show how to set up Tactrix Openport  2.0 with Nissan Consult 3 plus specifically.

Got the Openport 2.0 clone cable

Set up Openport for Nissan Consult 3 Plus 1

Nissan Consult version 73 downloaded online

Need to configure diagnostic tool.ini to let the software see the adapter
Where is the folder in which you need to correct this file
C:\CONSULT-III_plus\System\Application\ApplicationData\CommonSetting
There we edit/replace the DiagnosticTool.ini file with the one we made and everything will work.

Set up Openport for Nissan Consult 3 Plus 2

At first it was like this

Set up Openport for Nissan Consult 3 Plus 3

Then like this

Set up Openport for Nissan Consult 3 Plus 4

Set up Openport for Nissan Consult 3 Plus 5

Incorrect configuration

Install openport driver

Set up Openport for Nissan Consult 3 Plus 6

To do this, download Link openport driver

The driver file is located in the folder C:\Program Files (x86)\OpenECU\OpenPort 2.0\drivers


After install driver and configure DiagnosticTool.ini

it works fine with openport.

Set up Openport for Nissan Consult 3 Plus 7

Set up Openport for Nissan Consult 3 Plus 8

Set up Openport for Nissan Consult 3 Plus 9

Related reading:

How to Use Godiag J2534 with Nissan Consult III+?

2024/01/23

How to Enable Porsche Multi Function Steering Wheel with Thinkdiag?

I got my Multi Function working using an $89 ThinkDiag OBD2 Scannner and my phone. It was stupid easy and did it while at a stop light thumbing through the various sections. 

I took a bunch of screenshots and will try to recreate this from memory. I'm only posting a few select select screenshots but the path is noted below. Let me know if the path needs a little tweaking... I found this while poking around the app at a stop light.

All Systems Diagnostic -> Use VIN Decode then then select Porsche (will need to DL) -> Automatic Search -> System Selection -> Steering Wheel Electronic -> Code/brush Hiding -> Rule Coding -> Coding value -> Coding value_1 _MF Steering wheel ->Click on this (window will open) and change from "NO" to "YES" & then click on WRITE CODE.

Enable Porsche Multi Function Steering Wheel with Thinkdiag 1

Enable Porsche Multi Function Steering Wheel with Thinkdiag 2

Enable Porsche Multi Function Steering Wheel with Thinkdiag 3


Thinkdiag Porsche Coding Instructions

 This Thinkdiag obd2 scanner is the coolest gadget ever. You need an Android device to run it.

Here are all the instructions to use Thinkdiag to code/access useful information in Porsche cars.


1.Windows up/down with key

Windows going up/down when you keep pressing the key to lock/unlock

1. System Selection -> Front-End Electronics -> Code/brush Hiding -> Rule Coding -> Coding value -> Coding value_2 -> “Coding value–Comfort functions–Window comfort open” Set to true
2. System Selection -> Front-End Electronics -> Code/brush Hiding -> Rule Coding -> Coding value -> Coding value_2 -> “Coding value–Comfort functions–Window comfort close” Set to true
3. System Selection -> Front-End Electronics -> Code/brush Hiding -> Rule Coding -> Coding value -> Coding value_1 -> “Coding value–Comfort functions–Comfort functions via door lock” (At the very bottom) Set to true
4. System Selection -> Front-End Electronics -> Code/brush Hiding -> Rule Coding -> Coding value -> Coding value_1 -> “Coding value–Comfort functions–Comfort functions via remote control” (At the very bottom) Set to true


2. GT3 steering calibration
Electric Power Steering -> Code/brush Hiding -> Rule Coding -> Coding value
There should be two options with the top one opening a drop down that has 10 or so options.


3. Coolant real temperature
To get the real reading for cool temperature:
Instrument Cluster =>Code/Brush Hiding => Rule Coding => then look for Coolant temperature Characteristics curve
You will get 16 items split in 2 parts:
8 items “Coolant temperature characteristic curve–Real coolant temperature–X n” (n from 1 to 8)
8 items “Coolant temperature characteristic curve–Displayed coolant temperature–X n” (n from 1 to 8)
You have to take the number set for each of the “Real” items and set it to each equivalent “Displayed” item.

Thinkdiag Porsche Coding 1

Thinkdiag Porsche Coding 2

4. Silence GT3 steering warning
For those who changed steering software to GT3 and getting warning on the dash (early 991s), here is the trick to silence the warning.
Keep in mind that this trick silences all warnings related to the Electric Steering but not failures (you still get messages about failures).

Instrument Cluster =>Code/Brush Hiding=>Rule coding => you get a list of Warning Configurations (0 to 5 if I remember correctly)
In one of those Warning Configurations (I think it was the 3rd) you’ll need to look for item number 121 (Warning Configuration –EPS warnings–Power steering fault warning (121). You set that to 0.

Thinkdiag Porsche Coding 3

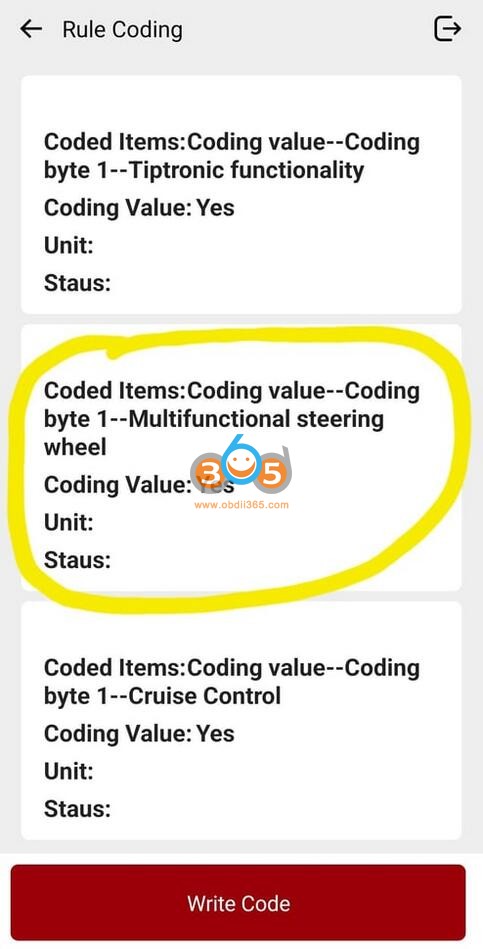
5. Turning on Multi Function Steering wheels (991.2)
For turning on Multi Function Steering wheels (991.2) where it was retrofitted (compatible parts need to be installed)

System Selection -> Steering Wheel Electronic -> Code/brush Hiding -> Rule Coding -> Coding value -> Coding value_MF Steering wheel ->Click on this and change from “NO” to “YES”

Thinkdiag Porsche Coding 4

6. Disable Seat Belt Warnings

Thinkdiag allows you to disable the seat belt warnings and chimes. There are either 1 or 4 params to change, depending on your preferences. Change all four codes to completely disable all of the belt warnings and chimes. Change only the last one to simply kill the chimes without affecting the lights and warnings.

Instrument Cluster: Coding value–Coding byte 2–Driver seatbelt warning = 0 {Default: 1}

Instrument Cluster: Coding value–Coding byte 2–Passenger seatbelt warning = 0 {Default: 1}

Instrument Cluster: Coding value–Coding byte 2–USA seatbelt warning = 0 {Default: 1}

Instrument Cluster: Coding value–Coding byte 2–Acoustic belt warning (Not USA, not Canada) = 0 {Default: 1}


7. Changed/increased the max boost scale 

changed/increased the max boost scale so its not maxed out so quickly.

Instrument Cluster > code/brushing > Rule coding > Further coding > max boost pressure – changed from 1.2 bar (default – 17 psi) to 1.4 bar (20 psi)

Thinkdiag Porsche Coding 5

8. PTV (Porsche Torque Vectoring) 

it’s standard in Carrera S/4 and optional for other models.

For those who want to activate it or maybe turn it off (to reduce break wear, for track use or whatever reason…) it’s very straight forward:
In the PSM module -> Hidden/Brush…->Function Coding->Coding Byte 2–PTV: Porsche Torque Vectoring and you change the value.

Thinkdiag Porsche Coding 6

Thinkdiag Porsche Coding 7

9. Gear shift assist

System Selection -> Instrument Cluster -> Code/brush Hiding
Search for “upshift display
When you find “Board computer menu configuration – byte 7 – Upshift display, enable it & write code

Thinkdiag Porsche Coding 8

Note that there are a couple of other locations where “upshift display” will show up, but they are specific to the key memory for your car, not to enable the function overall.

Thinkdiag Porsche Coding 9

10. TPMS Coding

Instrument Panel: Board computer menu configuration=Board menu configuration – byte 7- TPM circuit=1 {Default: 0}

Instrument Panel: TPMS Coding – Display summer menu item (freely selectable) =Yes {Default: No}
Instrument Panel: TPMS Configuration – Set of Wheels Designation =20” Track {Default: xxxx}


Here is the revised list of what can be able to do with the Thinkdiag. All settings are working on Prosche 991 (2019):


· Free navigation map update

·  Overrev Report accessed (ranges 4-6 =0!)
· Brake lights EBD enabled, g-values (-0.65g/-0.35g), speeds (15kph/1kph) and timing (1 sec.) set
· Remapped Coolant Gauge Curve to real (sensor) values
· Set Auto Start/Stop to “remember last setting”
· Comfort Key FOB opening/closing for windows and sunroof
· Wiper Teardrop Function ON
· Turn light one-touch set to 5x (instead of 3x)
· Front DLR 4-point LEDs always on, even when headlights on
· Cluster Lights (Speedometer/RPMs) always on (“non-Scandinavian” solution)
· Seatbelt Chime off after 4x (Warning still in Cluster Display)
· Spoiler extend/retract speed reduced by 15kph/10kph (90kph/60kph)
· Expert Menu permanently enabled
· Performance Menu (Torque/Power) permanently enabled
· Oil Fill Level displayed in 4 segments instead of one
· HVAC Setting to “Driver Memory” from Basic (key-coded memory)
· Automatically tilt the Passenger’s Mirror when in Reverse

· Enabling a race track mode in TPMS (Enabling a race track mode so that the TPM system is not sensitive to the big pressure swings from cold tires to hot tires and back to cold again, which is common at the track.)

Most of the 718-programming works just fine, and occasionally on 2019 991.2, the respective “switches” are in different places of the sub-menus. But all are very easy to work with.

People have coded 987, 981, 718, 991.1 and 991.2 and 992 with the thinkdiag scanner.