2017/04/25

How to install Cummins Insite 8.1 on Windows 7-Windows 10

Free download Cummins Insite 8.2/ 8.1/ 7.6.2 on Mega and get how-to’s of Cummins Insite software installation, to use with Cummins Inline 6 data link, DPA5 Dearborn, NEXIQ USB Link, XTruck USB Linkfor truck diagnosis.

THE MOST IMPORTANT- a working Cummins insite crack or original
There are many links below to download Cummins Insite for free; but usually the software may come with unknown security coz never be tested by professionals, or expire after use for several days. For sake of safety, you had better use a tested version.

cummins insite 7.6 download: unknown security
Please send PM @timbruun in http://mhhauto.com/ for cummins insite password

cummins insite 7.6.2 download: unknown security
Please send PM @jb40 in http://mhhauto.com/ for cummins insite 7.6.2 keygen

cummins insite 8.1 download:
Cummins INSITE 8.1.1.199 Pro Version: 100% tested, confirmed to work perfectly!
Cummins INSITE 8.1.1.199 Lite Version: 100% tested, confirmed to work perfectly!
cummins-insite-8-1-01
cummins-insite-8-1-02
cummins-insite-8-1-03
INSITE Software System Compatibility:
Windows 7 32-bit and 64-bit
Windows 8 32-bit and 64-bit
Windows 8.1 32-bit and 64-bit
Windows 10 32-bit and 64-bit

How to step by step install Cummins Insite 7.6.2:
1) Open the folder < Cummins InSite7.6.2 install>
2) open the autorun.exe
3) Here is Insite installation menu
4) go to manually install packages
5) install 7.6.2
6) go to upgrade insite on the dvd menu
7) let update manager find the updates off the dvd
which will update it just below sp5
change dropdown un update manager to find updates off internet and let it completely update
I think 7.6.1 has been removed off their site and 7.6.2 needs it
9) disable your antivirus program
10) Open the folder Cummins insite 7.x keygen (Cummins 7.x kg)
11) insert your PC-ID and get key for activation
12) .insert the activation key to run the software

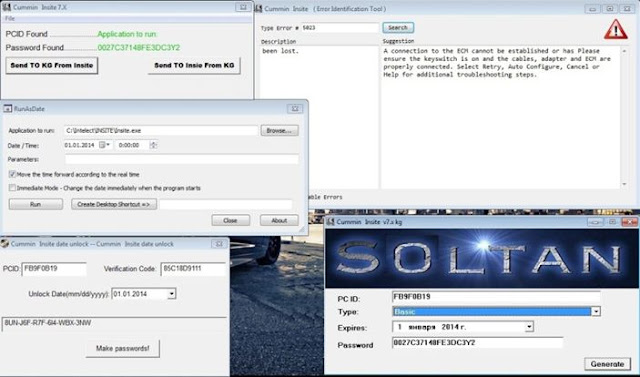
How unlock the expired program Cummins inside:
Now you need to start to change the date on the computer,
set the date 1 january 2014 on your computer/notebook.
Then run the program INSITE. You will see a message about changing the date. Click OK.
Now you can see the PC-ID and Verificaton Code
for ex. see the picture:
unlock-cummins-insite-software
Open the Cummins Date Unlock and set the same date 1 january 2014 and your PC-ID and Verification Code.
Click the Make Passwords!
Now you have the unlock password code.
Enjoy!
unlock-cummins-insite
Cummins Insite review of operation systems:
I have had it work on win10 home too but it quit working. I reformatted my drive tried to install insight and it says something is interrupting install. I am trying it on win10 pro.

I installed 7.6.0 and it worked fine, I then copied my entire Intelect folder from another computer that is running XP withinsite 7.6.2 to a flash drive and from the flash drive I moved the intelect folder to the computer that I am using windows 8.1 on. It worked fine for me after unlocking and applying the SP5 patch. I did the same to a computer using windows 10 with no issues.

I install version 7.6 of insite in Windows 10 without any problem, the following maner before giving double click the setup, then you give right- click and select properties select compatibility compatibility mode to win xp sevice pack 2 and ready the program began to install only have patience .

I’m running Ubuntu 15.10 with VirtualBox, and Win XP VM. INSITE works perfectly, and not one problem with the install. I have done it multiple times. Try running a VM with an older version of Windows. Just my two cents.

I have install all Insite, Jpro, DDDL, on win 8.1 then updated to win 10 all work fine on issue.

i got mine to work but had to set it as admin and run as windows 7.

How to solve Volvo PTT 2.04.55 Java error “return exit code=101”

Problem: When opening Volvo Tech Tool  PTT 2.04.55, a popup box error show: “Java was started but returned exit code=101”?
Here share with you two PTT Java access error solutions! Check below:
volvo-ptt-java-error
Volvo PTT 2.04.55 Java error “return exit code=101” solution 1
If you all get problem when to access JAVA in Volvo Premium Tech Tool V2.04.55 when you finish install that software, just try this solution below:
Firstly, you must remove old JAVA from your computer.
Secondly, download this solution “java dan GX app problem.zip” file and install the file. That’s ALL.
!-knuH5JLEBX5SYFyVvJwzcEW8mPit3g03BQAouXJI8Q
Note: This solution is tested working by some forum members. This blog is not saying it 100% success. So try your luck!

Volvo PTT 2.04.55 Java error “return exit code=101” solution 2
To get a 100% safe and working solution for this error, you are advised to update Tech Tool to Volvo PTT 2.04.87!
The license of the embedded version of Java will expire and must be updated. This update is in the 2.04.87.
volvo-ptt-license
Which truck diagnostic tool can work with Premium Tech Tool PTT?
volvo-vocom-88890300

volvo-vcads


Tip. Know more popular truck diagnostic scanners here:

2017/04/18

How to troubleshoot Volvo D13 truck by Tech Tool PTT 2.04

This is how-to’s of Volvo Premium Tech tool PTT 2.04.87 user manual for Volvo D13. Hopefully it’s helpful to someone. Enjoy!

First, you need a working PTT 2.04.87. There are many free links for you to download online; you can have a try but it’s not a good choice i bet, coz most of them will expire in the near future after use or cannot be activated or need the password. Had better buy a crack Tech tool with good reviews, likehttp://www.obdii365.com/wholesale/volvo-premium-tech-tool-20486-development-with-apci-update.html
It’s confirmed working 100%, and installation help can be got by the vendor
volvo-ptt-2.04
Anyway, good luck with a working PTT 2.04.87!

Part 1: How to use PTT 2.04.87 for Volvo D13 scanning
First make sure your apci+ is well installed or the correct version is used.
(That’s why it recognized as older 98 electronics truck.)
click on Help about tech tool and see if apci+ has date next to it.
if its blank than just load new file, no need to reinstall.
then go to test and select service and maintenance then fault codes.
E.g. giving code SPN 111 FMI 5
volvo-d13-fault-code
Part 2: Tech Tool Volvo PTT 2.04.87 & Volvo 2015 d13 parameter turn off cruise and speed limit
In tech tool while connected to truck go to programming go to parameter programming once loaded the cruise control speed limit should be the first parameter in the list. The road speed limit will be under Road Speed Limit Function Group if you change the view from Control Unit to Function Group dont forget to change speed on pedal as well as otherwise only the cruise control will go up.


Part 3: How to solve Volvo d13 2010 fuel system problem using Volvo Tech Tool
for injector cups/sleeves, remove the return from the tank and fit a piece of clear tube then start your engine and if it looks like champagne coming through the return then your sleeves/cups are likely goosed


Part 4: How to use Tech Tool PTT 2.04.87 for Volvo D13 regeneration
It has active codes for aftertreatment efficiency and EGR cooler efficiency. fuel pressure 57 psi,-engine and aftertreatment. I don’t bother myself about EGR cooler efficiency now, because it should be closed while regen anyway.


Part 5: How to do with Volvo D13 check engine code via Premium Tech tool
How to fix a Volvo with D13 that has a check engine code: MID 140 PPID 278 FMI 9 and error message “After-treatment Reagent level abnormal update rate”….

About the question, if you performed a Delete you must verify, that your new parameters data fits the new flash.
If you haven’t perform a delete, perhaps the error don’t comes from the MID140, because this is the instruments panel ECU, therefore, any error means that there is a parameter changed on the MID128 that is incompatible with your actual MID140.
Be aware, this is the symbol that your Delete didn’t work well, most likely you have increased HP because you have change the way the engine interacts, this can result on cracking old cylinders, because, now the combustion is more clean (more oxigen) which means more violent, because of new air flow is entering into the combustion chamber, any solution?
Yes, find a better flash pm to ChesterTech (be patient with him, that patience will be rewarded) Or reduce the amount of Diesel, changing the injectors parameters.

2017/04/17

Original vs. HQ Clone Chrysler wiTech MicroPod II

Here’s a comparison chart of genuine vs. clone witech micropod 2 system, incl. High-quality witech micropod system vs. bad micropod 2 china clone.

Genuine WiTech Micropod2 vs. Clone wiTech Micropod II
witech-micropod-original-vs-clone-1
witech-micropod-original-vs-clone-2
witech-micropod-original-vs-clone-3
witech-micropod-original-vs-clone-4
witech micropod2 for sale:
witech-micropod-ii
– the copy is 1:1 of the genuine, of high quality and good stability, its connector matches the car OBD plug perfectly.
– With high-quality USB cable which transfer data stably and reliably
– The package is anti-static, moisture-proof, anti-electromagnetic interference
– Workable with your current wiTECH software
– No smart cables required
– No drivers needed

micropod 2 ebay?
Ebay should be a good place to buy items. But for professional vehicle diagnostic tools, a site with experienced experts and technical support teams like http://www.obdii365.com/

witech micropod 2 price:
Original micropod 2: $4599 around
Clone micropod 2: $179 – $525, depends on quality
Note: MicroPod 2 (Item. No SP271-B) is the best quality one among china clones, same as the original.

witech micropod II HQ Clone Customer Review:Just ordered a chinese clone MicroPod II and it has been working exactly like an OEM unit. No errors so far and tested functions on 3 different vehicles. It has been confirmed working with unmodified software wiTECH v17.03.10 (downloaded directly from Chrysler). For now it works fine.
I have tested Dodge also. I just used it on a 2014 dodge avenger just fine. I am able to flash a module update and program a new key with the unit.

I don’t have experience with Windows XP. This version of Witech works fine on Windows 7 and Windows 10.
I have also uploaded pictures of the internals for those who are curious.
witech-micropod-2-clone-pcb-1
witech-micropod-2-clone-pcb-2
witech-micropod-2-clone-pcb-3
witech-micropod-2-clone-pcb-4
witech-micropod-2-clone-pcb-5
witech software download:

2017/04/16

How to Set up JLR SDD2 V149 diagnosis on Windows 7

JLR SDD2 Landrover and Jaguar Diagnostics, Reprogramming, Immobiliser and Smart key programming software released to latest V149. Obdii365.com here provides JLR SDD2 v149 free download and installation guide.


How to Install JLR SDD2 V149 diagnosis and programming software on Windows 7:

Step 1: Install V149 setup
Open Software CD
Open JLR V149 folder
open-jlr-v149-folder
Open SDD 149.00_FULL setup
sdd-149-full-setup
Select setup language
setup-language
Setup wizard install complete, click on Install
Setup-wizard-install-complete
Accept license agreement
Accept license agreement again, click on Next
Select “I have read and understand this firewall comparability”, cilick on Next
Click Next
Click Next
Click OK
Click Install
If SDD V149 prompts “Would you like ActiveCGM to be the default TJF viewer”, click Yes
Application is being installed
Install setup driver
click Next
click next
Restart the computer, click on Finish
restart-computer
Step 2: Install SDD 149.01 setup
Run SDD_149.01 setup
sdd-149-01-setup
click OK
Configuraing
Update Complete
Restart computer, click on Finish
Step 3: Install Terminator software V3.7
Open Terminator software V3.7
select Terminator language
click on Next…
Click I to ready to install FVDI2 Based Software List setup
Click on Next until it generate FVDI2 Based Software List shortcut on desktop
Click Extract to extract FTDI CDM Drivers
FTDI-CDM-driver
Click Next
Accept license agreement
Click Finish
Install PL-2303 Driver installer program, click next
Click Finish
Completing the FVDI2 based Software List setup wizard,click Finish
Step 4: Register JLR SDD2 V149
Win7 system will detect folder
Open folder to view files
Cut JLR register v4.0 folder to desktop
jlr-register-4.0
Open JLR register v4.0 folder
Copy app.war and replace it in C:/Program Files/JLR/SDD/SDD
Copy-app.war
replace-file
replace-file-2
Click on JLR register
Click on Generate register request file
Generate-register-request-file
Save file to desktop and name it “abc”
Open software folder
Copy and paste abc.exml to desktop
Open JLR register v4.0 folder on desktop
Open JLR register folder
Open JLR register
Click on Register
Open abc.exml on desktop
Open abc.exml on desktop
Register finished
Register finished
Step 5: Update and Run Software
Open FVDI2 Based Software List on desktop
check new version info and click on Update
Click Download the latest version
Download finished
download-finished
Click Install
Select setup language
follow system prompt to complete FVDI2 J2534 driver setuop installation
Confirm uninstall, click Yes
Uninstall complete, click Finish
Open FVDI2 Based Software List on desktop
J2534 Compatible software->JLR
J2534 Compatible software JLR
Run diagnosis and programming functions
jlr-sdd-2-v149-1
jlr-sdd-2-v149-2

2017/04/14

OBD Terminator Program VW Touareg 2013 All Keys Lost via OBD

Obdii365.com engineer has just successfully programmed new keys on VW Touareg 2013 3.0T Diesel  5th immobilizer system via OBD. Just for sharing.

Vehicle:
VW Touareg 2013 3.0T Diesel 5th IMMO all keys have lost

Equipment used:
FLY OBD Terminator key programmer
OEM Orange 5 eeprom programmer
(Note: OBD Terminator has Full Version and Locksmith version. It supports Immobilizer /Odometer / CBS Reset /Airbag/Sync/Program and Free Update Online,comes with free J2534 Software like Honda HDS, JLR SDD, TIS, IDS and so on.)
VW-Touareg-2013

Procedure:

Step 1:Read BCM2 data

Read BCM2 P FLASH and D FLASH, read ELV data
remove/open BCM2 and ELV to read CPU eeprom by Orange5 programmer and save data

Step 2: Write Key ID into BCM2

Open OBD terminator software, select Audi A4/A5/Q5
Upload BCM2 data
Generate dealer key and re-write data back to BCM2.
The key generated can neither turn indicator on nor start engine.
The step aims to write key ID into BCM2.
upload-bcm2-data
(Ps. If you use SMELECOM key or master key, you can use TM100 to change new key ID into original key ID to decode directly. Then you can move step 1 to step 3.)

Step 3: Write Crypto key into New Key

Open OBD terminator software, select Audi A6/A7/A8/Touareg
Upload BCM2 eeprom and ELV data,
Upload-BCM2-eeprom-and-ELV-data
Program dealer key with the new key generated in step 1. This time the key will turn dashboard indicators on, but will not start the engine.
indicator-flashThe intention of this step is to write key crypto into the new key.
If the dashboard indicators did not flash after this step, you may have improper operation.

Step 4: Collect CAN database

Use the key above to turn dash light on and connect OBD Terminator interface to Touareg’s CAN network (OBD 6 PIN-CAN H, PIN 14-CAN L). Collecting CAN database takes about 3 minutes. (If you need the CAN wiring diagram , please contact FLY company engineer).Volkswagen owners can check database to see if their car is affected.
(ONLY IN STEP 4 YOU NEED TO CONNECT OBD TERMINATOR WITH VEHICLE. IN OTHER STEPS YOU DO NOT NEED)
connect-obd-terminator-with-vehicle
correct-can-databaseStep 5: Get ISK key
Save the CAN database and send it to FLY engineer. They will send you back the ISK decode key. Wait for 1 hour around. Decode ISK key success.
decode-isk-key

Step 6: Write ISK key into the new Key

Open OBD Terminator software.
Select Audi A6/A7/A8/Touareg
Upload BCM2 eeprom and ISK key.
Use the key programmed in Step 3 to generate dealer key.
This time the new dealer key will start the engine.
program-dealer-key
start-engine
Now you have a working key, open OBD terminator additional VVDI2 software to add another key.
Conclusion:
You need to complete these steps:
Write key ID into BCM2
Write Crypto into key
Write ISK code into key

2017/04/10

Carprog A1 adapter for CAN BUS communication Solution

Any possible to rework the Carprog A1 cable for Can Bus?
Definitely YES! Carprog v8.21 full China clone Can Bus communication solutions… Here you go.

Why you need rework Carprog A1 adapter?
Because some China Carprog comes with a bad A1 pcb that causes the issue CANBUS NO WORKING.

How to get Carprog to communicate on Can Bus?
Compared with original A1 adapter, It’s easy to find WHERE THE PROBLEM IS!!!! in china peoples changing positions CAPACITORS AND RESISTORS !!!!.

carprog ori codecard
carprog-ori-codecard
carprog po mod
carprog-po-mod
carprog pred mod
carprog-pred-mod
IMPORTANT  information:
IN A1 ADAPTER IS NOW SOLDERED NEW MCP old MCP
i don‘t soldered back
i don’t tested ODL MCP if work wit this or not .
BY ME NOW WORKING GOOD.

So, Carprog A1 rework successfully!
PRT SCR from China clone Carprog programmer no issues to connected to Opel CAN
carprog-can-bus-communication
BIG THANKS to the contributor @rkteck


If it’s not working or hard for you to rework Carprog A1 pcb, you can buy a working A1 cable with the high-quality board:
it’s $11.99, tested by professionals; so, 100% working


  1. a good tip for reference: How to test CarProg with A9 A1 A1+ adapters:
Good luck!