JLR SDD2 Landrover and Jaguar Diagnostics, Reprogramming, Immobiliser and Smart key programming software released to latest V149. Obdii365.com here provides JLR SDD2 v149 free download and installation guide.
How to Install JLR SDD2 V149 diagnosis and programming software on Windows 7:
Step 1: Install V149 setup
Open Software CD
Open JLR V149 folder
Open SDD 149.00_FULL setup
Select setup language
Setup wizard install complete, click on Install
Accept license agreement
Accept license agreement again, click on Next
Select “I have read and understand this firewall comparability”, cilick on Next
Click Next
Click Next
Click OK
Click Install
If SDD V149 prompts “Would you like ActiveCGM to be the default TJF viewer”, click Yes
Application is being installed
Install setup driver
click Next
click next
Restart the computer, click on Finish
Step 2: Install SDD 149.01 setup
Run SDD_149.01 setup
click OK
Configuraing
Update Complete
Restart computer, click on Finish
Step 3: Install Terminator software V3.7
Configuraing
Update Complete
Restart computer, click on Finish
Step 3: Install Terminator software V3.7
Open Terminator software V3.7
select Terminator language
click on Next…
Click I to ready to install FVDI2 Based Software List setup
Click on Next until it generate FVDI2 Based Software List shortcut on desktop
Click Extract to extract FTDI CDM Drivers
select Terminator language
click on Next…
Click I to ready to install FVDI2 Based Software List setup
Click on Next until it generate FVDI2 Based Software List shortcut on desktop
Click Extract to extract FTDI CDM Drivers
Click Next
Accept license agreement
Click Finish
Install PL-2303 Driver installer program, click next
Click Finish
Completing the FVDI2 based Software List setup wizard,click Finish
Step 4: Register JLR SDD2 V149
Win7 system will detect folder
Open folder to view files
Cut JLR register v4.0 folder to desktop
Accept license agreement
Click Finish
Install PL-2303 Driver installer program, click next
Click Finish
Completing the FVDI2 based Software List setup wizard,click Finish
Step 4: Register JLR SDD2 V149
Win7 system will detect folder
Open folder to view files
Cut JLR register v4.0 folder to desktop
Open JLR register v4.0 folder
Copy app.war and replace it in C:/Program Files/JLR/SDD/SDD
Copy app.war and replace it in C:/Program Files/JLR/SDD/SDD
Click on JLR register
Click on Generate register request file
Click on Generate register request file
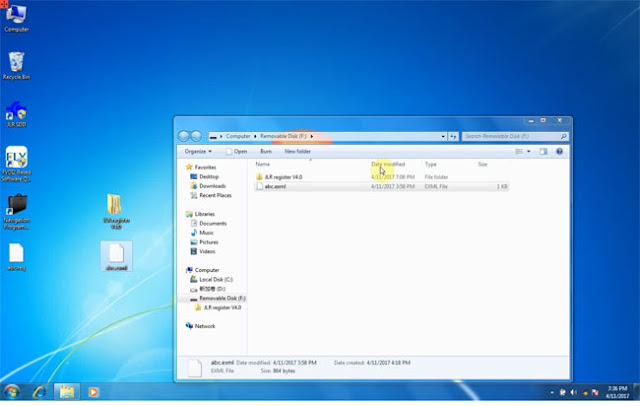
Save file to desktop and name it “abc”
Open software folder
Copy and paste abc.exml to desktop
Open software folder
Copy and paste abc.exml to desktop
Open JLR register v4.0 folder on desktop
Open JLR register folder
Open JLR register
Click on Register
Open abc.exml on desktop
Open JLR register folder
Open JLR register
Click on Register
Open abc.exml on desktop
Register finished
Step 5: Update and Run Software
Open FVDI2 Based Software List on desktop
check new version info and click on Update
Click Download the latest version
Download finished
check new version info and click on Update
Click Download the latest version
Download finished
Click Install
Select setup language
follow system prompt to complete FVDI2 J2534 driver setuop installation
Confirm uninstall, click Yes
Uninstall complete, click Finish
Open FVDI2 Based Software List on desktop
J2534 Compatible software->JLR
Select setup language
follow system prompt to complete FVDI2 J2534 driver setuop installation
Confirm uninstall, click Yes
Uninstall complete, click Finish
Open FVDI2 Based Software List on desktop
J2534 Compatible software->JLR
Run diagnosis and programming functions
blog.obdii365.com all rights reserved, original post JLR SDD2 V149 Free Download and Installation on Win 7


No comments:
Post a Comment