Here, i will share a tutorial of how to step by step install Cummins INSITE 8.1, sourced insite.cummins.com
Note that it is recommended to ensure that Microsoft .NET Framework 4.5.2 is installed prior to starting the INSITE installation.
Windows 8.1 will have Microsoft .NET Framework 4.5.2 installed by default or after all the Windows updates have been run.
cummins insite LITE 8.1
cummins insite PRO 8.1
Both tested OK and works no issues on Windows 7, Windows 8, Windows 10
INSITE 8.1 WIndows 8 install…in detail…
Step 1: After putting the disc in the DVD drive, click on the DVD RW Drive prompt:
Then click on the Run autorun.exe field:
Alternately, if the AutoPlay is not enabled, open Windows Explorer, find the DVD-ROM drive (could be any letter), and click on the autorun or autorun.exe Application file:
Step 2: If the Cummins Inc. Update Manager is already installed, proceed to step 12.
Step 3: If Cummins Inc. Update Manager is not installed, in the INSITE Installation Menu that opens, click on Manual Install Options:
Step 4: In the Manual Install Options screen, click on Required Installs:
Step 5: In the Required Installation screen, click on Install Update Manager:
Step 6: Approve the User Account Control prompt.
Step 7: In the InstallShield Wizard language selection prompt, select the appropriate language, and then click on OK:
Step 8: In the following InstallShield Wizard screen, click on Next:
Step 9: In the next Installation screen, click on Install to start the installation:
Step 10: In the InstallShield Wizard Completed screen, click on Finish:
Step 11: When you return to the Required Installations screen, click on Main Menu:
Step 12: In the
Cummins INSITE Installation Menu, click on Upgrade INSITE:
Step 13: If you have just installed Cummins Inc. Update Manager, proceed to step 17
Step 14: If Cummins Inc. Update Manager was already installed and has not yet been updated, click Yes in this prompt to update the Cummins Inc. Update Manager:
Step 15: Click on OK in the prompt to exit the Cummins Inc. Update Manager:
Step 16: Click on OK in the prompt notifying the user that the Cummins Inc. Update Manager was successfully updated:
Step 17: In the Cummins Inc. Update Manager click on the middle blue button with yellow file folder to Install Updates:
Step 18: Since Windows 8 will already have Microsoft .NET Framework 4.5 or greater installed, please proceed to step 23
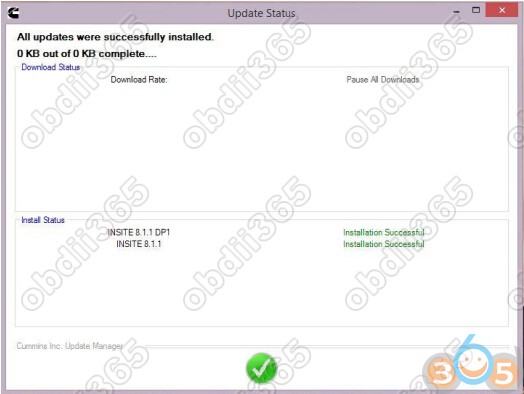
Step 23: The Update Manager will show the progress of the installation of INSITE 8.1.0 and other files
Step 24: Once all the updates are complete, click on the green check mark:
Step 25: Again, click on the middle blue button with the yellow file folder to Install Updates:
Step 27: Once the updates are complete, click on the green check mark:
Step 28: It will now tell you that No new updates are available:
Step 29: You will now need to change the drop-down box in the top right-hand of the window to point to the Internet. At this point, you will need a good and stable Internet connection. Click on the left-hand green button:
Step 30: The Cummins Inc. Update Manager will update itself. Click Yes in this prompt to update the Cummins Inc. Update Manager:
Step 31: You will see a prompt requesting you to restart the operating system. Click on Yes, but it may or may not restart the operating system, and you are not required to restart the operating system:
Step 32: Click on OK in the prompt notifying the user that the Cummins Inc. Update Manager was successfully updated:
Step 33: The Cummins Inc. Update Manager will again update itself. Click Yes in this prompt to update the Cummins Inc. Update Manager:
Step 34: The Cummins Inc. Update Manager will show the progress of the download of the Update Manager:
Step 35: Click on OK in the prompt to exit the Cummins Inc. Update Manager:
Step 36: Click on OK in the prompt notifying the user that the Cummins Inc. Update Manager was successfully updated:
Step 37: In the Cummins Inc. Update Manager click on the middle blue button with yellow file folder to Install Updates:
Step 38: The Update Manager will show the progress of the downloads and installation of INSITE 8.1.2 and other files:
Step 39: Once all the updates are complete, click on the green check mark:
Step 40: You may be prompted again to update some FIS files. Again, click on the middle blue button with the yellow file folder:
Step 41: Once the updates are complete, click on the green check mark:
Step 42: Once all the updates are complete, it will state that No new updates are available. Click on the right-hand red button to exit:
Step 43: Click on Yes to exit the Cummins Inc. Update Manager:
Step 44: In the INSITE Installation Menu, click on Exit to close the screen:
Step 45: Find the Cummins INSITE icon on the desktop and double click on it. If you still have a valid active license, INSITE should open.
What else you wanna know:
Cummins Insite 8.1 Windows 10 install:
Insite 8.1 Win7 Win8 Win10 install review:
Cummins INSITE Basic vs. INSITE Lite vs. INSITE Pro: