2024/03/28

Which Software for Nissan Programming and Coding?

 What is the difference between these different versions? Nissan Consult III Plus, Nissan Consult III R2R and NERS.


There are two software for Nissan car programming. One is called NERS, and the other one called consult3 plus. NERS is the software for purely programming which you can program ECU and some TCU. Other stuffs you definitely need consult 3 plus.

Another software is called R2R which is very new software from Nissan. R2R can do full diagnostic using J2534 although the software works only after 2018 car.

Nissan Consult 3+ comes with Immo, but R2R does not. Immo cannot be done through the R2R side. Must have the Nissan tool to accomplish it.

Don’t confuse that with the Consult III-R2R or the NERS software which don’t have diagnostic capabilities or immobilizer functions but DO have coding/reprogramming options and are significantly cheaper to purchase or rent without requiring a huge yearly subscription fee.


NERS: For reprogramming, write/modify VIN, configuration, programming the NERS is the cheapest route for $350 + $599 (Mongoose Plus-J2534).
Consult III Plus: For diagnostics, reprogramming, write/modify VIN, configuration, programming this is $1300 + $599 (Mongoose Plus-J2534).
Consult III Plus (clone): For diagnostics & Immobilizer ONLY (VXDIAG Nissan ($229)/ VNCI Nissan $339).
Consult III Plus R2R: full diagnostic for 2018 onwards Nissan Infiniti, ECU programming/reprogramming, write/modify VIN, configuration


CONSULT-III Plus R2R Diagnostic System Information:

  • Software supports diagnostics functionality on all Nissan and Infiniti 2018 model years or newer vehicles.
  • Software supports all ECU programming/reprogramming & configuration on 1999 model year and newer vehicles and 2018 model year and newer for VIN writing into ECUs.
  • Software does not support Immobilizer diagnosis. Immobilizer diagnosis can be completed by authorized and registered Security Professionals using CONSULT-III plus software.
  • It is recommended the latest version of CONSULT-III plus R2R be installed before connecting to a vehicle.

CONSULT-III plus r2r

CONSULT-III plus Information
Nissan Consult III Plus (Consult3 +) is a comprehensive diagnostic and service tool for Nissan and Infiniti vehicles, providing various features to diagnose and maintain these vehicles.

It offers a wide range of diagnostic capabilities, including fault code reading and clearing, sensor detection, real-time data stream monitoring, programming and coding, special function activation, and more.

Functions:

  • Diagnostic Trouble Code (DTC) Readout: It can read and display diagnostic trouble codes.
  • Clear Fault Codes: It can clear fault codes from the vehicle’s electronic control units (ECUs).
  • Retrieve Vehicle Information: Provides access to vehicle information.
  • Automatic Full Scan: Conducts a comprehensive diagnostic scan of the vehicle.
  • Learned Data Reset: Allows for the reset of learned data in the vehicle’s systems.
  • Manual Injector Cut Out: Supports manual control of injector cut-out.
  • Manual DPF Service Regeneration: Supports manual regeneration of diesel particulate filters (DPF).
  • Trip Reporting: Likely for generating reports on vehicle diagnostics.
  • Parameter Changes: Allows for adjustments to vehicle parameters.
  • Sensor and Parameter Monitoring: Monitors various sensors and parameters.
  • Live Data: Provides real-time data from the vehicle.
  • Transmission Sensor Values: Specifically monitors transmission-related sensor values.
  • General Sensor Values: Monitors general sensor values.
  • Engine Sensor Monitoring Test: Likely used for testing engine sensors

CONSULT-III plus software

So pretty much nothing is different besides the Immobilizer function.


If you need just scan, I recommend AutelLaunch X431 or Consult3+ clone.  Autel and launch scanners can scan most of the modules except minor stuffs.

However, we recommend OEM consult 3 plus VII for programming.
If you go J2534 path, get cardaq2 or Jbox2.


Nissan Reprogramming options:

Option 1: Reprogramming/Configuration ONLY:
Mongoose Plus J2534 VCI Interface (Nissan approved list): $495
Consult III Plus R2R (1-day rental): $30 (download from Nissan-Techinfo.com)
Juke firmware calibration file package (find your year/make ECU Part number from online Nissan parts dealership): $29.95 from Nissan-Techinfo.com
Total: $555

The Consult-III plus (with subscription) can do flashing updated firmware calibration from Nissan for the various on-board computers: ECM, TCM, BCU, ABS, IPDM, etc. The advantage here is what was once a dealer only capability: updating to the latest firmware, can now be purchased online for $29.95. Only Nissan corporate has the capability to extensively code/recode and release firmware updates for all the on-board computers. An example might be to update the TCM firmware to the latest version to address a TSB or similar.


Option 2: Reprogramming/Configuration ONLY:
Mongoose Plus J2534 VCI Interface (Nissan approved list): $495
NERS software (Consult III Plus, no diagnostics): $350 (download from Nissan-Techinfo.com
Juke firmware calibration file package (find your year/make ECU Part Number, example 23710-1TV5E for 1st gen AWD/CVT): $29.95 from Nissan-Techinfo.com
Total: $875


Option 3: Reprogramming/Configuration + FULL Diagnostics:
Autel Maxysis 908S Pro: $1,795
J2534 VCI Interface: Included
Total: $2,395

Or more expensive Autel MS909, MS919, Ultra series.

The Autel Maxysis 908S Pro (or Ultra series) use their own internal vehicle firmware calibration database to get the latest firmware version for Nissan & all other supported vehicles. To update that firmware database you have to pay a yearly subscription fee of $795 but it should come pre-loaded with the latest at time of purchase. It has every firmware calibration available for all supported vehicles makes/models. For older Jukes probably the current firmware will be available and they aren’t recoding that firmware much anymore. As an example my 2012 Juke probably has gone thru (22) firmware updates as of today and it’s currently at version 1TV5E. My engine is running the 1TV5B so when I could reflash to that then use the UPRev software to tweak that and just save the .bin file like I do for my ECUTek flashes.


Option 4: Reprogramming/Configuration + FULL Diagnostics:
Consult-III Plus: ($1300), 1 time purchase “each” year required for reprogramming/reflashing
BOSCH J-52925-VI3 interface: $1,046 from (TECH-MATE)
Juke firmware calibration file package (find your year/make ECU Part number): $29.95 from Nissan-Techinfo.com
Total: $2,376 + $1250 yearly subscription after 1st year


Option 5: Reprogramming/Configuration + FULL Diagnostics:

Another option might be the following: Purchase a 1-year subscription (software license and 1 year updates) for a Consult III Plus that will allow unlimited diagnostics and use it for that only, while still having unlimited programming/coding for the first year. Then maybe later purchase the Consult III-R2R or NERS strictly for cheap reprogramming/coding as needed with the daily $30 rental or $350 purchase respectively. This is kinda what the dealerships do basically renting out the software on the cheap. Make sense, combine the multiple softwares to do individual functions when you need them. Nissan –Techinfo.com have the full blown Consult III Plus owners manual for download so I’d take a look at that as well just to see what you can and can’t do with the various softwares.


www.obdii365.com

Autel Gen1 vs Gen2 vs Gen3 DS MX MK MP Scanners

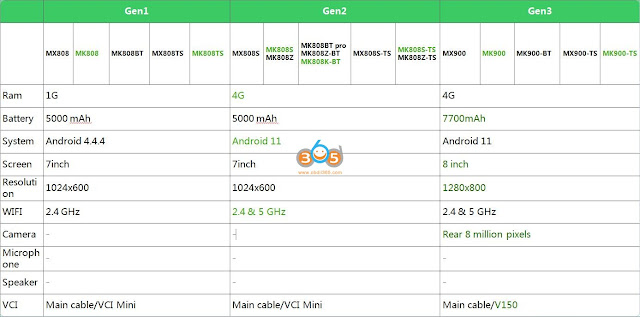
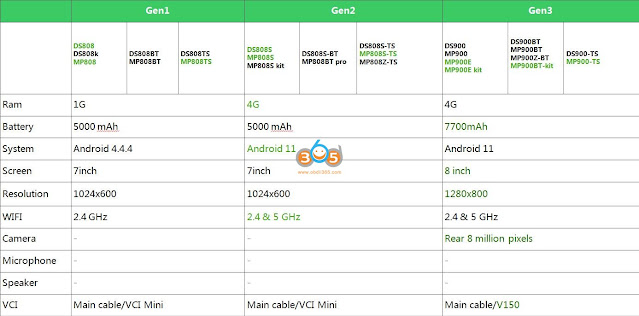
 Here is the comparison among Generation 1, Generation 2 and Generation 3 Autel DS, MX, MK and MP series diagnostic scanners.


*Click to enlarge images.
1.MX and MK 808, 900 series

Gen1: MX808, MK808, MK808BT,MX808TS, MK808TS

Gen2: MX808S, MK808S/MK808ZMK808BT Pro/MK808Z-BT/MK808-BT, MX808S-TS, MK808S-TS/MK808Z-TS

Gen3: MX900, MK900, MK900-BT, MX900-TS, MK900-TS

Autel Gen1 vs Gen2 vs Gen3 DS MX MK MP Scanners 1

Autel Gen1 vs Gen2 vs Gen3 DS MX MK MP Scanners 2

Gen2 and Gen3 has Android 11 system.
Gen3 has larger battery and rear camera.
Gen1 and Gen2 don’t support Scan vin, scan license, pre&post scan, wifi printing and screen cast.

Gen3 has built-in CAN FD protocol.


2.DS808 MP808 DS900 MP900 Series

Gen1: DS808/DS808K/MP808DS808BT/MP808BT, DS808TS/MP808TS

Gen2: DS808S/MP808S/MP808S Kit, DS808S-TS/ MP808S-TS/MP808Z-TS

Gen3: DS900/MP900/MP900E/MP900E kit, DS900BT, MP900BT, MP900Z-BT, MP900BT-kit, DS900-TS/MP900TS

Autel Gen1 vs Gen2 vs Gen3 DS MX MK MP Scanners 3

Autel Gen1 vs Gen2 vs Gen3 DS MX MK MP Scanners 4

Autel Gen1 vs Gen2 vs Gen3 DS MX MK MP Scanners 5

Gen2 and Gen3 has Android 11 system.
Gen3 has larger battery and rear camera.
Gen1 and Gen2 don’t support Scan vin, scan license, pre&post scan, wifi printing and screen cast.
Gen2 and Gen3 support BMW Porsche VW online coding, BMW hidden functions, Gen1 does not.


www.obdii365.com

2024/03/27

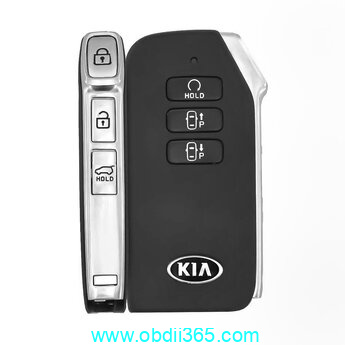
How to Program 2021 Kia Forte All Keys Lost

 Here comes the problem:

Working on a 2021 Kia Forte LXS with bladed ignition. All keys lost. Customer gained entry somehow before I arrived and alarm was active (sounding.)
The Hyde manual states no transponder on this model. No security symbol.  There’s a security light when the car senses a transponder key. If there’s no transponder key there’s no light. It’s opposite from every other manufacturer out there.

It might have a transponder being a 21 but basically the new update to the BCM that they came out with makes it where you can’t start the vehicle if the alarm’s going off and you can’t deactivate the alarm without the remote.
Customer had key code so I cut a test key blade and it turn the ignition but would not start the vehicle.

How to turn the alarm off with a non-transponder key? Some of the older ones would turn off by cycling the key 6 times with foot on brake. Or does some of the Kias have transponders?

Program 2021 Kia Forte All Keys Lost

Problem solved:
Turn ignition on and leave for 30 seconds. Alarm will sound for the 30 seconds then beep twice. Used the Kia online owners manual.
 

2024/03/20

Free Software to Read BMW Siemens Bosch ECU ISN

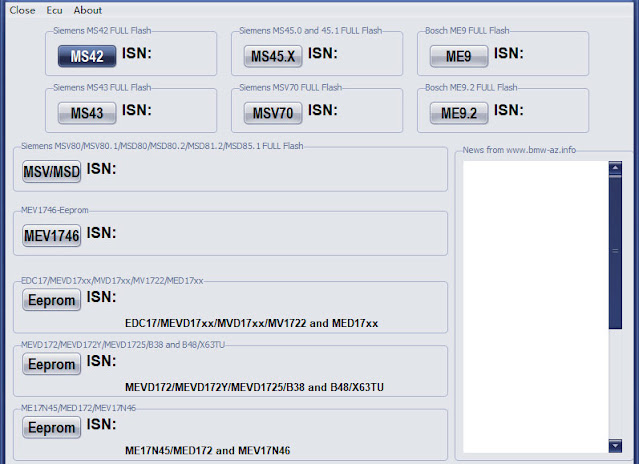
Free software to read/calculate BMW Siemens/Bosch ECU ISN code via eeprom/flash data.


Support following ECUs:

Siemens MS42/43/45.0/45.1/MSV70/ME9/ME9.2

Siemens MSV80/MSV80.1/MSD80/MSD80.2/MSD81.2/MSD85.1
Bosch EDC17/MEVD17xx/MVD17xx/MV1722/MED17xx
Bosch MEVD172/MEVD172Y/MEVD1725/B38 and B48/X63TU
Bosch ME17N45/MED172/MEV17N46
Read BMW Siemens Bosch ECU ISN
Contact www.obdii365.com if need software link.

How to Install Yanhua Mini ACDP MQB48 Interface Boards?

 Yanhua Mini ACDP/ACDP2 released new module 33 for VAG MQB48 add key, all keys lost (need sync data) and mileage correction.


Module 33 has 13 full-set MQB adapters. There are two types of interface boards:

– Lock Fastening Interface board        
– Thumb Screw-Fastened Interface board


Here we will show how to install ACDP MQB48 adapters.


Install ACDP Module 33 Lock Fastening Interface board

Take MQB-77 interface board as an example.

1. Push the lock fastening of the interface board to the unlock position.

Install ACDP Module 33 Lock Fastening Interface board 1

Find the interface board installation area on the instrument according to the visual positioning mark on the interface board.

Install ACDP Module 33 Lock Fastening Interface board 2

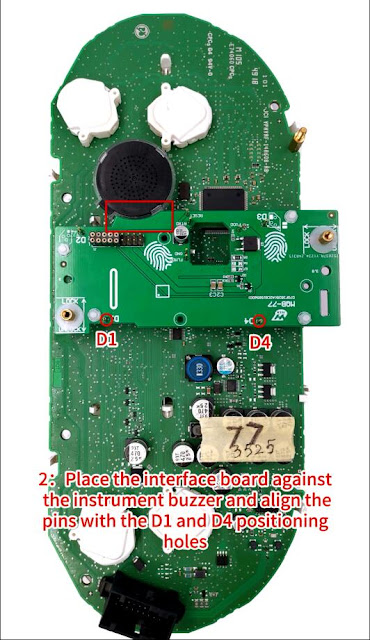
2. Place the interface board against the instrument buzzer and align the pins with the D2 and D4 positioning holes.

Install ACDP Module 33 Lock Fastening Interface board 3

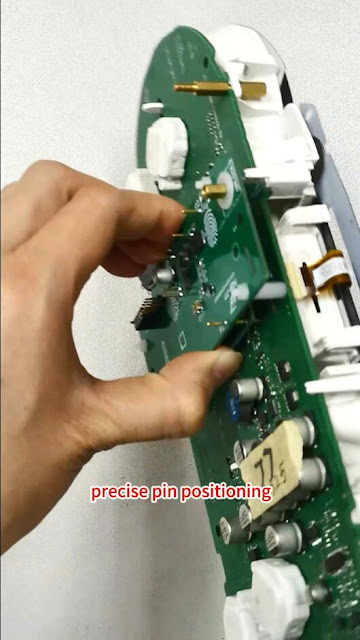
3. Check that the D1 and D4 positioning pins are completely aligned with the D1 and D4 positioning holes of the instrument

Make sure the PCB lock buckle is completely aligned.

Install ACDP Module 33 Lock Fastening Interface board 4

Install ACDP Module 33 Lock Fastening Interface board 5

4. Place your finger on the fingerprint position of the interface board.
Press down on the interface board.
Push the PCB lock buckle to the Locked position to lock the interface board.

Install ACDP Module 33 Lock Fastening Interface board 6

Install ACDP Module 33 Lock Fastening Interface board 7

Install ACDP Module 33 Lock Fastening Interface board 8

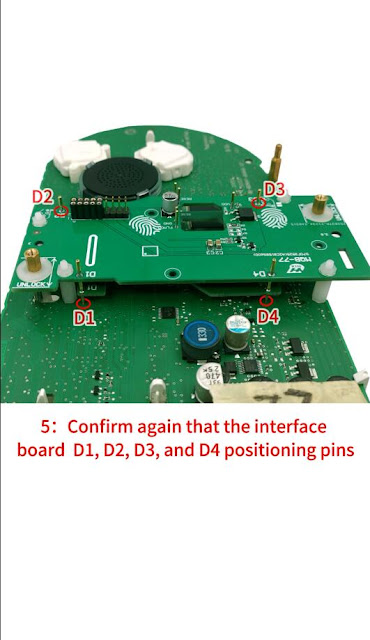
5. Confirm again that the interface board D1, D2, D3 and D4 positioning pins are completely aligned with the D1, D2, D3 and D4 positioning holes of the instrument.

Install ACDP Module 33 Lock Fastening Interface board 9Install ACDP Module 33 Lock Fastening Interface board 10

After install MQB interface board, connect interface board with ACDP2/ACDP

Install ACDP Module 33 Lock Fastening Interface board 11


Install ACDP Module 33 Thumb Screw-Fastened Interface board

Take MQB-75 interface board as an example.

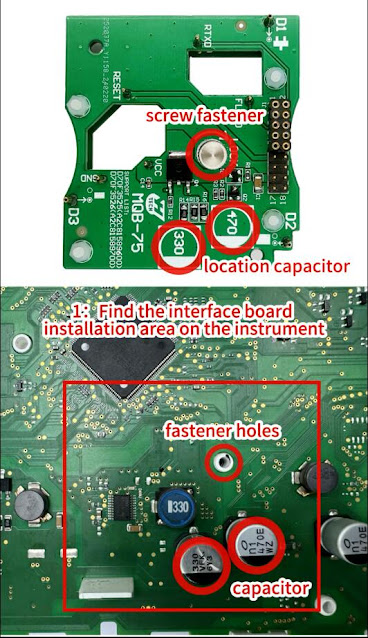
1.Find the interface board installation area on the instrument.

Install ACDP Module 33 Thumb Screw-Fastened Interface board 1

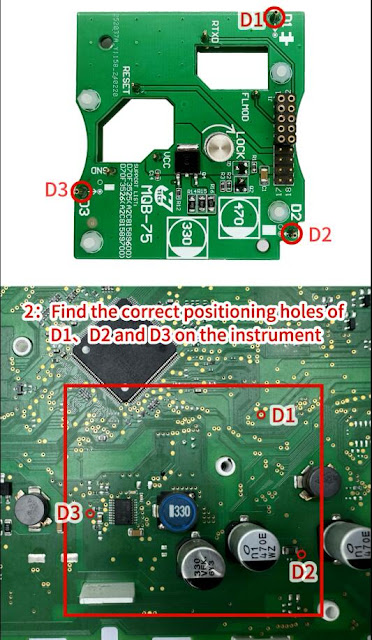
2. Find the correct positioning holes of D1, D2 and D3 on the instrument.

Install ACDP Module 33 Thumb Screw-Fastened Interface board 2
3. Align the interface board with the screw fastener holes and D1, D2 and D3 positioning points.

Install ACDP Module 33 Thumb Screw-Fastened Interface board 3
4. Press the interface board down with your left hand, tighten the locking screw with your right hand.

Install ACDP Module 33 Thumb Screw-Fastened Interface board 4

Install ACDP Module 33 Thumb Screw-Fastened Interface board 5
5. Confirm again that the interface board D1, D2 and D3 positioning pins are completely aligned with the D1, D2 and D3 positioning holes of the instrument.

Install ACDP Module 33 Thumb Screw-Fastened Interface board 6

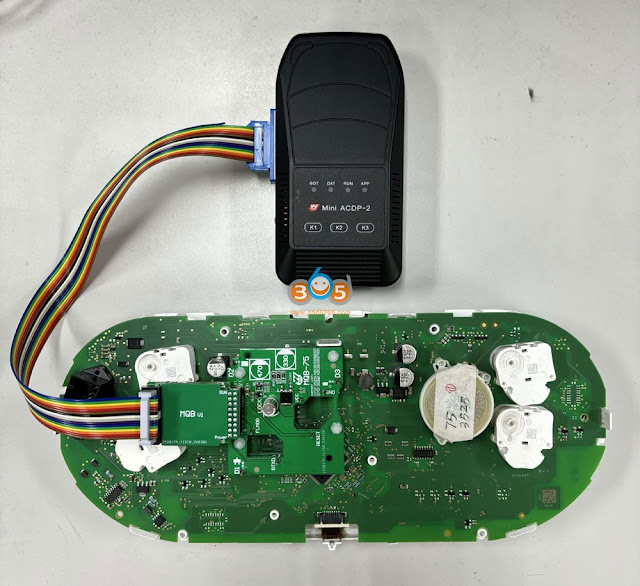
After install MQB interface board, connect interface board with ACDP2/ACDP


Install ACDP Module 33 Thumb Screw-Fastened Interface board 7

2024/03/19

How to Virgin Audi BCM2 with Xhorse VVDI2?

 How-to: make virgin from Audi BCM2 using Xhorse VVDI2 programmer.


To virgin BCM2, you need to read (back up) original EEPROM and flash data using vvdi prog or multi prog.

Quick Login, run Audi software
Select Special function-> BCM2 dump tool

Virgin Audi BCM2 with Xhorse VVDI2 1

Virgin Audi BCM2 with Xhorse VVDI2 2

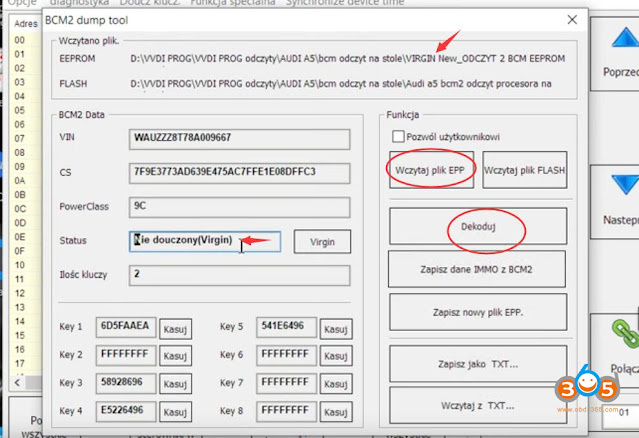
In BCM2 dump tool, upload original FLASH and eeprom data

Virgin Audi BCM2 with Xhorse VVDI2 3

Press Decode to decode VIN, CS, Powerclass and key information

You will see the BCM2 is not virginized

Virgin Audi BCM2 with Xhorse VVDI2 4

Delete all other keys (key 3, key 4 and key 5) except key 1

Press Decode again

Virgin Audi BCM2 with Xhorse VVDI2 5

Then press Virgin BCM2 data

Virgin Audi BCM2 with Xhorse VVDI2 6

BCM2 is virginized

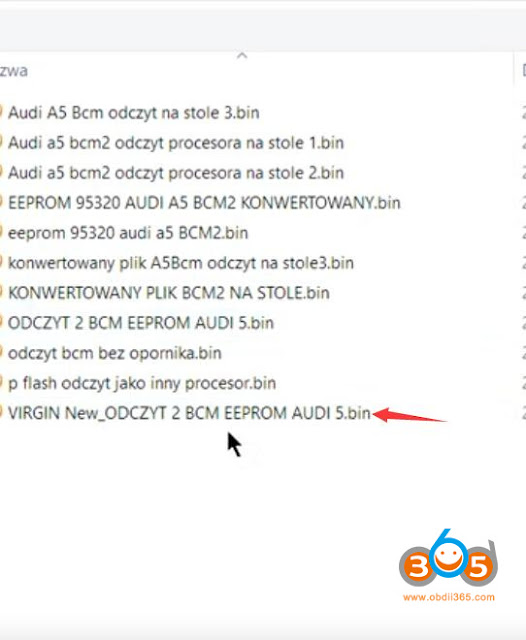
Save new EEPROM data

Virgin Audi BCM2 with Xhorse VVDI2 7

Virgin Audi BCM2 with Xhorse VVDI2 8
Upload new virgin EEPROM data and decode again
You can see the BCM2 now is in virgin status

Virgin Audi BCM2 with Xhorse VVDI2 9

Read also:

Audi 5th Immo System Locked BCM2 Solution with VVDI 2 & VVDI PROG

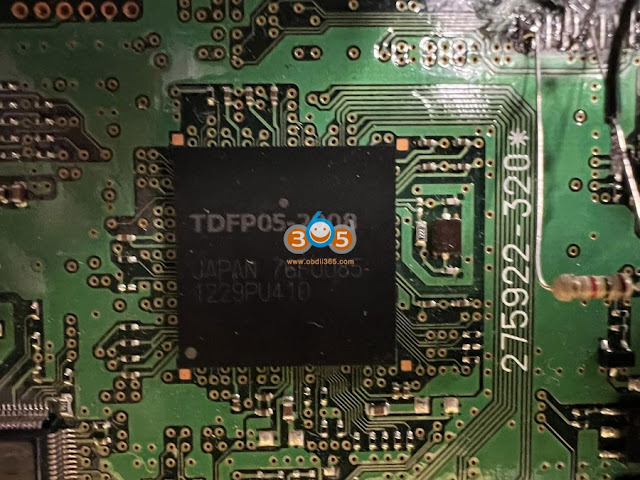
Foxflash or Ktag to Read Toyota 76F0085 Denso ECU?

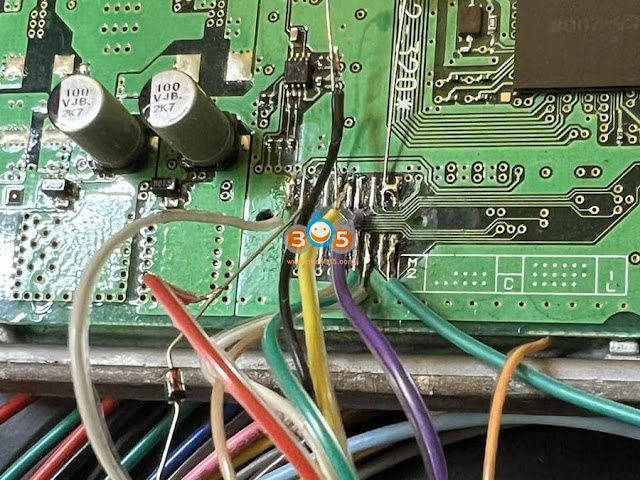
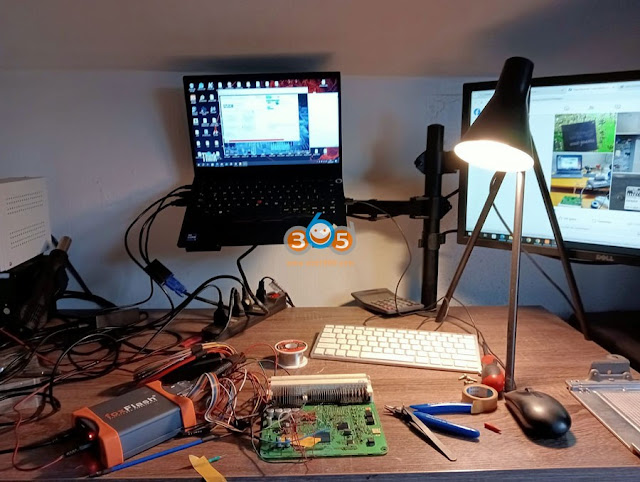
 Toyota Denso ECU chip 76F0085, which tool to read/write?


Foxflash 

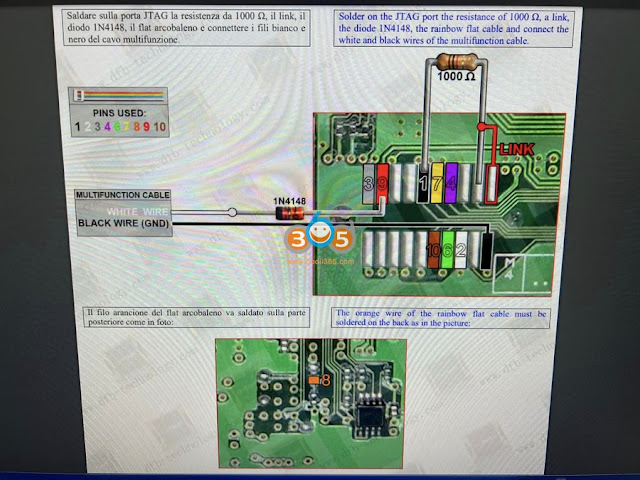
Yes, it will read Denso 76F0085 ECU in Jtag mode.

Connect according to manuals from foxflash.

Need 24v power supply. 12V will not work (error boot)

foxflash Read Toyota 76F0085 Denso ECU 1

foxflash Read Toyota 76F0085 Denso ECU 2

foxflash Read Toyota 76F0085 Denso ECU 3

foxflash Read Toyota 76F0085 Denso ECU 4

foxflash Read Toyota 76F0085 Denso ECU 5

foxflash Read Toyota 76F0085 Denso ECU 6

foxflash Read Toyota 76F0085 Denso ECU 7


Ktag

Use Ktag in jtag mode.
ktag has instructions too.

Many problems to read even with ktag, there are tutorials on youtube to ground some pin to shell of the unit.

ktag Read Toyota 76F0085 Denso ECU 1

ktag Read Toyota 76F0085 Denso ECU 2

ktag Read Toyota 76F0085 Denso ECU 3


KESS3
KESS3 will read this denso ECU via OBD.
VR and obd Write easy and fast.

KESS3 Read Toyota 76F0085 Denso ECU 1


http://blog.obdii365.com/2024/03/19/read-toyota-76f0085-denso-ecu-by-ktag-foxflash-or-kess3/

2024/03/18

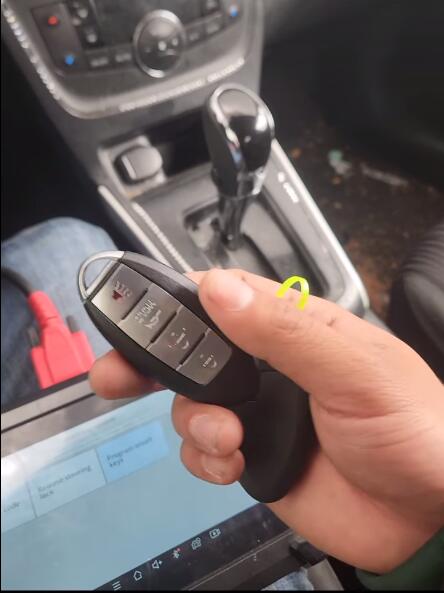
Nissan Sentra 2018 Key Works Key System Error?

 Problem:

Nissan Sentra 2018 Key Works but it says key error see owners manual on the dashboard.

Nissan Sentra 2018 Key Works Key System Error 1

Nissan Sentra 2018 Key Works Key System Error 2

Possible reason and solution:

Wrong button configuration is what throw the I key light.

The car you are working on probably has remote start and your keys aren’t.

Never use shit keys from Amazon.

Always get original keys do that on Sentras.


www.obdii365.com