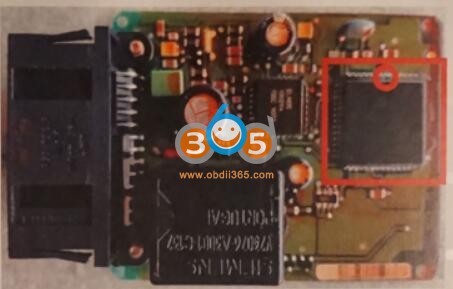
Showing posts with label ak90. Show all posts

2022/07/10

How to Improve AK90+ to Solve PIN No Touch?

 The AK90+ is a clever tool, but that tether cable has problems that result in “pin no touch” messages. You can follow the solution here to fix this problem. If you are reasonably handy & can solder, you can have it reliable in about an hour.

This is a how-to improve your AK90+ key programmer?

Here’s How You Fix It:

0.) Order 2 of this socket [Part Number 2057-PLCC-52-AT-NO about $6.50 US from digikey (#2 is in case you screw up ..you know you do).
1.) Chop the socket from the end of the cable with scissors. keep as much cable length as you can
2.) Salvage the white shrink wrap intact if you can. Its useful later. Stretch it as little as possible.
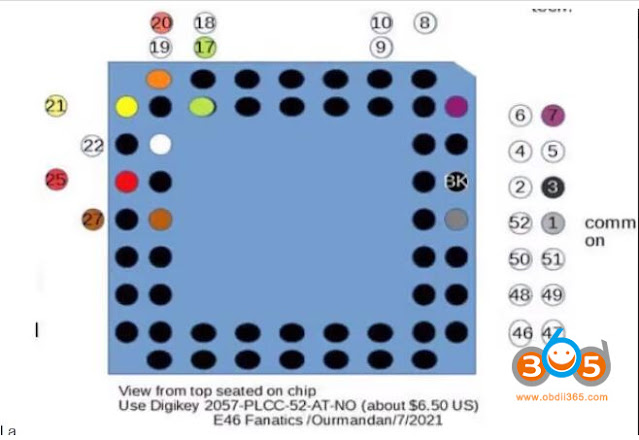
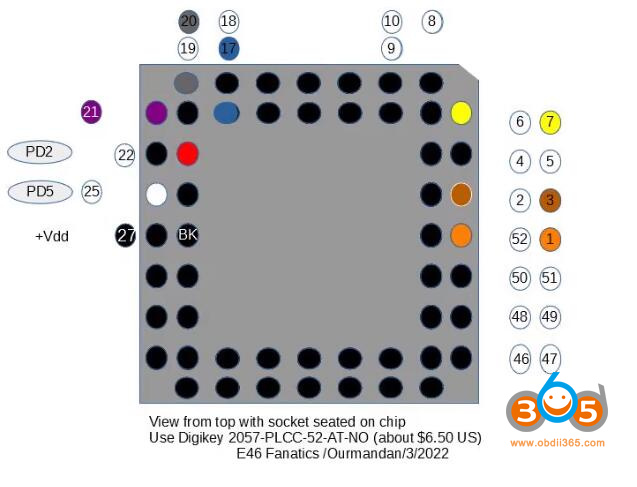
3.) Compare the 2 known cable pattern photos below & pick the matching socket pin-out.
4,) Carefully separate the wires for about 1 inch

Either blue or green will appear on your solder map. Don’t strip the un-used B or G, we’ll need that as a strain relief.
trim down 50% length from the unused pins. I folded mine over being careful not to touch. It gets them out of the way of the wires and stopper
Strip all other wires 1/4 in & twist the wires in each then tin.

>>> Don’t forget to thread the white shrink <<<<<

Solder the wires in place. I used needle nose to make a ‘U” around each pin. I alternated pins across the socket to keep the wires from bending to the breaking point.

Once about half the wires are soldered, use a little “Shoe goo” from Walmart or similar to anchor the unused “Strain relief” wire (blue for me) to the middle of the socket. adjust its length to relieve tension on the wires, solder the remainder.

Almost done! You can shrink the white plastic back down on the socket .. but don’t melt the socket! a tiny amount (use toothpick) of Shoe-goo is a fine alternative.
finally cut your white shrink a bit under 1/8th all the way around the socket. Use a new razor blade straight-on to keep it consistent. the shrink cuts easily. So do your fingies.

Now we need to add a little handle, because you still have to jockey the socket in place and we need to relieve strain on the wires too.
If you live in the USA go to Ace Hardware , go to the parts bins and select the 50 cent black rubber cork. That’s the one that fits well. Use a little shoe goo from Walmart
or silicone rubber to secure the cork reasonable deep into the shrink. If you don’t have Ace where you live you are on your own.

If you aren’t used to cable building, seek out original post with more detailed instructions or contact me; if I’ve time I’ll make a cable for you .. you’ll pay for parts (about 10.00)
(your AK90+ will work every time).

Finally Mark the flat corner on the shrink with a sharpy. Always line it up with the flat corner of the chip. When you insert the socket it should be more of a “slide in from a side” then finesse the other sides down a little. The socket I specified has much springier pins so if you are gentle it will work almost every time.
Dont forget to remove any red coating on the processor pins. You can use alcohol, acetone on a qtip, or a thin nail file if you must .. but wipe it with a q-tip if you do that.

OK now you’ve got the con .. over and out.

Read this addendum

A recent cable issue was discovered by the fanatic known as “sideways”.

variant of the OEM AK90+ cable wire color key has been foundFor those who have the variant, my “how-to” pin out map would be incorrect.

Before you make the changes you must chose the soldering schema matching YOUR AK90+ cable.

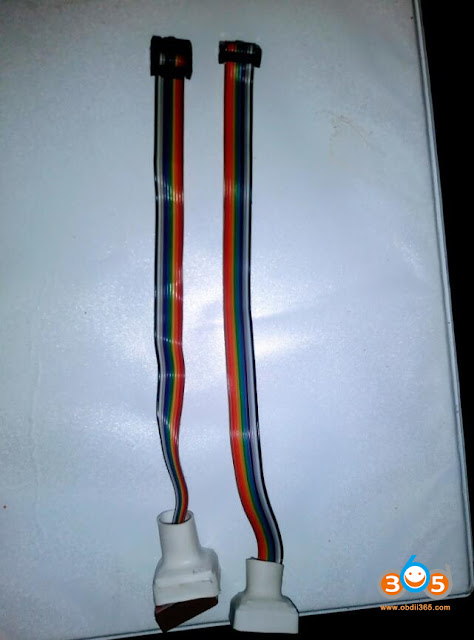
Here is a side by side of both possible cables. Plug the connector into the AK90, then determine if the left-most wire is brown or black. Then step down and pick the schema that matches your cable. IMPORTANT: my soldering schemas are shown as if the socket is sitting on top of the EWS Chip.

If you’ll be building a cable, scan the photos & drawings, then skip t the bottom for a few pointers .

Improve AK90+ to Solve PIN No Touch 1


Use this solder plan if your cable matches the photo on the left. (Left wire of the cable is Black (when plugged into the AK90)

Improve AK90+ to Solve PIN No Touch 2

Use this solder plan if your cable matches the photo on the right. (Left wire of ribbon is Brown when plugged into the AK90) .

Improve AK90+ to Solve PIN No Touch 3

Addendum:
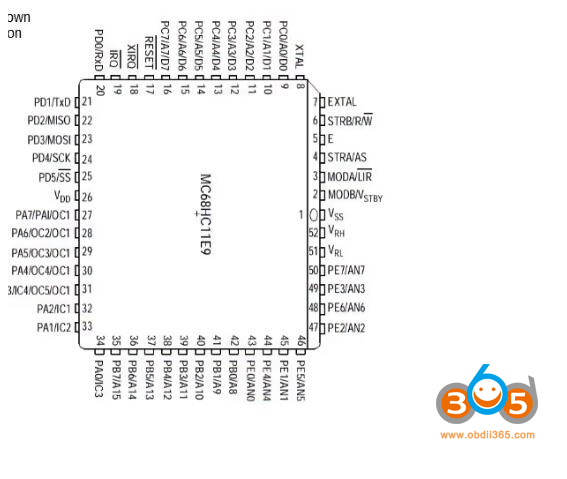
The processor pin-out below is only for those who are curious & want to know the purpose of each processor pins connected to the cable. You can make a working cable without looking at it.

Improve AK90+ to Solve PIN No Touch 4
http://blog.obdii365.com/2022/07/09/modify-ak90-key-programmer-to-make-it-reliable/

2021/09/22

How to Write 2001 Landrover Freelander EWS Key?

 Problem: 2001 Landrover Freelander it’s say unclonable on Xhorse VVDI Key Tool Max ! Any idea please?

vvdi key tool max clone 2001 freelander key 1


Possible reason:

It means you can’t clone it as in uncloneable as opposed to cloneable which means you can clone it.


How to do next?

Rolling code same as bmw, you have to write it to the module. EWS u cant clone the key Id must remove ews if u don’t have programmer or u don’t know how this system works do more research buddy but since I read that u said uncloneable and u don’t know 7935 chip.

means still u r new in this field cheers no offense I recommend you read more here is a push for you to search about Ak90 its your tool to do the job.


How to write 2001 Landrover Freelander key with AK90?


Step 1:Remove the EWS3 Module


Lange Rover Freelander’s EWS3 module is located below the park brake handle.

write 2001 Landrover Freelander key with AK90 1


Open the elbow reset, and remove the cup holder, straight upward. Set aside.Great place to store the screws you are about to be removing next.

write 2001 Landrover Freelander key with AK90 2


Rove these two T20 from under the cup holder.

write 2001 Landrover Freelander key with AK90 3


Under the trim around the base of the shifter,are 4 more T20.The trim around the shifter can be moved to access them all.

write 2001 Landrover Freelander key with AK90 4


Now the larger trim around the top of the center console,can be shifted from side to side,revealing the EWS3 module.

write 2001 Landrover Freelander key with AK90 5


The target module EWS3,is mounted on the drivers side of the shifter gear box.White Box Approx.3”x2”x1”

write 2001 Landrover Freelander key with AK90 6


A single 8mm head bolt secures the box in.Remove it and start working the EWS backwards towards the cup holder.

write 2001 Landrover Freelander key with AK90 7


Typically there is enough wire slack to move the box to the void where the cup holder was removed. Disconnect the single plug and take the EWS to the bench.

write 2001 Landrover Freelander key with AK90 8


This is a standard EWS3.I have seen them replaced with the following generation by the dealer.i.e.an EWS4 where and EWS3 was original.

write 2001 Landrover Freelander key with AK90 9


Here’s the board removed from the box. The target chip we need to remove from PCB is 0D46J,it is a 52 leg Plastic Leaded Chip Carrier(PLCC).Note PIN 1.

write 2001 Landrover Freelander key with AK90 10


It is very important when dealing with these EWS1-3 that you verify that the device is Mark 0D46J. Sporadically throughout its use, EWS can contain 2D47J. If you attempt to read a D47J as a D46J, you will corrupt the file.

write 2001 Landrover Freelander key with AK90 11


Connect the AK90 key programmer hardware and start the software. Verify that the proper device is selected.

write 2001 Landrover Freelander key with AK90 12


Both I,and the makers of the AK90 can not express how important it is not read a 2D47J as a 0D46J.You “Must” do it.

write 2001 Landrover Freelander key with AK90 13


Clean the lacquer off the 53 legs,either use chemicals such as ZipStrip or abrasives like this wire brush.

write 2001 Landrover Freelander key with AK90 14


Make sure the adaptor is oriented properly to Pin 1.I find that you cannot just clip this on.More likely that you must hold it download as you attempt the read.The read takes approx. 20 to30 seconds.If it fails,check for lacquer residue and adjust the adaptor to reestablish the connection.

write 2001 Landrover Freelander key with AK90 15


With all settings and connections established,click the read EWS button.There is both a visual and audio effect(ticking) as the AK90 read.

write 2001 Landrover Freelander key with AK90 16


Once the AK90 recognize the BIN file,it will auto open the Save AS Window,and auto name the file based on the info read.

write 2001 Landrover Freelander key with AK90 17


Connect the IKeyClone to the PC and start the SW.UtilitiesàKey GeneratoràKey By DumpàBMWàEWS.

write 2001 Landrover Freelander key with AK90 18


This window gives a few more details and the option to Open the Bin File.Check here.

write 2001 Landrover Freelander key with AK90 19


Select the AK90 save file(I know the file name doesn’t match the previous images,but you are smart enough to follow along,nonetheless.)

write 2001 Landrover Freelander key with AK90 20


We know that the IKC has accepted the file because there were no error messages and the options buttons illuminated.This screen displays useful info such as keys programmed and the sync code.

write 2001 Landrover Freelander key with AK90 21


We can see that 3 of 10 slots are occupled,so I will be selecting a slot a “long distance” from the last existing key,as to not interfere with keys ordered from the manufacturer.You can also overwrite existing transponders.

write 2001 Landrover Freelander key with AK90 22


Verify that an acceptable transponder,here a 7935,is located on top of the IKC hardware as shown on the top.

write 2001 Landrover Freelander key with AK90 23


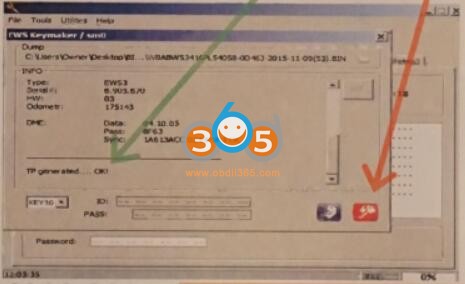
Then click the write transponder button and then verify that “TP Generated OK!” appears.This can take 20 to 45 seconds.

write 2001 Landrover Freelander key with AK90 24


Note:IKC didn’t require a new bin file to be generated or named.This is our cue that a rewrite of the device is unnecessary.So return everything to the vehicle and test your work.I have provided the following picture of different locations you may find the EWS modules.A vest majority of them are located near the driver’s left foot and are EWS3 generation.

write 2001 Landrover Freelander key with AK90 25

write 2001 Landrover Freelander key with AK90 26

write 2001 Landrover Freelander key with AK90 27


Good to know:

The AK90 in blue and white color (shown as above) is not available now, please choose AK90+ V3.19 instead. It can program EWS key from 1995 to 2009 year.

write 2001 Landrover Freelander key with AK90 28


http://blog.obdii365.com/2021/09/22/2001-landrover-freelander-pcf7935-cannot-be-cloned-only-write-key/

2020/05/24

How to Solve AK90+ BMW EWS “PIN No Touch” Error?

Problem:
I picked up an AK90+ and began the usual task of scraping the board coating off the 2L86D chip.  It can read the key but cannot read the EWS.
Have any of you guys ever had any trouble reading EWS 3 with the AK90? I cleaned the pins properly and also pry out the pins on the connect but still get “pin no touch” error. Will the K-Line adaptor make a difference?

Updated:
I’ve tried a few different packages, removed the software and the silicone drivers, rebooted my computers in between, plugged the unit in, then installed the software, tried turning the chip cable connection each direction and tried a minimum of 20 reads each direction with varying levels of pressure on the main chip, pulled the pins on the reader out a bit thinking they were pressed in too far (on the cable), just about everything.  All I get is still “pin no touch”. Any idea?
ak90-pin-no-touch-1

ak90-pin-no-touch-2

ak90-pin-no-touch-3

ak90-pin-no-touch-4

ak90-pin-no-touch-5

ak90-pin-no-touch-6

Solution:
If you have the ‘Pin no touch’ error, that means that the program is communicating with the AK90 properly. You can verify that by seeing if the AK90 can read a key.
The problem is likely that pins haven’t been cleaned where the socket contacts them (or you have selected the wrong module version, or have the orientation wrong, or the cable isn’t plugged in).
Seems like some people get it to work easily and others have to fight it to the death.
Here obdii365.com engineer provides some possible solutions. If one doesn’t work, try another instead.

1).
Best to uninstall everything if the unit wasn’t plugged in before install the first time. There’s no down side and it only takes a minute.
Go to add remove programs in the control panel and browse there by installation date. That way you won’t miss anything.
Uninstall anything called Silicone. Then reinstall the software, but be sure to have the AK90 plugged in before you start installing the software. That is important. You must get the drivers all Uninstalled before you reinstall them properly with the unit plugged in. Also, you have to rotate the plug 90° counter clockwise. The arrow and the dot did not match up.

2).
Worked.
I had to remove all the software including the drivers with add/remove programs. Anything to do with it, anything named silicon I think it was. Then I plugged the AK 90 in to the one port that worked and then reloaded the software from the disk with the AK90 key programmer plugged in. Then followed the instructions to right click on the new desktop icon and load the drivers. Then I had to try the cable in all 4 directions and the dot and arrow did not line up, but on the 4th direction try it worked to read the ews.

3).
Worked.
When I had that issue, all I had to do was rotate the ak90 connector. 

4).
I went through two AK90+, a K-Line adapter, and multiple laptops while continuously getting a pin no touch error. The only thing that worked for me was scrapping the chip on my spare EWS module like it owed me money (I literally had metal shavings on my desk afterword) and applying moderate pressure to the connector while it read and wrote the chip. Obviously I’m not brave enough to do this again to my stock module, but that was what it took for me.
From what I observed while messing with my EWS modules is that if the connector is incorrectly oriented or not fully seated it will fault with the Pin No Touch almost instantly, however if it’s on correctly but isn’t getting enough pressure it will take a few seconds to fault out. Once I got it not immediately faulting I just kept putting more and more pressure pushing down the connector until it worked.Again, not something I’m comfortable with repeating on my stock module, but that’s what it took to get the spare to work and reprogrammed.


5).
Make sure you have the plug clipped onto the chip the correct way.. this is indicated by lining up the dot on the plug and the dot on the chip.
Worked like a champ. I did have to use version 3.02. I also had to push the connector down on the chip while it read and write. Had to hold the transponder with my fingers. If it says pin no touch make sure the connections are clean (i used a sharp knife) and push down on the connector.


6).
Pull the white shrinking tube from the connector. Look for two PCB tracks that go to the outer pins. They are close to each other. This should be your right “top” and should match the dot of the Chip. Also push the connector all the time onto the chip.
ak90-pin-no-touch-solution-1

ak90-pin-no-touch-solution-2

ak90-pin-no-touch-solution-3

ak90-pin-no-touch-solution-4
7).
Press the adapter onto the chip and keep it pressed. Then read.  Did that for about an hour eventually it worked and keep trying.


8).
I always have this problem. You have to push down chip really really hard, even with both hands.


9).
Put pressure on the clip when reading.


In Sum, 
Press and hold connector (put pressure on the chip) seems to be the method with the highest success rate.

Here’re pictorial guides to help you understand the process better:

2018/10/15

3 Methods to Program BMW EWS4 Key without Soldering

As titled, here obdii365.com introduces 2 methods to program BMW EWS4 (EWS4.3 & EWS4.4 transponder) using BMW EWS-4.3 & 4.4 IC adapter adapter without soldering.
bmw-ews4-immo-box
ews-adapter
The EWS4 IC adapter can be used with R270/R280/Xprog/AK90 etc.

Method 1:
Program EWS4 key with AK90+/AK91 & EWS4 adapter 
Remove EWS4 immo box
Connect EWS4 board to EWS4 adapter and AK90 key programmer
ak90-bmw-ews4-key-1

ak90-bmw-ews4-key-2

ak90-bmw-ews4-key-3
ak90-bmw-ews4-key-4

ak90-bmw-ews4-key-5
Select MCU 2L86D and Read EWS
ak90-bmw-ews4-key-6
Read data success and save data
ak90-bmw-ews4-key-7
ak90-bmw-ews4-key-8
EWS Analyse
ak90-bmw-ews4-key-9
You should be at the main screen with all the numbers and letters on, place your virgin/new key into the slot on the AK90 and select write key
Select the slot and select write key you will get a warning making sure that you have placed key in slot just select yes
After aprox 1-2mins you should see confirmation that the keys data is coded
Put EWS4 unit back to car.


Method 2:
Read dump with R270 & Write key with key programmer
Again remove EWS4 immo box
Connect EWS4 board with EWS4 adapter and R270 BDM programmer
r270-bmw-ews4-key-1
r270-bmw-ews4-key-2

r270-bmw-ews4-key-3
Open R270 in-circuit programmer software
Select correct MCU: 2L86D
r270-bmw-ews4-key-4
Press Read
Software requests to check pin state
Press YES
r270-bmw-ews4-key-5
Pin check and MCU correct
r270-bmw-ews4-key-6
Press Yes and read begins
r270-bmw-ews4-key-7
Save dump file (file containing rolling key codes)
r270-bmw-ews4-key-8
Open your key programmer software, i.e AD-900 pro or other programmer can be loaded dump file
Select EEPROM and upload bin file read by R270
ad900-bmw-ews4-key-1
ad900-bmw-ews4-key-2
Software opens correct module 063 for BMW EWS4
ad900-bmw-ews4-key-3
Key slot 1 to 4 are listed
To avoid manufacturer conflict, select highest available slot 4
ad900-bmw-ews4-key-4
Insert blank 7935 transponder into AD900 and press Program button
ad900-bmw-ews4-key-5
Data is sent to the AD900
Transponder is produced to start vehicle
Then reinstall EWS4 immo box back to vehicle.

Method 3: Program EWS4 with vvdi prog
Read EWS4 EEPROM with VVDI Prog using Xhorse EWS4 adapter
Xhorse ews4 adapter can be used with vvdi-prog only. 
Then program key with VVDI2 BMW key programmer.
Reference blog:
How to make BMW EWS4 key with VVDI Prog & EWS4 adapter