The Mercedes AAM (Alarm and Anti-Theft) module is a critical component that ensures vehicle security. However, over time, the processors in these modules can fail, leading to issues such as random alarm triggers. In this article, we’ll walk through the process of cloning a Mercedes AAM module, focusing on reading the original key coding data and transferring it to a donor module.
Background:
The Mercedes AAM module is prone to failure over time, particularly the processors that store key coding data. In this case, the customer’s vehicle was experiencing random alarm triggers in the middle of the night. The hardware was still functional, but the processor data had become corrupted, causing the alarm to activate unexpectedly.
Tools and Equipment
To address this issue, the following tools were used:
- Xhorse Multi Prog prorammer: A versatile tool for reading and writing processor data.
- XDNP41 Adapter: Specifically designed for the MC68HC705X32 processor.
- Soldering Equipment: Including a heat gun, flux, and soldering iron.
Step 1: Removing and Reading the Original Processor
The first step in the cloning process is to remove the original processor from the AAM module. This is done using a heat gun and flux to ensure the pins are cleanly desoldered. Once removed, the processor is placed on the Xhorse Multi Prog with the XDNP41 adapter to read the original AAM module processor data.
Step 2: Reading the Donor Processor
Next, the donor processor is removed from its module and read using the same setup. This step ensures that the donor processor is functional and ready to receive the original data. The Xhorse Multi Programmer quickly reads the data, providing a clean and accurate copy.
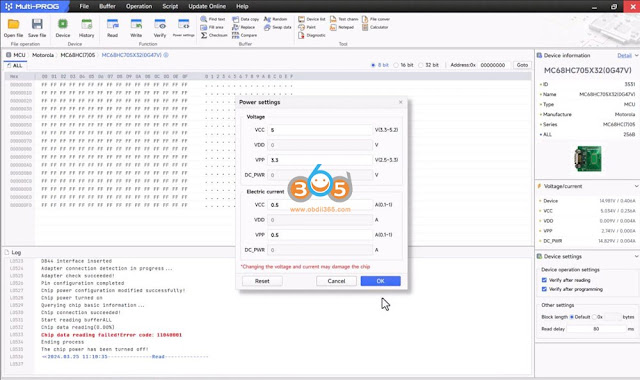
If data is not read, raise the VPP voltage to 3.3v.
Step 3: Writing the Original Data to the Donor Processor
With the original data successfully read, the next step is to write this data to the donor processor. The multiprog makes this process efficient, with fast read and write speeds. The original data is transferred to the donor processor, ensuring that all key coding information is preserved.
Step 4: Verifying the Data
After writing the data, it’s crucial to verify that the transfer was successful. The multi-prog allows for quick verification, ensuring that the donor processor now contains the exact same data as the original. This step confirms that the cloning process was accurate and that the donor processor is ready for installation.
Step 5: Reinstalling the Donor Processor
Once the data has been verified, the donor processor is soldered back into the AAM module. The same care is taken during installation as during removal, ensuring that all connections are secure and that there is no risk of short circuits.
Conclusion
Cloning a Mercedes AAM module is a detailed process that requires precision and the right tools. By using the Xhorse Multi Prog and following the steps outlined above, it’s possible to successfully transfer key coding data from a failing processor to a new one. This ensures that the vehicle’s security system functions correctly, without the risk of random alarm triggers.
For those who may not have the necessary tools or expertise, professional services are available to perform this task. By addressing the issue at the processor level, vehicle owners can restore their AAM module’s functionality and enjoy peace of mind knowing their vehicle is secure.


No comments:
Post a Comment