Showing posts with label xhorse multi prog. Show all posts

2025/08/24

Xhorse Multi Prog Repair Porsche Cayenne 12V Lithium Battery

 How-to: repair Porsche Cayenne / Lamborghini Urus / Audi Q8 12V lithium battery with Xhorse Multi Prog programmer. Multi-prog has built-in algorithms that can directly repair modules.

Fault code DTC P1D6C00 – 12V lithium battery diagnostic system monitoring fault.

Xhorse Multi Prog Repair Porsche Cayenne 12V Lithium Battery 1

Xhorse Multi Prog Repair Porsche Cayenne 12V Lithium Battery 2

This error appears after a critical battery discharge. After the battery is discharged, the BMS module turns on protection.
There are 2 ways to solve the problem: buy a new battery or remove protection in DFLASH.

Repairing the battery is not a difficult task, the most difficult thing is to get to the BMS board.
The battery is located at the feet of the front right passenger.

Xhorse Multi Prog Repair Porsche Cayenne 12V Lithium Battery 3
We take out the battery and take it to the table for repair.
The BMS board is under the top battery cover. The cover is glued and you will have to tinker to remove it. You need to remove the side cover and unscrew the two battery terminals, then carefully remove the top cover.

Xhorse Multi Prog Repair Porsche Cayenne 12V Lithium Battery 4

Xhorse Multi Prog Repair Porsche Cayenne 12V Lithium Battery 5

Xhorse Multi Prog Repair Porsche Cayenne 12V Lithium Battery 6

Xhorse Multi Prog Repair Porsche Cayenne 12V Lithium Battery 8

To remove protection here we use multiprog, but it can be done with another programmer.

Multi Prog pinout to Porsche 12V battery module SPC5644B-ON32E.

Xhorse Multi Prog Repair Porsche Cayenne 12V Lithium Battery 9

Steps:
1) Read and back up DFLASH data.
2) Correct the file (click Renew and Repair)
3) Write it back
4) Before connecting, be sure to charge the battery; if you do not do this, you may get the protection triggered a second time.

Xhorse Multi Prog Repair Porsche Cayenne 12V Lithium Battery 11

Xhorse Multi Prog Repair Porsche Cayenne 12V Lithium Battery 12

2025/08/08

Xhorse Multi Prog Clone Audi A7 Encrypted BCM2 Module

 It’s an Audi A7 equipped with an encrypted BCM2 (Body Control Module 2) module, identified by the 4H0 part number prefix. Modules starting with 4H0 are usually encrypted BCM2 modules。 This BCM2 module contains an MCU chip, the D70F3634, which adds an extra layer of security.

Xhorse Multi Prog Clone Audi A7 Encrypted BCM2 Module 1

Xhorse Multi Prog Clone Audi A7 Encrypted BCM2 Module 2

Xhorse Multi Prog Clone Audi A7 Encrypted BCM2 Module 3

Our engineering team attempted to clone this module using Xhorse MULTI PROG.


Attempt 1: Using Xhorse First-Generation Audi BCM2 Adapter

Install the BCM2 solder free adapter, connect the adapter with multi prog. Also need to connect 12V power supply to the BCM2 green connector.

With the first-gen BCM2 adapter, multi prog read the module’s ID. While the adapter successfully detected the module, it returned an error indicating that the chip was encrypted and could not be decrypted. This confirmed that the older adapter lacked the necessary decryption capabilities and could not clone an encrypted BCM2 module.

Xhorse Multi Prog Clone Audi A7 Encrypted BCM2 Module 4

Xhorse Multi Prog Clone Audi A7 Encrypted BCM2 Module 5

Xhorse Multi Prog Clone Audi A7 Encrypted BCM2 Module 6

Attempt 2: Using Xhorse Second-Generation Audi BCM2 Adapter

Next, we switched to a new second-generation BCM2 adapter. The new BCM2 adapter is easier to install. Don’t need to 12v power supply.


New BCM2 adapter features enhanced functions, including:

  • Encryption/decryption support

  • Full data cloning capability

Using this upgraded tool, we were able to:

  1. Read the module ID successfully.

  2. Read D-Flash and P-Flash data without issues—though reading P-Flash took slightly longer due to its size.

  3. Write the complete cloned data back to a replacement module.

Xhorse Multi Prog Clone Audi A7 Encrypted BCM2 Module 7

Xhorse Multi Prog Clone Audi A7 Encrypted BCM2 Module 8

Xhorse Multi Prog Clone Audi A7 Encrypted BCM2 Module 9

Xhorse Multi Prog Clone Audi A7 Encrypted BCM2 Module 10

The second-generation BCM2 adapter proved effective in cloning the encrypted BCM2 module, overcoming the limitations of the older version. This confirms that with the right tools, even secured modules like the 4H0-series BCM2 with D70F3634 PCU chip can be successfully duplicated.

This breakthrough ensures efficient module replacement and repair processes for Audi A7 vehicles with encrypted control units.

2025/03/31

Xhorse Multi Prog Clone Hyundai SIM2K-242 ECU

 Understanding the Task

Cloning a Hyundai Kia SIM2K-242 ECU, transferring data from an original unit to a donor unit. The ECU in question, identified as a SIM 2K model, integrates both the Powertrain Control Module (PCM) data and transmission data on a single board. Typically, cloning might involve only the ECU chip (in this case, a TC1766 processor), leaving the transmission data untouched if the issue lies solely with the transmission. However, the goal is to transfer the PCM (Powertrain Control Module) data from a donor ECU to an original ECU while preserving the transmission data.
For this clone, only the PCM data is transferred, leaving the transmission data intact. This is useful when the transmission is functioning correctly, but the engine control module needs replacement.

Tools and Preparation
  • Xhorse Multi Prog: Used for reading and writing ECU data.
  • Donor and Original ECUs: The donor ECU provides the data, while the original ECU is the target for cloning.
  • Soldering Equipment: Required for connecting boot mode pins (P1, P2, P3) since the SIM2K-242 lacks a direct boot mode option in Multi-Prog.

Step 1: Back up donor ECU data.
Reading the Donor ECU
The first step was reading the donor ECU.
  1. Select the Correct Protocol:
    SIM 2K 242 lacks boot mode support in MultiProg; the SIM2K-241 model provides the necessary pinout (P1, P2, and P3) for soldering and communication.

    (both share the same MCU/processor). Select SIM2K-242 ECU and use pinout of SIM2K-241.

  2. Boot Mode Connection: Soldering is required to access the boot mode pins (P1, P2, P3) for communication.
  3. Read Process:
    • Connect the donor ECU to Multi-Prog.
    • Read both the internal EEPROM (storing immobilizer data and VIN) and internal flash (storing firmware and VIN).
    • Save the files (e.g., “Donor_PCM”) for later use.
The reading process took approximately 5 minutes and 50 seconds for the flash alone, as reported by MultiProg’s built-in timer. The EEPROM and flash each contain a VIN number, a crucial detail that must be updated during cloning to match the original vehicle.
Xhorse Multi Prog Clone Hyundai SIM2K-242 ECU 1

Xhorse Multi Prog Clone Hyundai SIM2K-242 ECU 2

Xhorse Multi Prog Clone Hyundai SIM2K-242 ECU 3

Xhorse Multi Prog Clone Hyundai SIM2K-242 ECU 4

Xhorse Multi Prog Clone Hyundai SIM2K-242 ECU 5

Xhorse Multi Prog Clone Hyundai SIM2K-242 ECU 6

To locate the VIN, the technician entered specific addresses in the MultiProg hex editor: 1100 for the flash VIN and 7400 for the EEPROM VIN. This revealed the donor ECU’s VIN, ending in “104,” which would later be verified against the cloned unit.
Step 2: Reading the Original ECU
Next, the original ECU was read to capture its EEPROM and flash data. This step ensured that the technician had all the necessary information to overwrite the donor ECU accurately. The process mirrored the donor reading, with the data saved for comparison and writing.
Xhorse Multi Prog Clone Hyundai SIM2K-242 ECU 7
Step 3: Writing the Data
Connect the donor ECU back to the multi prog and initiated the writing process.
  1. Load Donor Files: Open the saved donor EEPROM and flash files in Multi-Prog.
  2. Write to Original ECU:
    • Transfer the EEPROM data first, followed by the flash data.
    • The VIN from the donor will overwrite the original ECU’s VIN, ensuring compatibility.
To ensure accuracy, we can perform a second write, leveraging MultiProg’s comparison feature. This second pass skipped unchanged sections, completing in just 30 seconds for the EEPROM and 56 seconds for the flash—confirming a successful write.
Xhorse Multi Prog Clone Hyundai SIM2K-242 ECU 8
Xhorse Multi Prog Clone Hyundai SIM2K-242 ECU 9
Step 3: Verification
Post-writing, reread the donor ECU’s EEPROM and flash to verify the VIN. Using the same addresses (7400 for EEPROM and 1100 for flash), the VIN ending in “104” was confirmed, matching the original. This step ensured the cloning process preserved the vehicle’s identity and functionality.
  • Perform a second write to confirm data integrity (Multi-Prog skips unchanged sections).
  • Check the VIN locations (addresses 1100 for flash and 7400 for EEPROM) to ensure correct cloning.
Step 4: Testing the Cloned ECU
The final test involved installing the cloned donor ECU into the vehicle. After a brief moment with the security light on, the car started successfully, validating the cloning process. tools like OBDStar DC706 could also read SIM2K-241 ECUs, and the 241 protocol might even work for the 242 model due to shared reading and writing protocols.
Challenges and Observations
Internet connectivity is also critical, as the tool communicates with a server during reading and writing; slow connections can disrupt the process. 
Boot Mode is Crucial: Without soldering the boot pins, communication with the ECU is impossible.

VIN Must Match: Both the EEPROM and flash must have the same VIN to avoid issues.

Conclusion
Cloning an ECU is a meticulous process requiring precision, the right tools, and a deep understanding of automotive electronics. This walkthrough demonstrates how the MultiProg, with its boot mode support and hex editing capabilities, can effectively clone a SIM2K 241 ECU for a Kia Optima or Hyundai Sonata. 


http://blog.obdii365.com/2025/03/31/xhorse-multi-prog-clone-hyundai-kia-sim2k-242-ecu/

2025/03/20

Xhorse Multi Prog Clone GM Delco E78 ECM

 Xhorse multi prog will do GM Delco E38, E37, E39, E39A, E92, E67, E82, E80, E83B, E78 and E98 ECMs on both bench and boot mode.

Jtag (boot mode) will read full backup Delco ECMs. If doing boot mode multiprog will ask for 16-digit password (password from Shadow Flash).

Xhorse Multi Prog Clone GM Delco E78 ECM 1

The importance of the shadow flash (password) has been discovered in the previous post here.

OBDSTAR DC706 Recover GM E78 ECM with Shadow Password

Multi prog will also recover the Delco ECM with the shadow password. Multi prog does not have the option to read shadow flash diretly. But you can still read the password on bench mode.

Here is an example of cloning GM Delco E78 ECM and reading shadow password using multi-prog.

Select ECU- Chevrolet- Cruze- GM Delco E78.

Check wiring diagram.

Xhorse Multi Prog Clone GM Delco E78 ECM 2

Connect ECM with multi prog follow the diagram.

Xhorse Multi Prog Clone GM Delco E78 ECM 3

Read INT flash data of the original ECM.

Xhorse Multi Prog Clone GM Delco E78 ECM 4

Read data successfully. multi prog will give you 16-digit shadow password. This password can be used for boot mode reading.

Record the password and save flash data.

Xhorse Multi Prog Clone GM Delco E78 ECM 5

Disconnect original ECM.

Then connect a donor ECM with multi prog.

Back up flash data of the donor ECM.

Xhorse Multi Prog Clone GM Delco E78 ECM 6

Xhorse Multi Prog Clone GM Delco E78 ECM 7

Write original ECM flash to the donor E78 ECM.

Xhorse Multi Prog Clone GM Delco E78 ECM 8

Write data successfully. Multi prog will give you another 16-digit password for boot mode writing.


FYI:

OBDSTAR DC706/G3 is better on cloning these GM Delco ECMs. It will full backup eeprom, shadow flash and int flash data.

2025/03/18

Xhorse Multi Prog Clone Mercedes AAM Module with XDNP41 Adapter

 The Mercedes AAM (Alarm and Anti-Theft) module is a critical component that ensures vehicle security. However, over time, the processors in these modules can fail, leading to issues such as random alarm triggers. In this article, we’ll walk through the process of cloning a Mercedes AAM module, focusing on reading the original key coding data and transferring it to a donor module.


Background:

The Mercedes AAM module is prone to failure over time, particularly the processors that store key coding data. In this case, the customer’s vehicle was experiencing random alarm triggers in the middle of the night. The hardware was still functional, but the processor data had become corrupted, causing the alarm to activate unexpectedly.


Tools and Equipment

To address this issue, the following tools were used:

  • Xhorse Multi Prog prorammer: A versatile tool for reading and writing processor data.
  • XDNP41 Adapter: Specifically designed for the MC68HC705X32 processor.
  • Soldering Equipment: Including a heat gun, flux, and soldering iron.

Xhorse Multi Prog Clone Mercedes AAM Module  1

Step 1: Removing and Reading the Original Processor

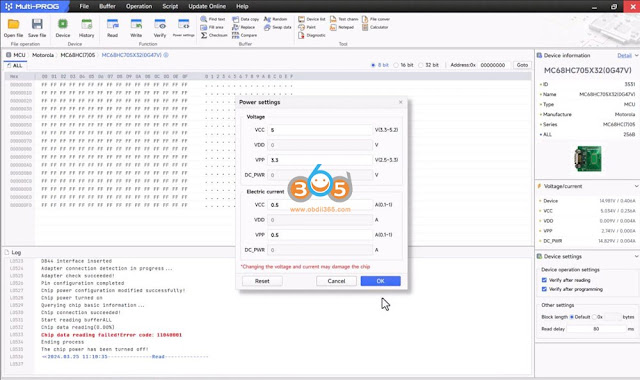
The first step in the cloning process is to remove the original processor from the AAM module. This is done using a heat gun and flux to ensure the pins are cleanly desoldered. Once removed, the processor is placed on the Xhorse Multi Prog with the XDNP41 adapter to read the original AAM module processor data.

Xhorse Multi Prog Clone Mercedes AAM Module  2

Xhorse Multi Prog Clone Mercedes AAM Module  3

Xhorse Multi Prog Clone Mercedes AAM Module  4

Step 2: Reading the Donor Processor

Next, the donor processor is removed from its module and read using the same setup. This step ensures that the donor processor is functional and ready to receive the original data. The Xhorse Multi Programmer quickly reads the data, providing a clean and accurate copy.

If data is not read, raise the VPP voltage to 3.3v.

Xhorse Multi Prog Clone Mercedes AAM Module  5

Xhorse Multi Prog Clone Mercedes AAM Module  6

Step 3: Writing the Original Data to the Donor Processor

With the original data successfully read, the next step is to write this data to the donor processor. The multiprog makes this process efficient, with fast read and write speeds. The original data is transferred to the donor processor, ensuring that all key coding information is preserved.

Xhorse Multi Prog Clone Mercedes AAM Module 7

Step 4: Verifying the Data

After writing the data, it’s crucial to verify that the transfer was successful. The multi-prog allows for quick verification, ensuring that the donor processor now contains the exact same data as the original. This step confirms that the cloning process was accurate and that the donor processor is ready for installation.

Xhorse Multi Prog Clone Mercedes AAM Module 8

Step 5: Reinstalling the Donor Processor

Once the data has been verified, the donor processor is soldered back into the AAM module. The same care is taken during installation as during removal, ensuring that all connections are secure and that there is no risk of short circuits.

Conclusion

Cloning a Mercedes AAM module is a detailed process that requires precision and the right tools. By using the Xhorse Multi Prog and following the steps outlined above, it’s possible to successfully transfer key coding data from a failing processor to a new one. This ensures that the vehicle’s security system functions correctly, without the risk of random alarm triggers.

For those who may not have the necessary tools or expertise, professional services are available to perform this task. By addressing the issue at the processor level, vehicle owners can restore their AAM module’s functionality and enjoy peace of mind knowing their vehicle is secure.


www.obdii365.com

2025/03/16

Xhorse Multi Prog Write VIN to Hyundai Used SIM2K-341 ECU

 How-to guide: Program a Junkyard Engine Computer: Writing a VIN to a Used Hyundai/Kia SIM2K-341 ECU.


When it comes to replacing or reprogramming an Engine Control Unit (ECU) in a vehicle, one of the most critical steps is ensuring that the Vehicle Identification Number (VIN) is correctly programmed into the used or junkyard ECU. This process is essential for the vehicle to function properly and for the ECU to communicate effectively with other systems in the car. In this article, we’ll walk you through the steps of programming a VIN into a used ECU Hyundai SIM2K-341.

Xhorse Multi Prog Write VIN to Hyundai Used SIM2K-341 ECU  1

Tools You’ll Need:

  1. Abrites or similar tool: Used to power the ECU and read the VIN before and after programming.
  2. Xhorse Multi Prog: A device that connects to the ECU and allows you to read and write data.
  3. Godiag GT100 breakout box: Used to power the ECU to read the VIN before and after programming.
  4. HxD (Hex Editor): A software tool used to edit the binary data in the ECU file.

NOTE: PCMFlash can read this PCM without opening, for some reason it cannot write a changed file.multi prog is fine.

Step-by-Step Guide to Programming a VIN into a Used ECU


Step 1: Power Up the ECU and Read the Existing VIN

  1. Connect the Godiag GT100: Start by connecting the Godiag to the ECU to provide power. This allows you to read the existing VIN stored in the ECU.
  2. Read the VIN: Using the diagnostic tool (in this case, the Abitus software), read the VIN from the ECU. This VIN (KM8JUCAC1AU033811) will likely be from the donor vehicle (the junkyard car). Make sure the ignition is on while reading the VIN.

Xhorse Multi Prog Write VIN to Hyundai Used SIM2K-341 ECU  2

Step 2: Connect the Multi prog to the ECU

  1. Refer to the Pinout Diagram: The Multiprog tool requires a specific pinout to connect to the ECU. Ensure you have the correct pinout diagram for your vehicle’s ECU.
  2. Connect the Multiprog: Once you’ve identified the correct pins, connect the Multi-prog to the ECU using the appropriate connectors.

Xhorse Multi Prog Write VIN to Hyundai Used SIM2K-341 ECU  3

Xhorse Multi Prog Write VIN to Hyundai Used SIM2K-341 ECU  4

Step 3: Read the ECU Data

  1. Read the ECU File: Using the Multi prog, read the data from the ECU. This process may take a few moments as the tool buffers and reads the data.
  2. Save the File: Once the data is read, save the file to your computer. In this example, the file is saved as “Hyundai_read_multi_channel_47.”

Xhorse Multi Prog Write VIN to Hyundai Used SIM2K-341 ECU  5

Xhorse Multi Prog Write VIN to Hyundai Used SIM2K-341 ECU  6

Step 4: Edit the VIN in the ECU File

  1. Open the File in HxD: Load the saved file into the HxD hex editor. This software allows you to view and edit the binary data in the ECU file.
  2. Locate the VIN: Search for the existing VIN in the file. In this case, the VIN was identified as “811.”
  3. Replace the VIN: Use the “search and replace” function in HxD to replace the old VIN with the new VIN that the customer needs. In this example, the new VIN is “ KM8JUCAC8AU031523.”
  4. Save the Edited File: Once the VIN has been replaced, save the file with a new name, such as “523_VIN.”

Xhorse Multi Prog Write VIN to Hyundai Used SIM2K-341 ECU  7

Xhorse Multi Prog Write VIN to Hyundai Used SIM2K-341 ECU  8

Xhorse Multi Prog Write VIN to Hyundai Used SIM2K-341 ECU  9

Step 5: Write the New VIN to the ECU

  1. Open the Edited File in Multi prog: Load the newly saved file (e.g., “523_VIN”) into the Multi prog software.
  2. Write the VIN to the ECU: Use the Multi prog to write the edited file back to the ECU. This process will overwrite the old VIN with the new one.

Xhorse Multi Prog Write VIN to Hyundai Used SIM2K-341 ECU  10

Xhorse Multi Prog Write VIN to Hyundai Used SIM2K-341 ECU  11

Step 6: Verify the VIN Change

  1. Disconnect the Multi prog: Once the writing process is complete, disconnect the Multi prog from the ECU.
  2. Read the VIN Again: Use the Abitus software to read the VIN from the ECU once more. Confirm that the VIN has been successfully changed to the desired number (in this case, “523”).
  3. Verify Vehicle Details: Ensure that the ECU now recognizes the correct vehicle details, such as the make, model, and market (e.g., “Pixon 2010 US market”).

Xhorse Multi Prog Write VIN to Hyundai Used SIM2K-341 ECU  12

Conclusion

Programming a VIN into a used or junkyard ECU is a detailed process that requires the right tools and careful attention to detail. By following the steps outlined above, you can successfully reprogram a used SIM2K-341 PCM/ECU to match the VIN of the vehicle it’s being installed in. This process is especially useful when dealing with older vehicles or when a dealership is unable to perform the task.


www.obdii365.com