2020/12/30

Corvette C5 BCM Programming with Tech2, Tech2win or Autel

 The powertrain control module (PCM) in your vehicle is the main computer controlling its various operating systems. For example, the PCM controls the engine, the transmission, the fuel system, and the speedometer. If the vehicle isn’t performing the way it should, the PCM can be reprogrammed to increase performance. Recalls are another reason your PCM may need to be reprogrammed. Since Chevrolet is a subsidiary of General Motors (GM), GM tools and software (i.e Tech2,Tech2win, Autel J2534 MaxiFlash passthrough device ) are used to reprogram a Chevrolet PCM.


  1. Corvette C5 BCM Programming Guide

Question: I will replace my 2000 Convertible’s BCM with a remain unit. Can you guys enlighten me on what the reprogramming process actually is and who can do it?


Reply: There is no tune for the BCM(Body Control Module) , only RPO configuration of these RPO’s. C5 BCM programming can be done by most bi-directional scanners like GM Tech2,Tech2win , Autel 

Corvette C5 BCM Programming  1


Or any decent shop and not just a Dealership should be able to program a module…


Step 1. Browse GM’s calibration look-up website, and type in your vehicle’s VIN number to check for any programming updates to your PCM. If there are updates, you are supposed  to purchase GM’s techline information system (TIS) programming software and service.


Step 2. Boot your computer and connect the scan tool (Tech2 or Autel) into it and your Chevrolet car with the pass-through cable. Start the scan tool and load the TIS programming software from GM on your computer.


Step 3. Select the “Service Programming System” option on the main screen of your TIS software on your computer. Then you will see “Select Diagnostic Tool and Programming Process” window.


Step 4. Select the “Pass-Thru” option under diagnostic tool, “Reprogram ECU” under select programming process, and “Vehicle” under ECU location. Click on “Next” button in the lower-right hand section of the window to proceed.


Step 5. Type the VIN number in the VIN text box in the “Determine Vehicle” window, and click on “Apply” next to the text box. This will fill in your vehicle’s data in the boxes below. Click on“Next” button to proceed.


Step 6. Go through the checklist in the “Preparing for Communication” window, and click on “Next” to confirm your VIN number whether is it correct. Click on “Next” in the bottom-right corner.


Step 7. Select the “PCM/VCM” under the “Select Controller” of the next window. Select “Normal” under programming type and click on the “Next” button.


Step 8. Select the newest calibrations for each system in the “Calibration Selection” window by clicking on each system’s tab, and putting a check mark next to the highest number of calibration. Click the “Next” button in the bottom-right corner of the window after every tab has a green check mark on it.


Step 9. Click “Next” at the summary screen after verifying your recalibrations. If all of your calibrations are up-to-date, an error will appear indicating there is nothing to reprogram. If they are not up-to-date, a transfer window will open and the program will begin to download and reprogram your PCM with the calibrations you selected.

Click the “Close” button on the “Programming Complete” window after the reprogramming is complete. You can turn off your scan tool and remove it from your vehicle.


  1. 99 Corvette BCM Programming Guide

I have a 99 corvette with tech2win running on my laptop. I was wondering it is worth to subscribe to this service for 2 years for $40. What could I do with this?


Reply:

I guess you have a VXDIAG VCX NANO with your Tech2win .
I was not able to use my Tech2win as pass through so I had to use my Autel J2534 MaxiFlash passthrough device together with my laptop to be able program my PCM.

Corvette C5 BCM Programming 2


Corvette C5 BCM Programming 3


Here are some related articles:

How to use GM Tech2 with TIS2000 to do PCM programming? 

How to + What for Chevrolet Malibu 2017 PCM Programming?

2020/12/28

How to use Audi A6L Q7 J518 Simulator?

 What is Audi A6L Q7 J518 Simulator (8E chip) with VVDI Pro MC9S12 Reflash Cable? 

– Audi A6L Q7 J518 Simulator (8E chip) is a universal solution, it can replace 3 types of MCU Mask: 1L59W, 3L40K, OL01Y directly.
-There is no electric motor in the simulator package, it comes with VVDI Pro MC9S12 Reflash Cable.

-It will completely solves the problem that the direction lock is easy to break.

use-audi-j518-simulator-1

use-audi-j518-simulator-2

use-audi-j518-simulator-3

How to use AUDI C6 Q7 A6 J518 ELV Emulator?

write in the dump form original J518 Module with the VVDI PROG dedicated line directly, No need solder wire.


Please use Xhorse VVDI PROG to read out the EEPROM data from the original J518 Module, and then write into this Simulator. If it is 128 type data, please send to obdii365.com engineer for modification.

This is wiring diagram.

use-audi-j518-simulator-4

use-audi-j518-simulator-5

Enjoy!


www.obdii365.com

2020/12/23

Free Download JLR SDD V160 Software Patch, Driver for Mangoose Pro

 Newest version SDD V160 has been verified working with JLR Mangoose interface perfectly on Windows 10 system. Obdii365.com provides JLR SDD software and patch download for free.


Software version: SDD V160

Language: Chinese, Dutch, French, English, Italian, German, Japanese, Korean, Portuguese, Russian, Spanish

Operating system: Windows 7, Windows 10

Compatible interface: JLR mangoose cable (SP116), JLR Mangoose Pro cable (SP205-B , SP205-C)


Free Download JLR SDD V160

http://diagnosticdelivery.jlrext.com/idscentral

(Download SDD  160_FULL only)

Free Download JLR SDD V160 Patch

https://mega.nz/#F!zBpSFarJ!phCGoR3RGYqOHYQa9kVBIw

Free Download mangoose pro JLR driver

http://drewtech.com/downloads/index.html


JLR SDD 160 Installation Guide:


Tested on Windows 10 64bit


Step 1: Install SDD 160 Setup

Create a new SDD 160 folder on desktop
Copy and paste all files from software CD or download links to SDD 160 folder

install-jlr-mamgoose-sdd-v160-1


Run SDD 160.00_FULL setup

install-jlr-mamgoose-sdd-v160-2


Select setup Language

install-jlr-mamgoose-sdd-v160-3


Press Next to install SDD setup
Accept license agreement and firewall compatibility

Choose destination folder C:/Program Files (x86)/JLR

install-jlr-mamgoose-sdd-v160-4


Select All Language to install

install-jlr-mamgoose-sdd-v160-5


Press Install

install-jlr-mamgoose-sdd-v160-6


Install JLRMeasureApplication until succeeded

install-jlr-mamgoose-sdd-v160-7


Complete installing HV Safety Installer

install-jlr-mamgoose-sdd-v160-8


Install MOXA UPort setup

Choose destination folder C:/Program Files/Moxa/USBDriver

install-jlr-mamgoose-sdd-v160-9


Press Install until finished
SDD is configuration new software installation

install-jlr-mamgoose-sdd-v160-10


SDD V160 setup installed completed
Restart computer now.


Step 2: Install JLR Driver

Open JLR Driver folder

install-jlr-mamgoose-sdd-v160-11


Install J2534 MangoosePro driver for 64bit system
Accept license agreement
Press Next

install-jlr-mamgoose-sdd-v160-12


Click Install

install-jlr-mamgoose-sdd-v160-13


Finish Install J2534 jlr mangosoe Pro JLR driver


Step 3: Install SDD Patch

Extract JLR SDD Patch folder to SDD 160 folder
Install JLR SDD-2020 patch

install-jlr-mamgoose-sdd-v160-14


Select Offline version to install
Open SDD notepad on patch folder

install-jlr-mamgoose-sdd-v160-15


SDD notepad contains login user name and password

install-jlr-mamgoose-sdd-v160-16


Run JLR SDD software on desktop
SDD will require to enter user name and password

install-jlr-mamgoose-sdd-v160-17


Copy and paste user name and password from SDD notepad
Press Identify
User authentication successful

Go to Settings to select software language and save

install-jlr-mamgoose-sdd-v160-18


Quit software.


Step 4: Connect mangoose cable and run software

Connect mangoose or pro cable with computer

install-jlr-mamgoose-sdd-v160-19


Go to Device Manger to check interface is well connected
Run JLR SDD software

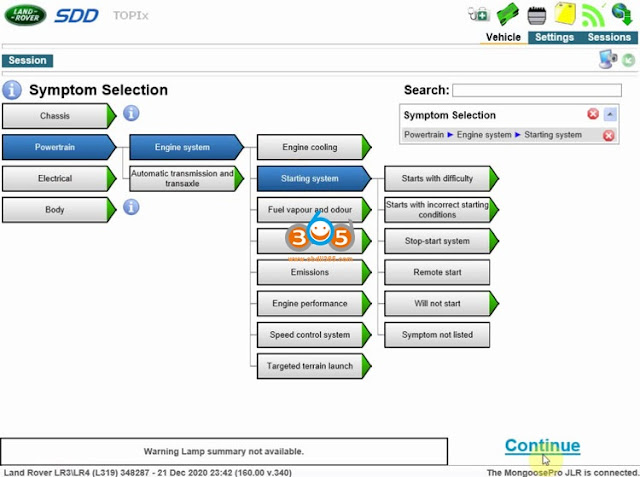
SDD will tell you MangoosePro JLR is connected

Read VIN

install-jlr-mamgoose-sdd-v160-20


Start diagnosis

install-jlr-mamgoose-sdd-v160-21

install-jlr-mamgoose-sdd-v160-22


www.obdii365.com

 http://blog.obdii365.com/2020/12/23/free-download-and-install-jlr-mangoose-sdd-v160/

2020/12/21

Vident Scan Tools Update GM up to 2020 2021

 Breaking news! Vident diagnostic & service reset tools (iLink400 / 410/440/450, iAuto 702Pro/700/701/710/730) free update 2021 & 2020 GM car (Chevrolet, GMC, Buick, Cadillac etc). What it can do is to read codes, erase codes, live data, read ECU info, active test, special functions.


FYI, the supported function may differ from one car model to another. Please refer to this Function list:

https://www.obdii365.com/upload/pro/20122016085321217877.xlsx

GM 2021 -2009 : Confirmed.


Applicable Vident devices:

-iLink400 (Full-system all-function diagnosis and service reset tool)

-iLink410 (Universal service reset tool, incl. ABS and SRS System Diagnosis, OBD II Diagnosis, ABS and SRS bi-directional test, ABS Bleeding, SRS Reset, Steering Angle Sensor Calibration, EPB.)

-iLink440 ( 4 system diagnosis for all makes worldwide.)

-iLink450 (Full Service reset Tool, EPB, Oil Service, ABS&SRS reset, Battery Configuration, Steering Angle Sensor Calibration, DPF regeneration and Throttle body alignment etc)


iAuto702Pro (Multi-Application Service Tool)

iAuto700 (Professional All System Scan Tool

iAuto 701, iAuto 710, iAuto 730 etc.


Seeing is believing:

We take Vident ilink400 GM scanner for example, select “Diagnosis” , then “Manual selection”, you will see there are option : 2021, 2020 … to 2009.

vident-ilink400-gm-update-2021-1

vident-ilink400-gm-update-2021-2


Firstly enter 2021 and have option: Chevrolet, GMC;

vident-ilink400-gm-update-2021-3


Then enter 2020 and have option: Buick, Cadillac, Chevrolet, GMC, Ravon.

vident-ilink400-gm-update-2021-4


Vident ilink400 gm scanner will access to a bunch of control systems, here are some examples:

vident-ilink400-gm-update-2021-5


Enjoy!


www.obdii365.com

2020/12/17

Yanhua Mini ACDP BMW DME Interface Board List

 Yanhua Mini ACDP key programmer is the best solution of BMW DME ISN reading & writing. It covers a wide range of BMW DME models, and it is the safest and most reliable. ISN code  is required when making BMW all keys lost.


To read /write BMW ISN code with Mini ACDP, you will need one extra #03_ISN Module, look at #03_ISN Module Feature:

1: Read ISN codes of N20/N55/N13 by OBD or without opening the DME shell.

2: Read ISN code of MSV70/MSV80/MSD80 without opening the DME shell.

3:Read ISN code of other models (B38, etc.) by opening the shell.

4:Read ISN code of MSV90/B48 by OBD. (Need to buy interface board)

5:Read & Write ISN code on Bench. Support full versions of N13/N20/N63/S63/N55/B38 etc.( Need to buy Bench interface board)

yanhua-acdp-dme-list-1


Image 1: Mini ACDP BMW DME ISN function menu.

yanhua-acdp-dme-list-2


Alright, for the details, please read the following tables.

Table 1: Yanhua Mini ACDP Bench Mode read & write BMW Exx / Fxx / Gxx / Rxx / Ixx ISN.

Bench Mode read & write BMW Exx / Fxx / Gxx / Rxx / Ixx ISN.

Interface   board typePictureExxFxxGxxRxxIxx
N20 Bench interface board N20(MEVD172P)N13(MEVD1725)
N20(MEVD1724)N20(MEVD172P)
N20(MEVD1729)N20(MEVD1724)
N20(MEVD1729)
N26(MEVD1729)
N63(MEVD172H)
N63(MEVD1728)
S63(MEVD172H)
S63(MEVD1728)
N55 Bench interface board N55(MEVD172)N55(MEVD172)
N55(MEVD172G)
N55(MEVD1726)
S55(MEVD172G)
B38 Bench interface board B38(MEVD172K)B38(MEVD172K)B38(MEVD172K)
B38(MEVD1723)B38(MEVD1723)B38(MEVD1723)
B48(MEVD172K)B48(MEVD172K)
B48(MEVD1723)B48(MEVD1723)
XM71(MEVD172K)
XM71(MEVD1723)
B48/B58 Bench Interface Board B37(MD1CS001)B46(MG1CS201)B37(MD1CS001)
B38(MD1CS001)B47(MD1CP002)B48(MG1CS201)
B48(MG1CS003)B47(MD1CS001)
B48(MG1CS201)B48(MG1CS003)
B58(MG1CS003)B48(MG1CS201)
B57(MD1CP002)
B58(MG1CS003)
B58(MG1CS201)
N63(MG1CS201)
N74(MG1CS003)
N74(MG1CS201)
BMW-DME-ADAPTER X1 N47(ECD17C50)B37(ECD17C50)B37(ECD17C50)
B47(EDC17C50)B47(ECD17C50)
B47(EDC17CP49)N47(EDC17C50)
N47(ECD17C50)
N47(ECD17C76)
N57(ECD17C76)
N57(ECD17C56)
N57(ECD17CP49)
BMW-DME-ADAPTER X2 N47(ECD17C41)N47(ECD17C41)N47(ECD17C41)
N57(ECD17CP45)N47(ECD17CP45)
N57(ECD17CP45)
BMW-DME-ADAPTER   X3 BMSX(ME172)
BMW-DME-ADAPTER X4 N12(MEV172)
N14(MED172)
BMW-DME-ADAPTER X5 N47(ECD17C06)
N47(ECD17CP02)
BMW-DME-ADAPTER   X7 N57(ECD17CP09)N57(ECD17CP09)
BMW-DME-ADAPTER X8 N45(ME1721)
N46(MEV1721)

This article is not yet finished. Yanhua engineer is working hard to write up the left BMW ISN reading writing lists:

OBD / CAN Mode read /write ISN

Open DME shell to read / write ISN

Read B38 ISN by opening DME shell

OBD read B48 DME ISN (Support F Chassis)

Please wait patiently.


This is the method to read BMW ISN with ACDP:

The BENCH method is preferred ; if not, please read / write ISN in the wiring method; If both Bench mode and wiring method are not okay, punch to read / write.


Finally, for the above interface board you need, just search at www.obdii365.com