In the case of BMW E-chassis sedans, the CAS removal is relatively easy, so you can safely make a key by soldering on a bench after removing it. However, the problem is that the CAS removal of an E-chassis MINI is an extreme vehicle maintenance task, so it is not easy. Also, in the case of older BMW SUVs such as the X5 and X6, most of the CAS information read with a scanner is a high version such as CAS3++ ISTAP. In this case, especially in the case of the MINI, if you work with OBD, the OBD programmer will request a downgrade, and during this process, the vehicle may become bricked, causing the existing key to not start. This is mainly a brick and communication failure phenomenon for high version 9389115 and others. Depending on the vehicle, it may be recovered through OBD, but it often fails. In that case, you need to use the CAS module on the bench to recover the lost data. This is because only then can you start the car normally again! CAS ID 9287535 is also applicable.
The problem with these E-chassis Mini Coopers is that the location of the chassis is so difficult and confusing that you’re always in a dilemma of whether to remove it and then make a key. So you end up either not doing it or taking a risk.
The CAS IDs for the higher-end vehicles mentioned above were mostly CAS3++ ISTAP 9389115 or 9287535 in the photo below. Working on these vehicles via OBD is always nerve-wracking and nerve-wracking. These vehicles aren’t something you master with a few tries; it feels the same every time, so it’s definitely not an easy task.
This version is also high. When making a key for such a vehicle, if you work on it using the OBD inside the car, the Xhorse VVDI Key Tool Plus or other devices will explain the precautions and work process.

The downgrade takes about 10 minutes, and they warn you to be careful. And the second suggestion suggests backing up your CAS data beforehand if you have time. <– This seems obvious, but the problem is always that you don’t want to do it.

We wait patiently for the 10-minute downgrade process, but there’s nothing we can do during this time. We can only humbly pray inwardly. Only after the downgrade has successfully completed the 2/2 stage will the key room open and we can begin making keys. Success doesn’t guarantee success the next time. Vehicle conditions are always variable, and scanners aren’t omnipotent, so they can’t be 100% reliable.

But if the downgrade fails in the middle for some reason like in the picture… it’s fortunate if you can resolve this situation even if it’s annoying, but if you can’t resolve it, hell will open. The engine won’t start, and even the original key that worked fine won’t start.

After that, you won’t be able to communicate with the vehicle. Something went wrong. This is usually when the car module becomes bricked. Bricking means that the once-moving car is now a giant, immobile block of brick.
Previously normal vehicle information has now disappeared, and the VIN has also disappeared. All that remains is to repair the CAS module. Of course, if the CAS is physically damaged, repairing it is meaningless. In that case, the CAS module must be replaced. This post focuses on cases where the CAS has become a brick due to software issues.


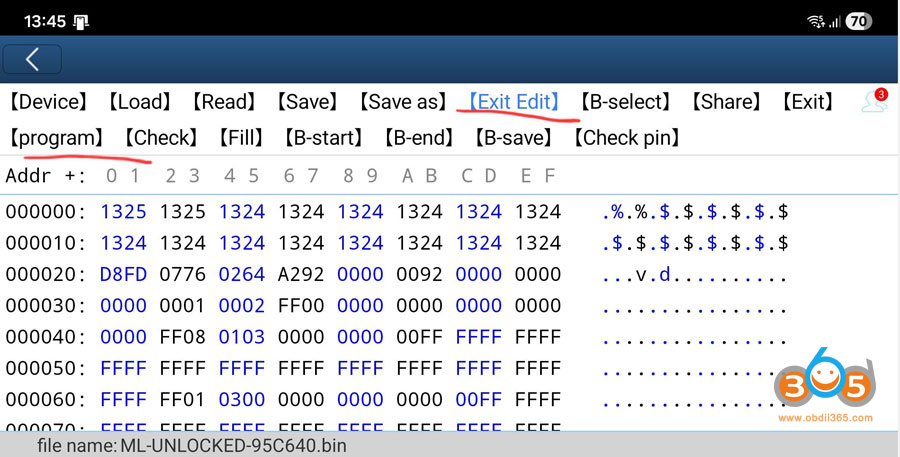
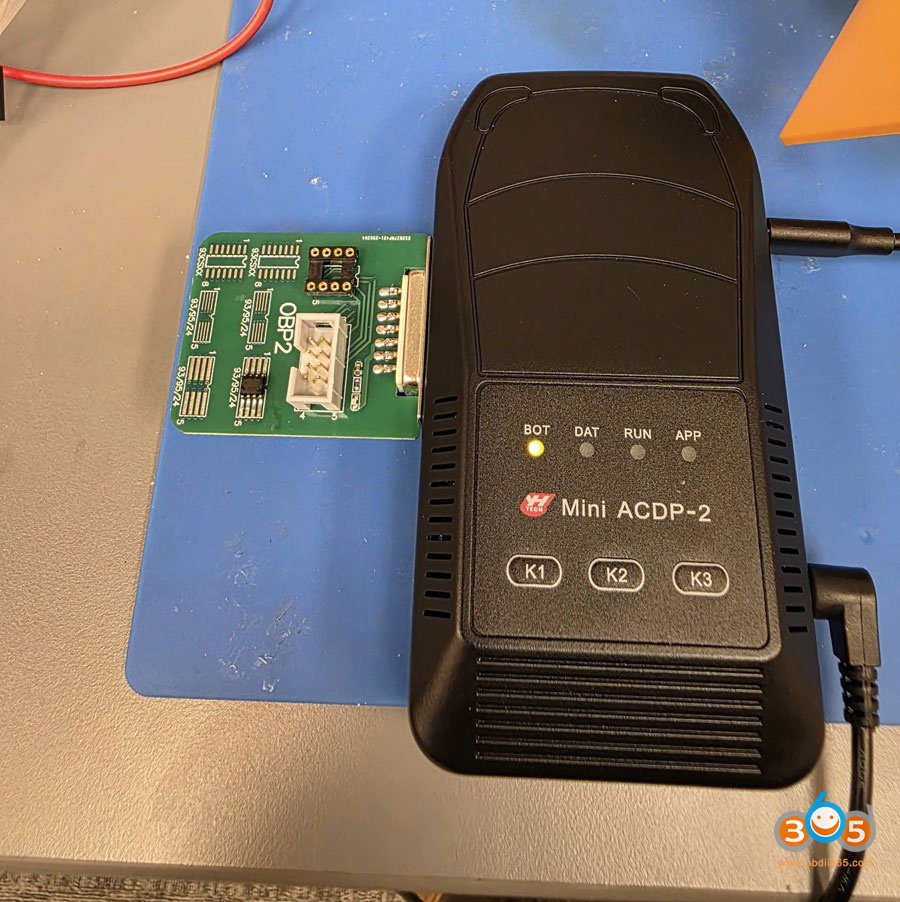
Now, after soldering to the CAS, the data that has been blown away and deformed is recovered.
The basic principle is to use the deformed dump data in the CAS to read it with a Hextag programmer, connect to the server, and recover the broken data. Here too, recovery may vary depending on the scanner. There are ways to recover the data that take a little longer and ways that are a little faster. Of course, sometimes it may be possible with OBD, but recovery is performed with BDM.

After the recovery is complete and the new data is loaded, the car is restored to its original state and communication with the Xhorse Key Tool Plus is attempted again.

The photo shows after the car was restored and communicated with the scanner. It displays normal vehicle information, identical to the pre-downgrade state. The restoration process is always subject to change, making it challenging.
Now, you can choose a key position and add keys. If there are only two keys registered, you can assume that no keys have been added since the car was shipped.

In this state, if you register a new key in the desired key position, you can then use that key to start the vehicle. This article briefly explains the recovery process for a BMW Mini Cooper E-chassis vehicle that had its CAS module bricked during an OBD downgrade, rendering the vehicle powerless.


