2022/07/10

How to Improve AK90+ to Solve PIN No Touch?

 The AK90+ is a clever tool, but that tether cable has problems that result in “pin no touch” messages. You can follow the solution here to fix this problem. If you are reasonably handy & can solder, you can have it reliable in about an hour.

This is a how-to improve your AK90+ key programmer?

Here’s How You Fix It:

0.) Order 2 of this socket [Part Number 2057-PLCC-52-AT-NO about $6.50 US from digikey (#2 is in case you screw up ..you know you do).
1.) Chop the socket from the end of the cable with scissors. keep as much cable length as you can
2.) Salvage the white shrink wrap intact if you can. Its useful later. Stretch it as little as possible.
3.) Compare the 2 known cable pattern photos below & pick the matching socket pin-out.
4,) Carefully separate the wires for about 1 inch

Either blue or green will appear on your solder map. Don’t strip the un-used B or G, we’ll need that as a strain relief.
trim down 50% length from the unused pins. I folded mine over being careful not to touch. It gets them out of the way of the wires and stopper
Strip all other wires 1/4 in & twist the wires in each then tin.

>>> Don’t forget to thread the white shrink <<<<<

Solder the wires in place. I used needle nose to make a ‘U” around each pin. I alternated pins across the socket to keep the wires from bending to the breaking point.

Once about half the wires are soldered, use a little “Shoe goo” from Walmart or similar to anchor the unused “Strain relief” wire (blue for me) to the middle of the socket. adjust its length to relieve tension on the wires, solder the remainder.

Almost done! You can shrink the white plastic back down on the socket .. but don’t melt the socket! a tiny amount (use toothpick) of Shoe-goo is a fine alternative.
finally cut your white shrink a bit under 1/8th all the way around the socket. Use a new razor blade straight-on to keep it consistent. the shrink cuts easily. So do your fingies.

Now we need to add a little handle, because you still have to jockey the socket in place and we need to relieve strain on the wires too.
If you live in the USA go to Ace Hardware , go to the parts bins and select the 50 cent black rubber cork. That’s the one that fits well. Use a little shoe goo from Walmart
or silicone rubber to secure the cork reasonable deep into the shrink. If you don’t have Ace where you live you are on your own.

If you aren’t used to cable building, seek out original post with more detailed instructions or contact me; if I’ve time I’ll make a cable for you .. you’ll pay for parts (about 10.00)
(your AK90+ will work every time).

Finally Mark the flat corner on the shrink with a sharpy. Always line it up with the flat corner of the chip. When you insert the socket it should be more of a “slide in from a side” then finesse the other sides down a little. The socket I specified has much springier pins so if you are gentle it will work almost every time.
Dont forget to remove any red coating on the processor pins. You can use alcohol, acetone on a qtip, or a thin nail file if you must .. but wipe it with a q-tip if you do that.

OK now you’ve got the con .. over and out.

Read this addendum

A recent cable issue was discovered by the fanatic known as “sideways”.

variant of the OEM AK90+ cable wire color key has been foundFor those who have the variant, my “how-to” pin out map would be incorrect.

Before you make the changes you must chose the soldering schema matching YOUR AK90+ cable.

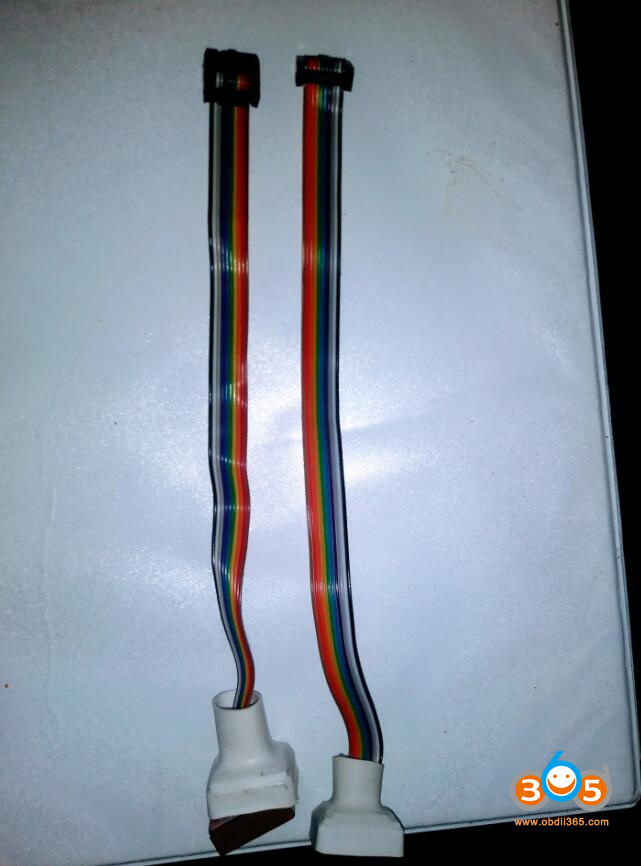
Here is a side by side of both possible cables. Plug the connector into the AK90, then determine if the left-most wire is brown or black. Then step down and pick the schema that matches your cable. IMPORTANT: my soldering schemas are shown as if the socket is sitting on top of the EWS Chip.

If you’ll be building a cable, scan the photos & drawings, then skip t the bottom for a few pointers .

Improve AK90+ to Solve PIN No Touch 1


Use this solder plan if your cable matches the photo on the left. (Left wire of the cable is Black (when plugged into the AK90)

Improve AK90+ to Solve PIN No Touch 2

Use this solder plan if your cable matches the photo on the right. (Left wire of ribbon is Brown when plugged into the AK90) .

Improve AK90+ to Solve PIN No Touch 3

Addendum:
The processor pin-out below is only for those who are curious & want to know the purpose of each processor pins connected to the cable. You can make a working cable without looking at it.

Improve AK90+ to Solve PIN No Touch 4
http://blog.obdii365.com/2022/07/09/modify-ak90-key-programmer-to-make-it-reliable/

2022/07/07

Free Download Orange5 Super Pro V1.35 Full Software

 The 2022 new Orange5 Super Pro v1.35 adds airbag and dash modules in the USB dongle and much more mcus. Here obdii365.com provides v1.35 software download free.

Check: Orange5 super pro vs Orange5 plus clone


Free Download Orange5 Super Pro V1.35 Software
https://mega.nz/file/6c4nBQJb#StikKVtqZ0ucFEP1WqDkCOlKeI5PwbD7ZslH70rt3ZQ


How to Install Orange5 Super Pro V1.35 Driver &Software?

Connect Orange 5 super pro device with PC via USB cable and insert USB dongle to PC

install Orange5 Super Pro V1.35 Full Software 1

Open Orange5 Super Pro software folder on the desktop
Run Orange setup as Administrator

Orange5 Super Pro V1.35 Full Software 2

Orange5 Super Pro V1.35 Full Software 3

If Orange5 says USB device not found which means the device drive is not installed
Go to Computer Management- Device Manager- Ports
Update USB Serial Device (COM5) driver

Orange5 Super Pro V1.35 Full Software 4

Choose Browse my computer for driver software
Select driver location depends on your system

C:/Users/Administrator/Desktop/orange5_SUPER PRO/Driver/X64 or X32

Orange5 Super Pro V1.35 Full Software 5

Orange5 Super Pro V1.35 Full Software 6

Windows has finished installing the drivers for this device.

Orange5 Super Pro V1.35 Full Software 7

Orange5 Super Pro V1.35 Full Software 8

Run Orange software as Administrator again

The Orange 5 super pro software is ready to use. Connect chip you desire to read and start your job.

Orange5 Super Pro V1.35 Full Software 9

2022/07/06

VOCOM II Mini WiFi Setting and Firmware Update

 Original ACTIA VOCOM II Mini WiFi dongle covers all the functions of the VOCOM2 88890400, which doesn’t need any cable accessories because it can be connected to the laptop via WIFI perfectly.

Here are the instructions on WiFi setting and firmware upgrade.
vocom ii mini

1). How to Connect VOCOM2 Mini via WiFi?
  1. Power on the vocom2 dongle and the lights will be flashing. Find the WIFI signal Vocom2D_******* from the laptop. Click connect.
  2. Input “v2d+ SN num”, SN number is 7 digits which you can find it from the back of the VOCOM2 dongle. Then click OK. And done.
Connect VOCOM2 Mini via WiFi 1

Connect VOCOM2 Mini via WiFi 2

2). How to Update Vocom II Mini Firmware via WiFi?

Make sure that the vocom2 dongle is powered up by 24V ECU or truck. Low voltage will affect the firmware update.

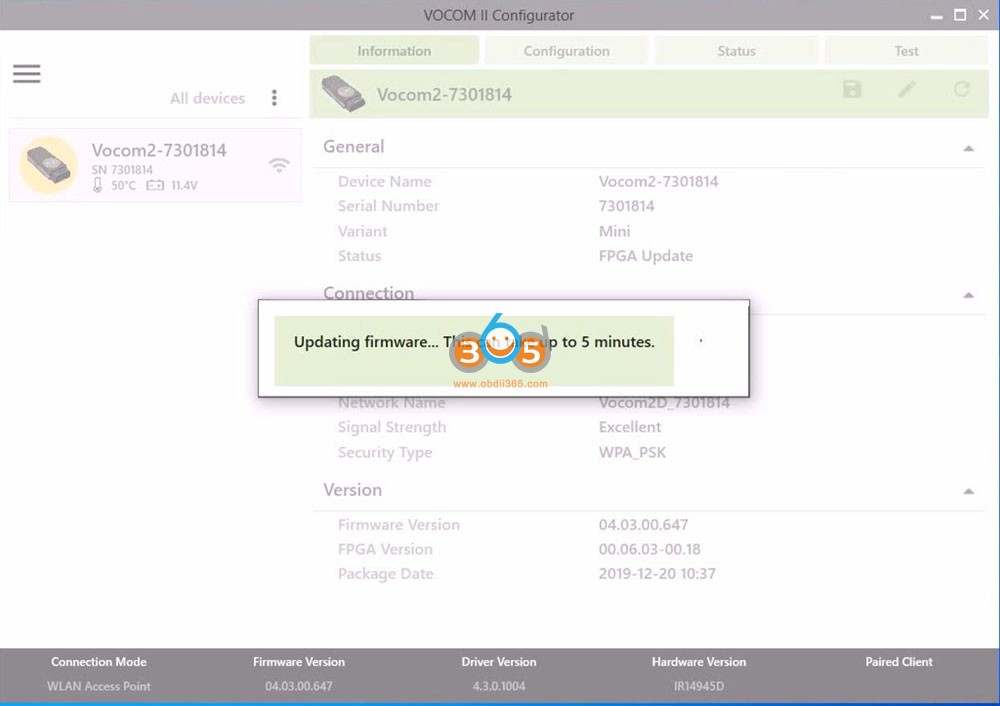
  1. After connecting with WiFi, go to All Programs and then click VOCOM II Configurator.
Update Vocom II Mini Firmware 1

2. You will see the windows as below. And Click the setting icon as the pictures bellow.
Update Vocom II Mini Firmware 2

3. Then choose ‘Advanced’- ‘Update Device Firmware’
Update Vocom II Mini Firmware 3

4. You will see the windows as below. And Click the upload icon as in the pictures below. And wait until it is finished.


Update Vocom II Mini Firmware 4

Update Vocom II Mini Firmware 5

Update Vocom II Mini Firmware 6

Update Vocom II Mini Firmware 7


It will run the Volvo TECH TOOL automatically when the firmware update is finished.

Yanhua Mini ACDP Clone Mercedes 9G-Tronic Gearbox

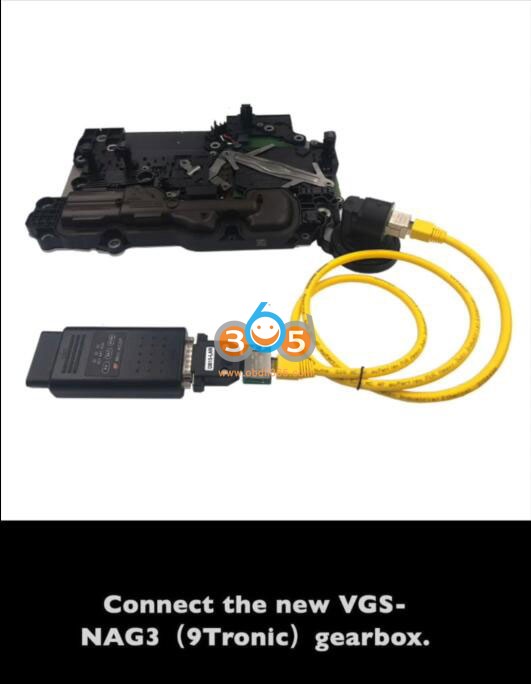
 The 9G-TRONIC automatic transmission from Mercedes-Benz is the world’s first automatic transmission to feature a hydrodynamic torque converter. With Yanhua Mini ACDP and Module 19, we are able to clone the 9G TronicVGS NAG3 gearbox using the interface board without soldering.


Procedure goes below:


Step 1: Install Interface Board

In VGA NAG3 9G Tronic function menu, ACDP will show you how to connect the interface board with ACDP and gearbox

Yanhua Mini ACDP Clone Mercedes 9G-Tronic Gearbox 1

Follow instructions guide to make connection

Yanhua Mini ACDP Clone Mercedes 9G-Tronic Gearbox 2

Yanhua Mini ACDP Clone Mercedes 9G-Tronic Gearbox 3

Yanhua Mini ACDP Clone Mercedes 9G-Tronic Gearbox 4

Yanhua Mini ACDP Clone Mercedes 9G-Tronic Gearbox 5

Yanhua Mini ACDP Clone Mercedes 9G-Tronic Gearbox 5

Install the interface board
Short circuit the CAN resistor on the DB15-LAN adapter to the CAN-R side
Connect interface board with ACDP mini host and connect power adapter


Step 2: Read full data

Run Mini ACDP app
Go to Benz function- Gearbox clone/reflash- C Class- VGS_NAG3 (9GTronic)

Yanhua Mini ACDP Clone Mercedes 9G-Tronic Gearbox 7

Select Full Backup Data

Yanhua Mini ACDP Clone Mercedes 9G-Tronic Gearbox 8

Make sure that the ACDP device is connected to the gearbox
Record the Boot version and Bosch part number
These two numbers of the new gearbox need to be the same as the original one
Make a screenshot to save the system information as well
Press Continue to reading chip data

Yanhua Mini ACDP Clone Mercedes 9G-Tronic Gearbox 9

Save data
Backup chip data finished


Step 3: Write data

Yanhua Mini ACDP Clone Mercedes 9G-Tronic Gearbox 10


Connect new VGA NAG3 9G Tronic gearbox with ACDP interface board
select Full Write Data

Yanhua Mini ACDP Clone Mercedes 9G-Tronic Gearbox 11

check if the two numbers of the new gearbox need to be the same as the original one
Make a screenshot to save the system information

Yanhua Mini ACDP Clone Mercedes 9G-Tronic Gearbox 12

Select chip data file
choose the chip data file that saved in the previous step

Write data finished.

Yanhua Mini ACDP Clone Mercedes 9G-Tronic Gearbox 13

9GTronic transmission gearbox cloning is done. Install new gearbox back to vehicle and test.

http://blog.obdii365.com/2022/07/05/clone-mercedes-9g-tronic-gearbox-by-yanhua-mini-acdp/

Orange5 Super Pro vs Orange5 Clone

 What’s the difference between the new Orange5 Super Pro and Orange5 plus v1.35 clone?


Orange5 Super Pro vs Orange5 Clone 1

Orange5 Super Pro vs Orange5 Clone 2

Table Comparison:

ItemOrange5 Super ProOrange5 Plus


Software versionV1.35V1.36 and orange 5 super pro v1.35 full function.
Software LanguageEnglish, RussianEnglish, Russian
USB DongleNoYes, Dongle use to 08-airbag and 09-dashboard modules
Software licenseMTRK (Included in Orange-5 base)

TMS (Included in Orange-5 base)

M08V NEW

Immo HPX 9V0

NEC V850ES/SJ3 V850ES/SG3  UART

NEC V850E2

MTRK (Included in Orange-5 base)

TMS (Included in Orange-5 base)

M08V NEW

Immo HPX 9V0

NEC V850ES/SJ3 V850ES/SG3  UART

NEC V850E2 NEW

New license:

MCU ( InfineonST and MicroChip)

Renesas: H8SXHD64FV850 UARTV850 SPIRH850 V3RL78

Special_05

AIRBAG

Dash

Fujitsu

F-DASH Tractor

EEPROM

A/B/C/D/E modules

Infineon MCU9 brands21  brands
ST MCU136140
Microchip MCU318361
Renesas10 types17 types, H8SX, HD64F, V850 UART, V850 SPI, RH850 V3, RL78 with license
Airbag4 car brands70 brands, 2020 database with wiring diagram, Help menu
Dashboard4 car brands,97 brands, 2020 database incl cars, motorcycles, ATVs, scooters,tractors

Scripts comparison:

Super pro supports more scripts and Wiring diagrams,v1.36 just about 60MB, but super pro is 2GB.

Orange5 Super Pro vs Orange5 Clone 3

PCB Comparison:

Orange 5 Super Pro uses high-quality ACTIA board SmartFusion2 chip.

The orange 5 uses regular board and chip.

Orange5 Super Pro pcb 1

Orange5 Super Pro pcb 2


Function Comparison:

The differences between orange 5 super pro and orange 5 plus:

We have more chip models than others in Infineon, ST and MicroChip of MCU, as shown in the figures:

Orange5 Super Pro vs Orange5 Clone 3

2-MCU, SUPER PRO has 11 models more than orange 5 plus
Orange5 Super Pro vs Orange5 Clone 4

Adds 4 ST MCU models
Orange5 Super Pro vs Orange5 Clone 5

Adds 30 Microchip mcu models
Renesas: Orange 5 Super Pro has more licenses for H8SX, HD64F, V850 UART, V850 SPI, RH850 V3, RL78 than others
Orange5 Super Pro vs Orange5 Clone 6

Orange5 Super Pro vs Orange5 Clone 7

Orange5 plus: Although there are Renesas 14 models,But only the 10 modules in the red frame can work
Orange5 super pro: Our 17 models have activated the license and can be used normally, more than others, such as H8SX, V850 UART, V850 SPI, RH850, etc.
Special_05:We guarantee that everything displayed can be used, no fake stuff, so we will not show this module option in the file we send to customers.

orange 5 plus has these button,but there are no licenses. it can’t work!
AIRBAG:
Orange 5 Super Pro has 2020 database, 70 car brands, mostly with help files  (wiring diagrams, etc.)
Orange5 Super Pro vs Orange5 Clone 8

Dash: 2020 database, 70 car brands, including cars, trucks, motorcycles, snowmobiles, tractors, construction machinery, etc., and most of them have help files such as wiring diagrams

Orange5 Super Pro vs Orange5 Clone 9

Fujitsu: We have this module, but other products do not have this module
Orange5 Super Pro vs Orange5 Clone 10

We have 61-Fujitsu series,MB90 series,91/95/96 series DASHBOARD ECT.Others has no these modules. 

2022/07/05

Lishi HU66 Single Lifter vs HU66 V3 Twin Lifter

 Question:

There are two lishi for HU66- HU66 Gen 1&2 and HU66 V3.
I don’t understand difference. Which is better?
Lishi HU66 Single Lifter vs HU66 V3 Twin Lifter 1

Answer:

The obvious difference of course is one got two lifers and the other only gets one lifter.
The major difference is how you read them after you pick them.
Basically with the single lifter when you pick it you’re going to be reading it in the opposite direction that you picked it.

So say you pick space number one going this way when you actually go to read the lock you’ll be reading it the opposite direction.

and most of the Lishi is going to have a little black arrow pointing up and down right here that this applies to so you know you got to read the opposite the way you picked it

Lishi HU66 Single Lifter vs HU66 V3 Twin Lifter 2

But now basically that’s going to be the main difference here with the twin lifter when you pick it you read it the same way you pick.

For example you know if were to pick position one going up then you would also read it up.

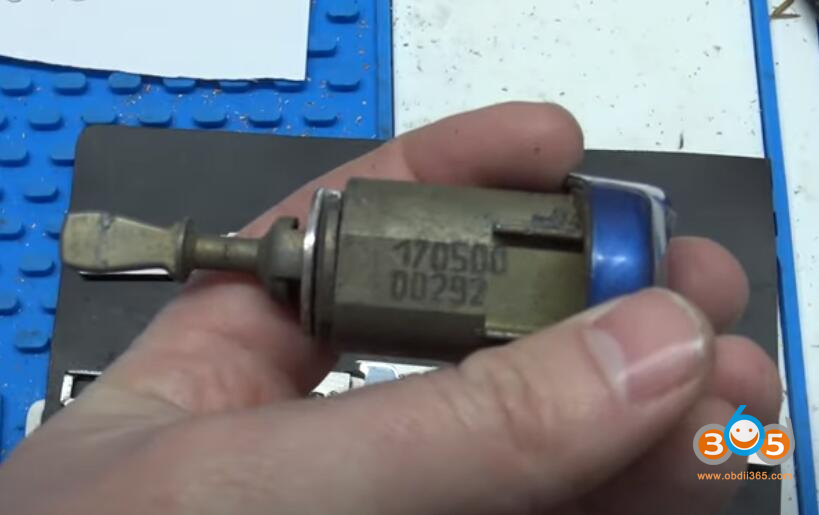
It’s not opposite and the lock we’re going to be using for this is off of VW beetle and it has a code on the lock the code is right there 0292

Lishi HU66 Single Lifter vs HU66 V3 Twin Lifter 3

and ran that through a program here and i’ve got the bidding on it which is 13223243

Lishi HU66 Single Lifter vs HU66 V3 Twin Lifter 4

and i cut a key on my xhorse dolphin ii for it.


Which one is better?

Single arm is easier to pick with but twin arm gives a better read once picked.  Twin arm is not hard to pick with.
I would recommend getting the twin lifter is better and decides the same direction.

Read also:
http://www.key-programmer.org/2017/12/06/pick-decode-hu66-vag-lock-with-lishi-2-in-1/