2023/09/15

How to Get Nissan Sentra 28-Digit Pin Code?

 Where to get 28-digit pin code for 2018+ Nissan Sentra & Sylphy B18 chassis smart key?

Here is the clue.


1. Bypass Method (Program Key without PIN Code):


Add key:


If Add key, both Lonsdor and OBDSTAR 40 Pin cable will bypass the pin code.


Lonsdor Nissan 40 PIN cable coverage (Add key)

Nissan Rogue T33 2021-
Nissan Pathfinder 2021-
Nissan Sylphy B18 2021-
Mitsubishi Outlander 2021-

Nissan New Sylphy B18 2021-

Nissan New X-trail T33 2021-

The function requires Nissan AKL license activated.

Lonsdor Nissan 40 PIN cable

OBDSTAR Nissan 40 PIN cable coverage (Add key)

Nissan Rogue T33 2021-
Nissan Pathfinder 2021-
Mitsubishi Outlander 2021-

Nissan Sentra B18 2021.08-

OBDSTAR Nissan 40 PIN cable

Compatible with x300 dp plus and x300 pro4


All Keys Lost

If all keys lost, Lonsdor only does New Sylphy B18 2021- and New X-trail T33 2021- all keys lost bypass pin code. For Sentra 2021 B18 chassis AKL, still need to get password from 3rd party.

OBDSTAR does program Nissan Sentra B18 2021.08- all keys lost bypass pin code.


Autel and other devices will not bypass B18 pin code. IM608 will add key and do all keys lost, but cannot read pin code just references a third party.


2. 3rd Party Resource

Contact this guy on facebook. He provides Nissan 20digit, 28-digit pin code calculation.

3rd Party Resource

We are not affiliated with this guy. Contact with caution.


3. Extract PIN code with Tool

For example: 2021 Nissan Sentra (28 Digit) Pin Extraction with Abrites- RH850/V850 Programmer


 Method 3 seems like a complicated task. So not recommended.


2023/09/12

Top Tools to Read and Write Simos 12.1

 What tools to read immo data from Audi Continental Simos 12.1 ECU with engine CJEB?

audi simos 12.1 ecu

Here we list top tools to read and write Simos 12.1 ECU.


1. Kess v2/Kess v3

original kess v2 and kess v3 will read this ECU by OBD (virtual read) and bench.

kess v2 5.017 clone can OBD write, you just need correct file.

kess v2 audi simos 12.1 ecu 1

kess v2 audi simos 12.1 ecu 2

2. Flex: read and write via OBD or bench

OBD mode:

Audi Continental Simos 12.1 OBD: Virtual Read/Write/Checksum Maps, Write Update (FRF/ODX, including flash counter correction)
Audi Continental Simos 12.2 OBD: Virtual Read/Write/Checksum Maps, Write Update (FRF/ODX, including flash counter correction)
Volkswagen (VW) Continental Simos 12.1 OBD: Virtual Read/Write/Checksum Maps, Write Update (FRF/ODX, including flash counter correction)
Volkswagen (VW) Continental Simos 12.2 OBD: Virtual Read/Write/Checksum Maps, Write Update (FRF/ODX, including flash counter correction)
Seat Continental Simos 12.1 OBD: Virtual Read/Write/Checksum Maps, Write Update (FRF/ODX, including flash counter correction)
Seat Continental Simos 12.2 OBD: Virtual Read/Write/Checksum Maps, Write Update (FRF/ODX, including flash counter correction)


Bench mode:

flex audi simos 12.1 ecu 1

3.Hexprog: OBD and Boot mode

Hexprog supports the following methods for Simos 12.1:
Factory Mode (On Bench): You Don’t need to open your Simos 12.1.
Boot Mode: You need to open Simos 12.1.
OBD Mode: Tuning/Modification can be done without dismounting Simos 12.1 from the vehicle.


4. Foxflash: Boot Mode ok

Foxflash cannot read it via obd, no vr file on server. The engineer team is working on it.

You can read and write it boot mode.

Here is the Foxflash Simos 12 boot mode instruction:

SIEMENS SIMOS 12 [ TC1797 INT.F.] – VW, Audi, Seat, Skoda

Below is the procedure to read the password (Step 1) and to set the control unit in the boot to read and write the file (step 2)

1).Password Search

Kit to use:
– Multifunction cable
– Bench Box
– 3 resistores 1000 Ω

Connect with the multifunction cable the following pinout and the connections on the pcb.
Use the driver:
→ TOOLS BOOT MODE
→ INFINEON TRICORE Password
→ PASSWORD SIMOS 12 BENCH BOX
→ Click on “Find Password”

foxflash audi simos 12.1 ecu 1

foxflash audi simos 12.1 ecu 2

Now that the password has been found it’s possible to read and write the control unit. See next step.

2) Read and Write ECU

Connect with the multifunction cable the pinout. (Attention: Now remove the bench box)
Do the connection shown below.
Use the driver:
→ TOOLS BOOT MODE
→ INFINEON TRICORE Boot
→ SAK TC1797

foxflash audi simos 12.1 ecu 3

foxflash audi simos 12.1 ecu 4

5. PCMFlash

original Module 57 Supports

1.8L TSI (SIMOS12.1/SIMOS12.2)
2.0L TSI (SIMOS12.1/SIMOS12.2)
Virtual reading, writing, checksum correction.

*pcmtuner module 57 cannot read Simos 12 via OBD virtual reading.


6. Magpro2 X17

Supports Audi Continental Simos 12.1 & Simos 12.2 Backup/Restore protocol via OBD.


7. Dimsport: Boot mode OK

dimsport audi simos 12.1 ecu 1

8. Autotuner: OBD and Boot OK

Supports Continental Simos 12 & Simos 18 : OBD virtual reading.

It also read and write in boot mode for

  • Simos 12.1 : VAG 1.8/2.0 TSI
  • Simos 12.2 : VAG 1.8/2.0 TSI
http://blog.obdii365.com/2023/09/12/read-audi-simos-12-1-by-kess-v2-flex-or-foxflash/

How to Run Wireless Display with Autel Scanners?

 How to run a wireless display with your Autel diagnostic scanner tablet like this? How to cast screens from Autel scanners?

Run Wireless Display with Autel Scanners 1

How to enable wireless display:

Way 1:

It’s a pre installed app on the device. If your tablet (for example MK908 II, MK908 PRO II, MS908S II, MS908S Pro II etc) does not have Teamviewer, google search teamviewer from your scanner go to the google play store and download the app. Then go to your computer and download the desktop version of the app and log in. It will mirror your display wirelessly.


Just plug the laptop into the monitor and download TeamViewer. You can use a mouse to navigate the scanner so you will never need to touch the screen again. Honestly a great feature autel offers on their newer scanners.


Use pre-install Teamviewer. (on Autel it shows Remote Desk and icon may vary in models)

Run Wireless Display with Autel Scanners 2

Run Wireless Display with Autel Scanners 3

In short:

1) Go to computer or phone

2)Download the desktop/mobile version of Teamviewer

3) Login in

4) Control Autel Scanners on monitor or phone

Run Wireless Display with Autel Scanners 4

Here is a detailed guide on controlling Autel Scanners (i.e MK808) on mobile phone (cast screen on phone).

Search “teamviewer” APP from Google Play or APP Store on your Android/IOS smartphone, and install it.

Run Wireless Display with Autel Scanners 5

Go to “Remote Desk” on Autel MaxiCOM MK808.

Run Wireless Display with Autel Scanners 6

Make sure the tablet has an internet connection.

If you’re on the road or whatever you can use your hotspot on your phone as long as the person has the Autel MK808 tablet with a hotspot (the regular 4g).
Enter TeamViewer APP and input the corresponding ID of your MK808 manually, and then tap “REMOTE CONTROL”.

Run Wireless Display with Autel Scanners 7

Allow remote support and wait for the connection.

Run Wireless Display with Autel Scanners 8

When the connection is completed, it will show “QuickSupport app has been minimized, Screen sharing active.”
At the same time, read the instruction on cell phone “Zoom is used to change the viewed portion of the remote device screen. Touches and all possible gestures are executed on the remote device.” After that, click “GOT IT”.

Run Wireless Display with Autel Scanners 9

Now what you can see on the smartphone screen is same as on the tablet.

Run Wireless Display with Autel Scanners 10

Then you can do service function, diagnostics and any other functions MaxiCOM MK808 supported.

Run Wireless Display with Autel Scanners 11


Way 2:

You can also use a Wireless display adapter.

Update on casting screens from Autel scanners. I was able to get it to work but needed to buy a Microsoft wireless display adapter as the Autel will not work on Chrome cast. It now works with my Ultra, ms906ts and mx808.
Just plugged the adapter into TV HDMI port and USB. Then go to Autel scanner settings select display then cast and it works.  It’s because that interface just takes an HDMI feed and then casts it.

Made a completely stand alone rechargeable diagnostic cart with wireless hdmi video transmitters.


2023/09/10

How to Program Jaguar XJ 1999 Key with JLR SDD?

 Here comes an old Jaguar XJ key programming review using clone JLR Mangoose sdd cable.


“I’ve had my 1999 X308 for 17 years, and have avoided any help with service, and have kept her sorted with just a generic scanner.

I successfully loaded V125 and then went in search of a cable. My car is a 1999 XJ8. I tried the Ford “VCM” cable, no joy.
Then I bought a Mangoose from OBDII365.com for $40. Took a couple of weeks to get here (UK).

jlr mangoose sdd cable

As shown, it comes with some pretty authentic-looking Mongoose badges, and comes with a DVD with drivers and a copy of V164. I stuck with V125, and the LED’s in the Mangoose change from flashing red to green when connected to the laptop.

Program Jaguar XJ 1999 Key with JLR SDD 1

In fact, as shown, the SDD recognizes the cable as a MongoosePro JLR.
Also, in the SDD “System Information”, it records Mongoose Pro JLR as the Gateway Device.
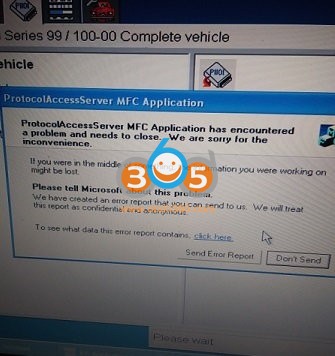
So, my car, being a 1999 X308, SDD takes me to IDS. And from there, when prompted to check trouble codes, it freezes:
Program Jaguar XJ 1999 Key with JLR SDD 2
A little further searching of the program freeze problem…Others using IDS for the first time have had this occur when trying to read codes.

I tried several tricks to fix the protocolaccessserver error, like setting the XP firewall “Off”, and reinstalling V125 and the Mongoose msi. No joy.

I found and installed IDS_DVD130_FULL with these other programs (the SDD V130 worked without these other programs, but I figured the other programs weren’t just included for “cocktail chatter”, so I added those too):
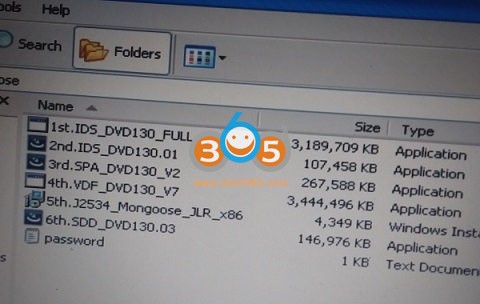
Program Jaguar XJ 1999 Key with JLR SDD 3
No small task to find, download and install these 8Gb total-size files.

Success!!!

Program Jaguar XJ 1999 Key with JLR SDD 4
This is a screen shot of V130 IDS reading trouble codes (DTC) on a Second scan… Note the blue bar at the bottom with “Please Wait”. So, this screen shot shows both the reading process and the result from the previous scan.

Five of the 6 systems were successfully read. (Note, Climate Control Module had an error, and was never able to be read– not an issue, at least, not for me…)

The 3 DTC’s shown in the screen shot were: P1000, and two other old DTC’s (Mfg specific) that a generic scanner will not clear, but were cleared in IDS! Who knew??? After 17 year of ownership, my vehicle is DTC-free, maybe for the first time!!!


Now, Let’s get down to the key programming part.

I have one working key for my 1999 XJ8 (VIN: SAJHD1049XC878441). I’ve only had one key for 17 years, but a few years back, I got a key cut, but never got ‘round to programming.

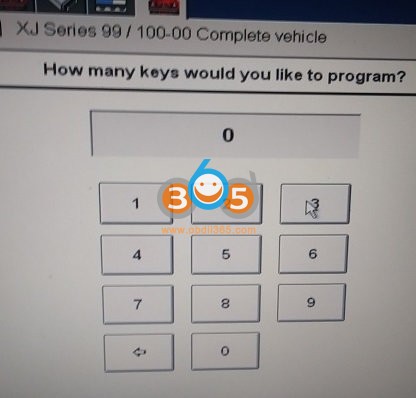
So now, I have SDD V130 and Mongoose cable. I’m a newbie with SDD, but I’ve successfully read the trouble codes (and cleared them), and found the Security setting for Transponder Programming.


Final Report:

My total cost for a DIY additional key was under $100, including key blank, cutting, and setting up SDD V130 and JLR Mongoose cable (laptop not included).

Meganos ID13 is correct for 1997-1999 vehicles, and Meganos ID48 is for 2000 up. My VIN shows it’s one of the last 1999 made at VIN 878441.

So, for completeness, here’s the procedure to program the key(s) when you have the cut key and the proper transponder (along with ALL old and new keys):

*From version 137, SDD cannot do offline programming. So stuck on older version if need to program keys.

Go to the tab in SDD (arrowed) and the highlighted section:

Program Jaguar XJ 1999 Key with JLR SDD 5

That will take you to Security:

Program Jaguar XJ 1999 Key with JLR SDD 6

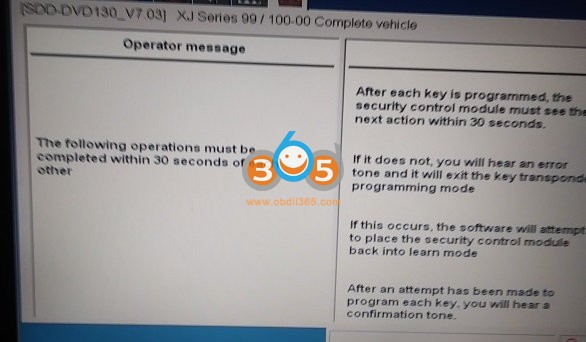
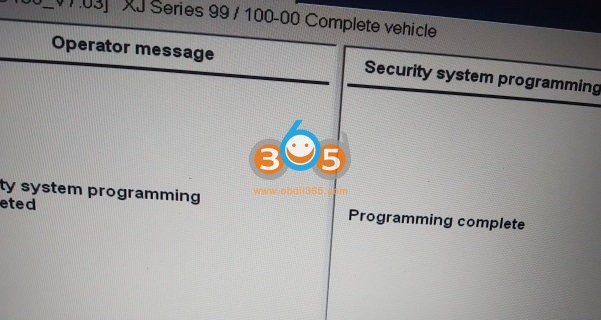
And, IDS will take you through the rest:

Program Jaguar XJ 1999 Key with JLR SDD 7

Program Jaguar XJ 1999 Key with JLR SDD 8

Program Jaguar XJ 1999 Key with JLR SDD 9

Program Jaguar XJ 1999 Key with JLR SDD 10
Many thanks to all contributors for this guide, and we hope this post can help others, benefits us all.


http://blog.obdii365.com/2023/09/10/program-jaguar-xj-1999-key-with-jlr-mangoose-sdd/

2023/09/06

How to Transfer Yanhua ACDP 1 License to ACDP 2?

 Is it possible to transfer installed modules for acdp 1 to a new yanhua acdp 2 unit?


Yes, users can transfer old modules to new ACDP 2.

How to Transfer Modules:

Plan A- License transfers
Transfer all license from ACDP-1 to ACDP-2 and delete ACDP-1
(ACDP-1 cannot be used any more)
$69

Plan B Shared license
Share all ACDP-1 license with ACDP-2
After license sharing, both ACDP-1 and ACDP-2 can use the shared license at the same time.

Cost will be 35% of the total amount of shared module official price.

Send ACDP-1 SN to obdii365.com to check license price.

Transfer Yanhua ACDP 1 License to ACDP 2 1


ACDP2 Module 181925 and 30 have different interface board, you need to purchase corresponding new modules separately for ACDP 2.


If don’t want to buy new modules, just make a little modification on the adapter of old modules.

cut off the protruding plastic and part on old interface board like image below

Transfer Yanhua ACDP 1 License to ACDP 2 2

FYI:

Yanhua tech has modified ACDP2 BMW program, BMW bench interface boards are compatible with ACDP2 now.

They are modifying the module 15 App, so it will be soon compatible with ACDP2. Don’t need to purchase a new module 15.


Read also:

How to Connect Yanhua Mini ACDP2 via USB?

2023/09/04

VVDI MB vs CGDI MB vs Autel IM608 vs AVDI

 Are you interested in buying a tool for Mercedes Key programming? Which Tool is easy to work? New update, support and more cars?

VVDI MB vs CGDI MB vs Autel IM608 vs AVDI

Here is a brief review of some common MB key programmers: Xhorse VVDI MB, CGDI MB, Autel IM508/IM608 and AVDI.


VVDI MB ($849) is probably the best of the ‘low cost’ tools. You can buy adapters and such to make the connections fast and easy, it’s reliable the only issue is the token system, it’s a pay per use model, however most come with 1 free token per day for a year.

VVDI Key tool plus ($2,095) is more expensive but you get a fairly well featured key programming tool for other purposes, and is standalone with no laptop required.

CGDI MB ($579) offers 1 free use per day in perpetuity, however you must be more familiar with how these cars work and be confident in wiring up the EZS manually. It also appears to generate the key EEPROM or write the keys poorly at times, especially with early cars you’ll have a key working but the dashboard will say key is calculating.

Autel im608 with G-Box ($2,579) offers good coverage but it can be really, really finicky for password extraction. No usage limits, however you’ll need to keep your update sub current for the online service required for generating keys and extracting passwords.

AVDI has excellent coverage, and doesn’t require you know the system quite as well as some of the others. But it’s expensive and the error handling if the internet drops during extraction is frankly terrible (it’ll sit there spinning it’s wheels forever if it drops at the wrong time). The manuals can be a bit useless though, especially for wiring diagrams.


CGDI MB vs VVDI MB which is better?

Much the same coverage, VVDI MB expects you to have a VVDI prog or use their accessory cables(or make your own) to get the data by IR. CGDI comes with a little bunch of wires that you connect according to the provided schematics for password extraction, can work from programmer dumps as well.

VVDI uses a token system or a yearly sub for password extraction, but you get free tokens if you use their keys. CGDI membership comes with 1 free password per day for the lifetime of the unit, they sell tokens as well but are very cheap.

VVDI writes keys fine, CGDI I find writes keys poorly at times, especially on 202/208/210 vehicles.

Neither one offers Gateway emulation for 209/211/169/245 vehicles, Poldiag and Autel offer that function which means you don’t need to wire up a gateway with the EZS on the bench. Neither VVDI nor CGDI are really designed to work in the car for AKL(though they can but not well), that’s a AVDI/Autel function.

Some people generally use the CGDI for getting the password, then read the car with Xhore VVDI, input the read password and write keys with VVDI. When writing replacement ESLs or EZSes some will usually do that on the bench with CGDI, the octopus of wires is far easier to do than finding the right adapter for what you’re working on.


In Sum:

Some solutions are more streamlined for certain cars than others, some are quicker than others at certain cars. And you’ll need to get an appropriate programmer such as smok/vvdiprog etc if you want to be playing in this space anyway because occasionally it’s 100% necessary to go back to the old way and get a dump out of a EZS. You need to decide on the mercedes coverage you need and your realistic budget and fit a tool to your needs and hopes.

2023/08/29

Yanhua ACDP Add Key 2020 Land rover Velar by OBD

 Problem:

2020 Velar, U.S car. Looking to add a key. Looks like an older style key. Could this be a Yanhua Mini ACDP module 9 car or module 24 with the replacement of RFA module?  we tried 608 but it failed via obd. I think the error was “failed to gain security access”.

Yanhua ACDP Add Key 2020 Land rover Velar by OBD

Solution:

2020 velar is old kvm. People have done spares with pathfinder and AKL jobs with pathfinder kvm out on bench. Allegedly the 608 can spares without ID clone (which sucks, don’t use it) .

If use YANHUA ACDP use module 9.

This car almost every tool can do easy job, some tools can program by OBD no need to remove KVM depending what tool you are using.