2018/01/11

Ktag bench flashing ECU from Citroen C5 2008

This is IAW 6LPB Magneti Marelli Bench Flashing with a Ktag master ecu programmer in Boot Mode.

Citroen C5 bench flashing – STF10280 boot mode
ktag-read-Marelli-IAW-6LP-1
Disassemble the ECU
ktag-read-Marelli-IAW-6LP-2
ktag-read-Marelli-IAW-6LP-3
ktag-read-Marelli-IAW-6LP-4
ktag-read-Marelli-IAW-6LP-5
ktag-read-Marelli-IAW-6LP-6
Select the model
ktag-read-Marelli-IAW-6LP-7
Manufacturer: Citroen
Model: C5 (II)
Version: 2000 16v
Type: RFJ (EW10A)
KW: 103
HP: 140
Fuel: Petrol
MY: 2008
ECU: Magneti Marelli IAW 6LP
Mode: BOOT ST
FAM: 45
CHK: √
RO: √
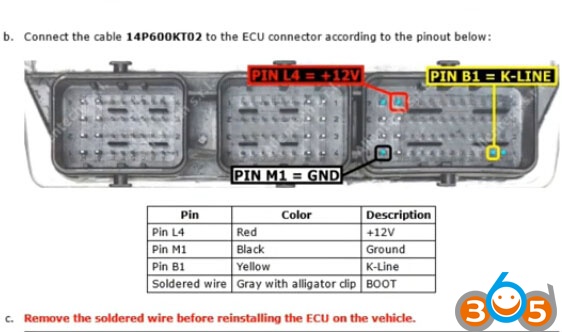
Connection instruction
ktag-read-Marelli-IAW-6LP-8
ktag-read-Marelli-IAW-6LP-9
ktag-read-Marelli-IAW-6LP-10
ktag-read-Marelli-IAW-6LP-11
ktag-read-Marelli-IAW-6LP-12
ktag-read-Marelli-IAW-6LP-13
So, the connection mode of Magneti Marelli IAW 6LPB is like what displayed in the Galletto Manual Type B, but use KTag BOOT PIN connection
ktag-read-Marelli-IAW-6LP-14
ktag-read-Marelli-IAW-6LP-15
ktag-read-Marelli-IAW-6LP-16
ktag-read-Marelli-IAW-6LP-17
Connected to CAN High and CAN Low, but CAN protocol not woek
Connect ed through K Line
ktag-read-Marelli-IAW-6LP-18
ktag-read-Marelli-IAW-6LP-19
ktag-read-Marelli-IAW-6LP-20
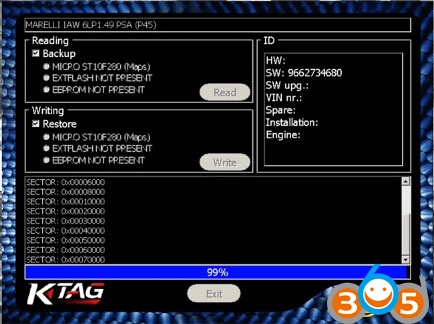
K-Tag is reading Marelli IAW 6LP1.49 PSA
ktag-read-Marelli-IAW-6LP-21
ktag-read-Marelli-IAW-6LP-22
ktag-read-Marelli-IAW-6LP-23
ktag-read-Marelli-IAW-6LP-24
Ktag master reads Marelli successfully
Save ECU data
ktag-read-Marelli-IAW-6LP-25
ktag-read-Marelli-IAW-6LP-26
Exit Ktag Ksuite software.

2018/01/10

Simos PCR2.1 Full Flash Tutorial

About: Simos PCR2.1 full flash

There are several parts included:

What is Simos PCR2.1?
What tool can read/write PCR2.1?
How to full read/write PCR2.1?
Which better for PCR2.1 read/write?


What is PCR2.1?
pcr-2.1-ecu
Simos-PCR2
What tool can read/write PCR2.1?

VVDI Prog programmer
Vvdiprog reading full flash PCR2.1. Like on X17 or Smok.
Ktag and transdata 
l use ktag and transdata and works fine , just make sure you only unlock once ie dont play around with it

Using Kess v2 v4.036 is working very well PCR2.1. read & write on the benchmark after unlock,not ktag or you can read thru obd with KESS..it will show you whether it is locked or unlocked…resistors boot only for unlock eeprom

 4 Magic x17
Use Magic x17No need to unlock or open pcr.
All via OBD now (since this week)

I did Reading, unlocking and writing with the FGTech_0475.
(but unlock in boot mode not by obd)
Everything is perfect !


How to full read/write PCR2.1?

Here, take Ktag as a flash tool. Full flash PCR2.1.
You need Pinout cable SSM 144300T111 (INFINEON TRICORE ECU PCR2.1 CABLE)
This is a SSM cable
ssm-cable
Connection
pcr-2.1-pinout
Already DONE
ktag-read-pcr2.1-success-1
ktag-read-pcr2.1-success-2
Need original ktag or HQ cloned ktag 7.020, open ecu and prepare Eeprom for cloning ECU.


Which better for PCR2.1 read/write?

ksuite tools (kess or ktag) seem to be more stable than fgtech on pcr but work too

On ksuite tools , you can’t read or write with ktag , only unlock . (alientech need to work on it…)
with kess it’s ok , BUT , you can’t use the tricore module !
The trick to get communication error free on both fgtech and kess cable is to use a strong external psu .
good psu and obd home made bench cable , remove tricore module on kess v2 = 100% tested bench flashing solution for pcr2.1 .

In details…

2018/01/05

Free Download Carprog AT91SAM7S256 Reflash Dump

Here’s little tutorial on programming and re-flashing mcu AT91SAM7S256 with carprog and jtag (including dump and program download)

We need:
1- dump+ program for JTAG
2- Jtag programmer
3-carprog programmer (carprog 7.28 or carprog 8.21 online version)

JTAG programmer pinout
jtag-pin-out
Jtag 20 pin
jtag-20-pin
Download H-Jtag software above
After the H-Jtag sotware is installed we can procced to configure:
Open the H-Jtag server and make the adjustments:
Select the port:
read-jtag-1
LPT Jtag setting:
read-jtag-2
TAP configuration:
read-jtag-3
Target manager:
read-jtag-4
Now connect the carprog full to JTag programmer and 12v supply and press “Detect Target” in H-TAG server, now the Carprog Mcu is detected!!!:
read-jtag-5
Now we procced to program the AT91 mcu:
Start the H-FLASHER and select the AT91SAM7S256 from the list
read-jtag-6
-Go to “4 Programming” in the programming wizzard and press “Check” to verify the communication with the target mcu, if all is ok the values must be:
Flash: AT91SAM7S256 0x270D0940
Target: ARM7TDMI LITTLE-ENDIAN
-In “Type” select: “Plain Binary Format”
-In “Dst Addr” select: “Flash Base Address”
-In “Src File” select the location of the AT91SAM7S256.bin in your hard drive.:
read-jtag-7
Now press the “Program” button and wait to finish:
read-jtag-8
If the progrmming was succefull you will receive the next message:
read-jtag-9
You can verify again if everything is ok by pressing the button “Verify”:
read-jtag-10
The programming process is finished!!, disconnect the 12v supply, then disconnect the programmer from carprog, solder the pin 55 wire to Ground (check the picture) and put back the AT88SC eeprom, reassemble the carprog and test it.

How to reflash AT91SAM7S256 mcu with jtag?
1- Remove AT88sc or lift AT88sc Pin4 only before erase the ARM7TDMI
2- Connect the CarProg clone device to USB cable
3- Connect the Carprog device to jTag device
4- Erase the ARM7TDMI by connect the WIRE Pin (in white circle) at VCC Pin
5- Config the j-Tag programmer like pictures
carprog-reflash-AT91SAM7S256-1
carprog-reflash-AT91SAM7S256-2
carprog-reflash-AT91SAM7S256-3
carprog-reflash-AT91SAM7S256-4
carprog-reflash-AT91SAM7S256-5
carprog-reflash-AT91SAM7S256-6
6- If the ARM7TDMI is successfully erased the program can be recognized in ARM7TDMI
carprog-reflash-AT91SAM7S256-7
carprog-reflash-AT91SAM7S256-8
7- Disconnect the WIRE Pin from VCC Pin
8- Program the carprog device with NEW Flash File
carprog-reflash-AT91SAM7S256-9
carprog-reflash-AT91SAM7S256-10
carprog-reflash-AT91SAM7S256-11
carprog-reflash-AT91SAM7S256-12
carprog-reflash-AT91SAM7S256-13
carprog-reflash-AT91SAM7S256-14
carprog-reflash-AT91SAM7S256-15
9- After successful programming solder back AT88sc eEprom to the board
or connect the Pin4 to GND
10- RUN CarProg device.


Disclaimer:  You are at your risk.
carprog-download